> ## Documentation Index
> Fetch the complete documentation index at: https://ship-jskiller1404-add-ommiting-private-fields-feature.mintlify.site/llms.txt
> Use this file to discover all available pages before exploring further.

# Digital Ocean

export const provider_1 = "do"

export const provider_0 = "do"

It's a step-by-step Ship deployment guide. We will use Digital Ocean Managed [Kubernetes](https://www.digitalocean.com/products/kubernetes), [Container Registry](https://www.digitalocean.com/products/container-registry), [Mongo Atlas](https://www.mongodb.com/), [GitHub Actions](https://github.com/features/actions) for automated deployment, and [CloudFlare](https://www.cloudflare.com/) for DNS and SSL configuration.

You need to create [GitHub](https://github.com/), [CloudFlare](https://www.cloudflare.com/), [Digital Ocean](https://www.digitalocean.com/) and [MongoDB Atlas](https://www.mongodb.com/cloud/atlas/register) accounts and install the next tools on your machine before starting:

* [kubectl](https://kubernetes.io/docs/tasks/tools/#kubectl) - CLI tool for accessing Kubernetes cluster;
* [kubectx](https://github.com/ahmetb/kubectx) - CLI tool for easier switching between Kubernetes contexts;
* [helm](https://helm.sh/docs/intro/install) - CLI tool for managing Kubernetes deployments;
* [k8sec](https://github.com/dtan4/k8sec) - CLI tool for managing Kubernetes Secrets easily;

<Accordion title="How to install k8sec on Linux?">
  Download k8sec tar.gz, then do:

  ```
  chmod +x k8sec
  ```

  ```
  sudo cp k8sec /usr/local/bin/
  ```

  ```
  k8sec --help
  ```
</Accordion>

Try the next commands to ensure that everything is installed correctly:

```
kubectl

kubectx

helm

k8sec
```

Also, you need [git](https://git-scm.com/) and [Node.js](https://nodejs.org/en/) if you already haven't.

## Setup project

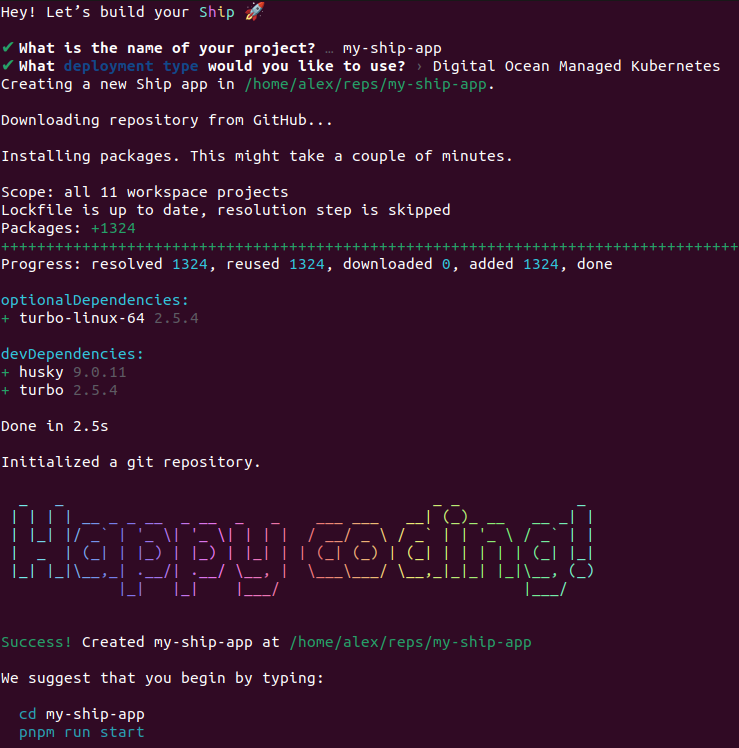
First, initialize your project. Type `npx create-ship-app@latest` in the terminal then choose **Digital Ocean Managed Kubernetes** deployment type.

<img src="https://mintcdn.com/ship-jskiller1404-add-ommiting-private-fields-feature/E9XBHl8mCOQjBjO1/images/init-project.png?fit=max&auto=format&n=E9XBHl8mCOQjBjO1&q=85&s=a8d3cdb2a50322afff948baff99dad1d" alt="Init project" width="739" height="748" data-path="images/init-project.png" />

You will have next project structure.

```shell theme={null}
/my-ship-app
  /.github
  /apps
    /api
    /web
  /deploy
  ...
```

## Container registry

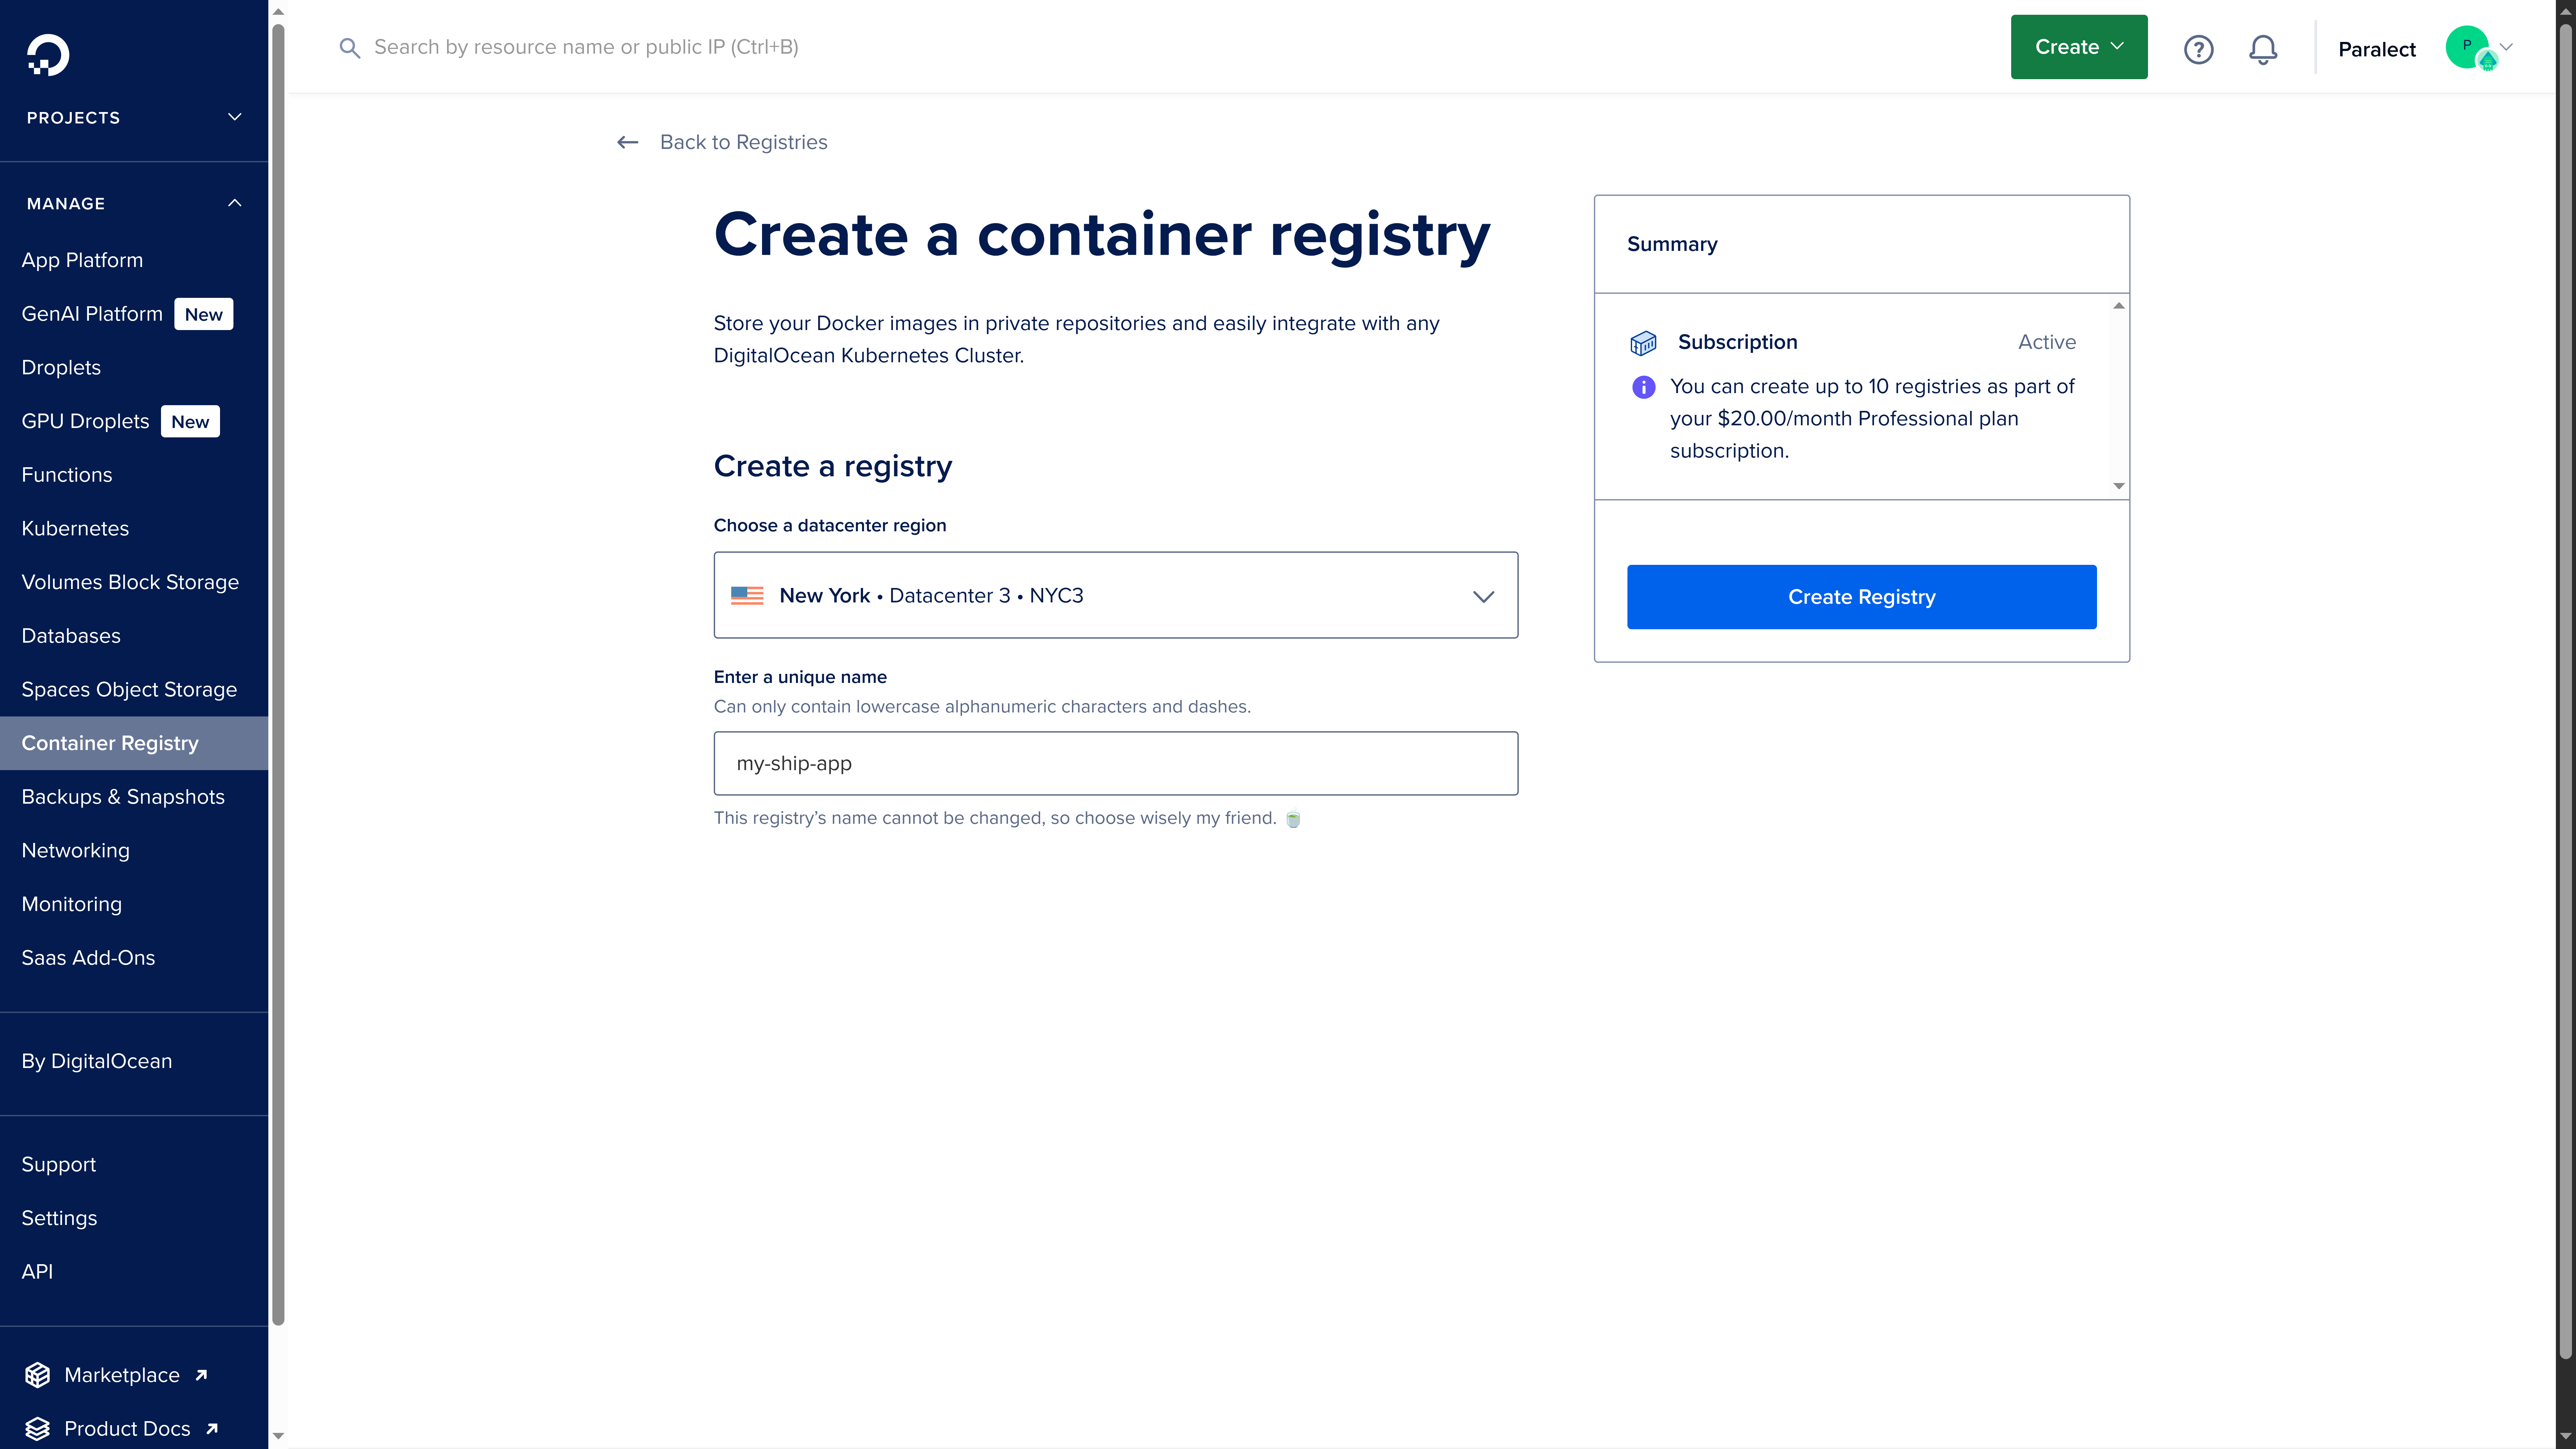
You need to create [Container Registry](https://www.digitalocean.com/products/container-registry) for storing Docker images. The deployment script will upload images to Container Registry during the build step, and Kubernetes will automatically pull these images from Container Registry to run a new version of service during the deployment step.

Name container registry as the name of organization, which usually is equals to the name of the project: `my-ship-app`.

<img src="https://mintcdn.com/ship-jskiller1404-add-ommiting-private-fields-feature/bAV2JshmglZLw2nx/images/container-registry-creation.png?fit=max&auto=format&n=bAV2JshmglZLw2nx&q=85&s=f5ee34c29aa85bab3c12929b06e04867" alt="Container Registry creation" width="7680" height="4320" data-path="images/container-registry-creation.png" />

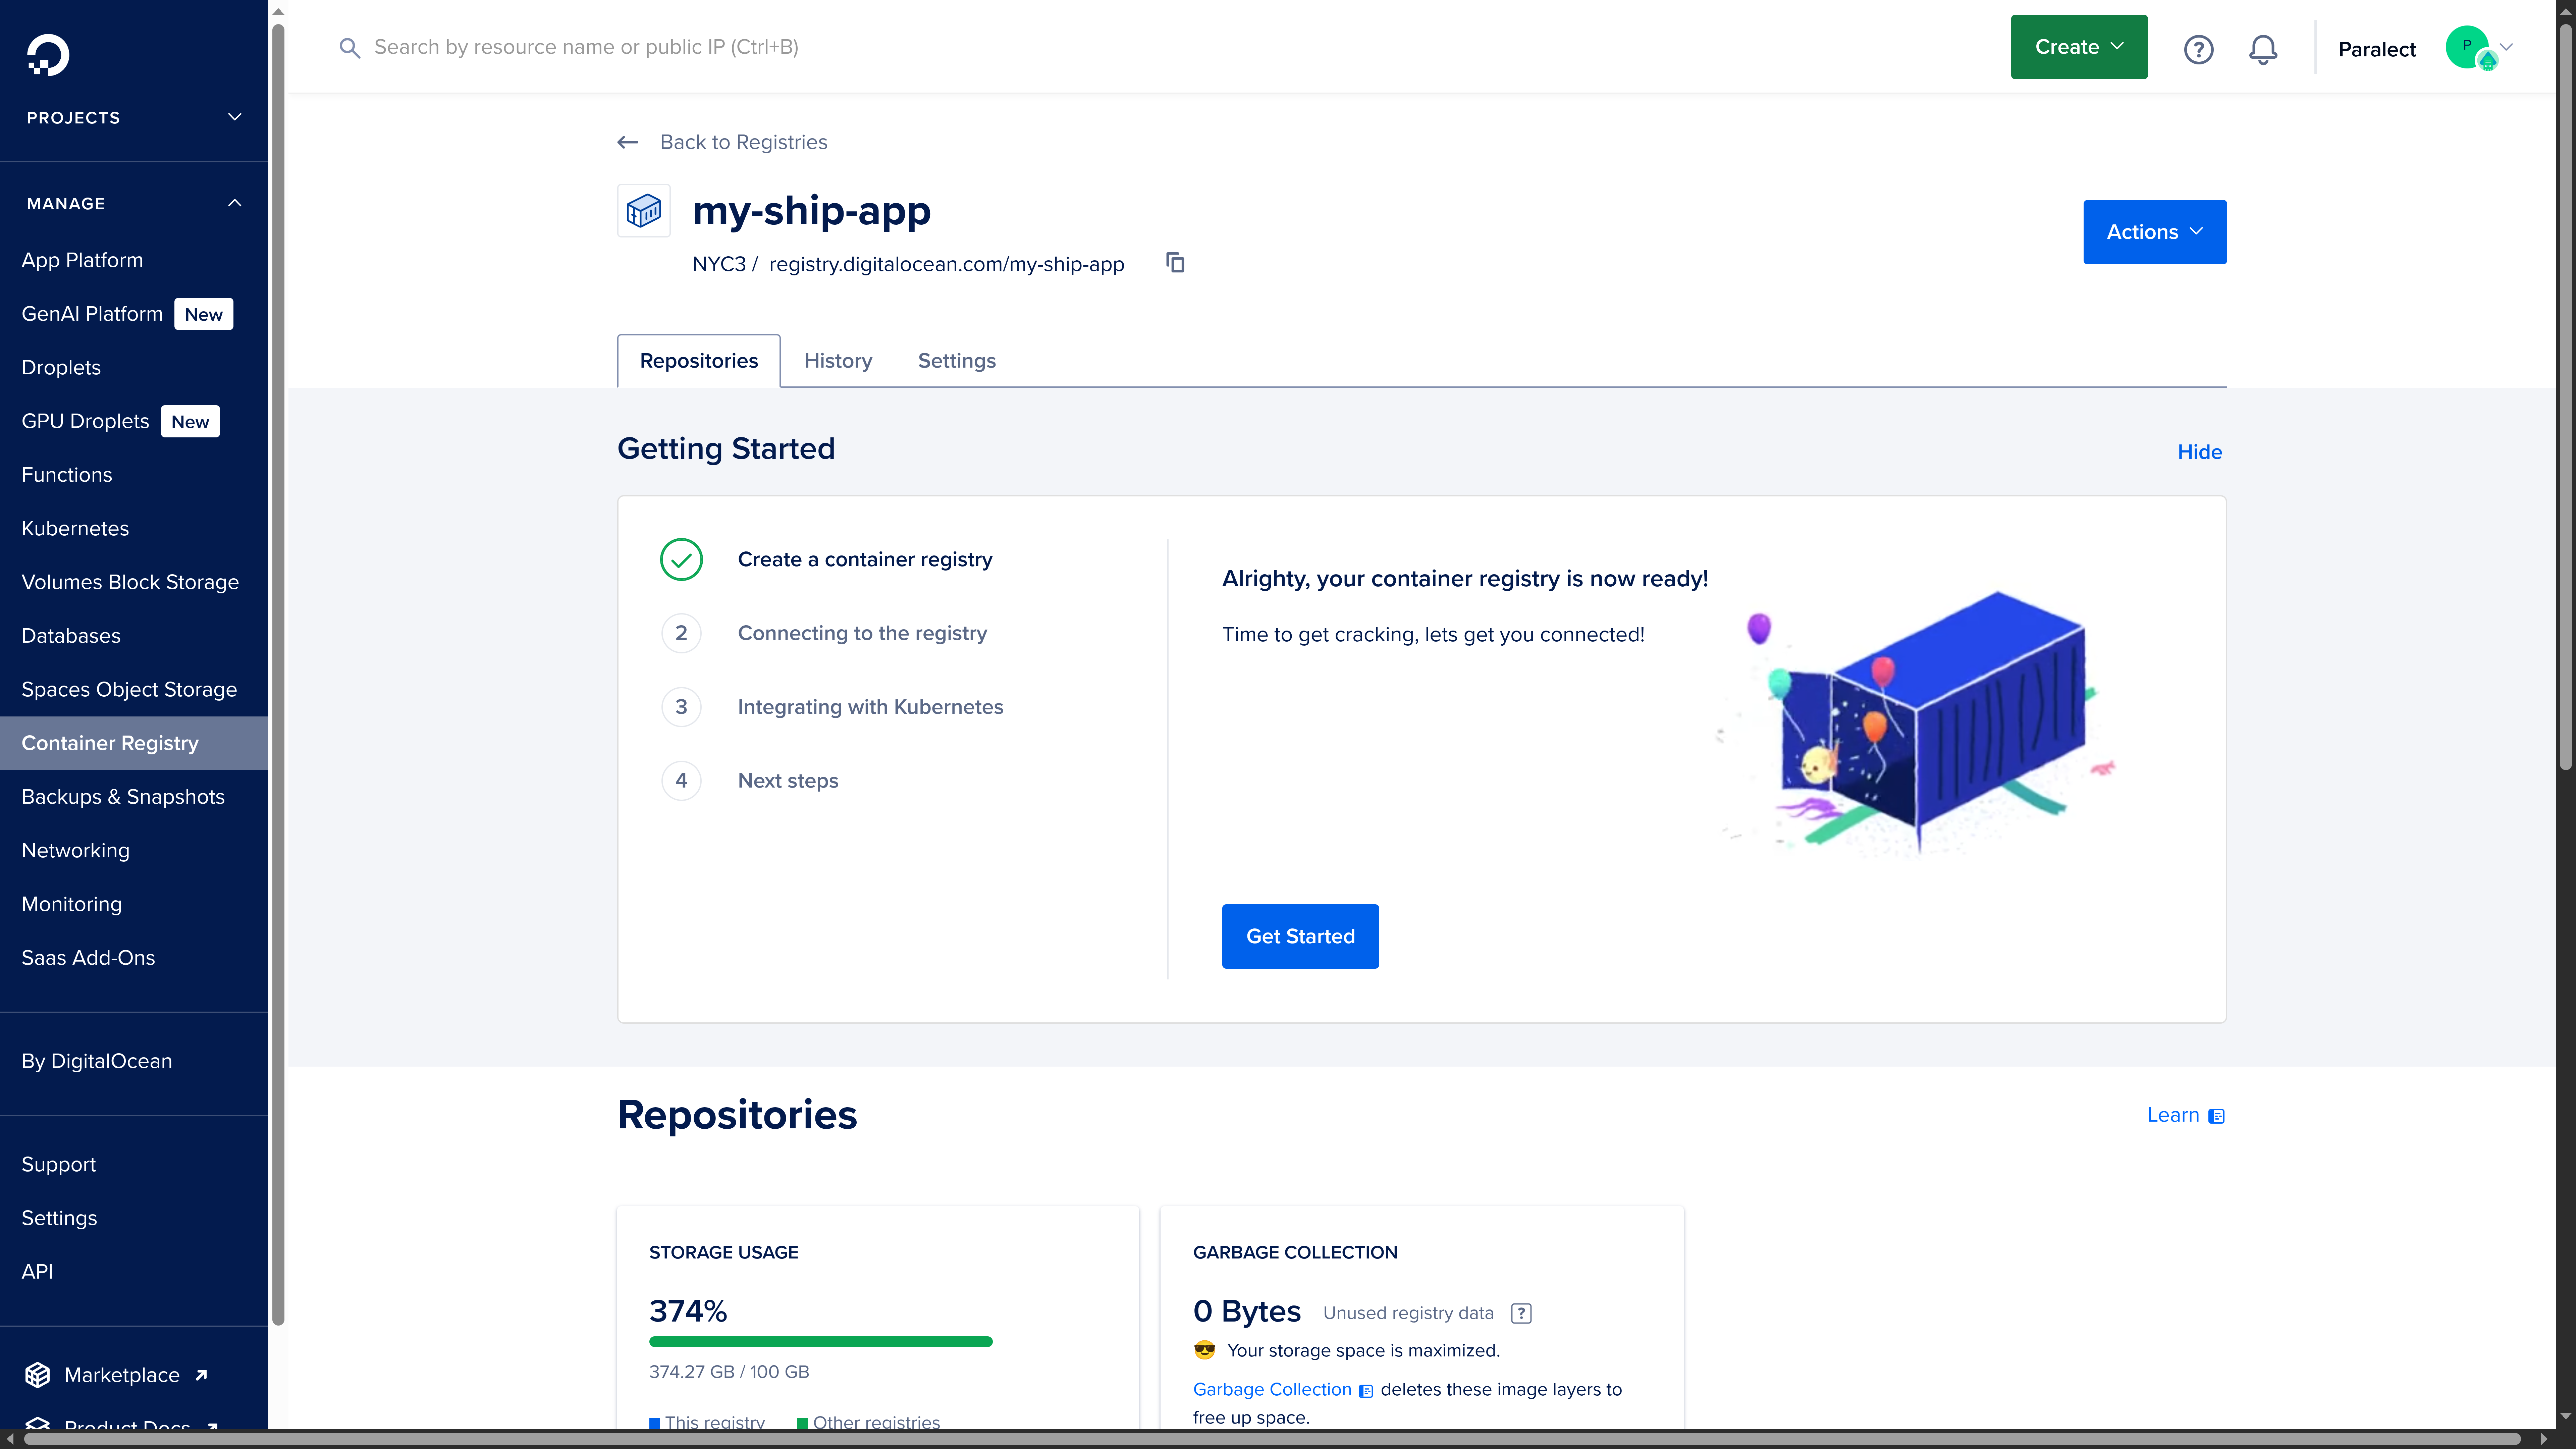
After some time, you will get registry endpoint.

<img src="https://mintcdn.com/ship-jskiller1404-add-ommiting-private-fields-feature/bAV2JshmglZLw2nx/images/container-registry-created.png?fit=max&auto=format&n=bAV2JshmglZLw2nx&q=85&s=6a65335ada681174c4fe9db6a26346f2" alt="Container Registry creation" width="7680" height="4320" data-path="images/container-registry-created.png" />

`registry.digitalocean.com/my-ship-app` is registry endpoint, where `my-ship-app` is registry name.

Docker images for each service are stored in separate repository.
In Digital Ocean repositories are created automatically when something is uploaded by specific paths.
During deployment process script will automatically create paths to repositories in next format:

* [**API**](/api-reference/overview) - registry.digitalocean.com/my-ship-app/api;
* [**Scheduler**](/scheduler) - registry.digitalocean.com/my-ship-app/scheduler;
* [**Migrator**](/migrator) - registry.digitalocean.com/my-ship-app/migrator;
* [**Web**](/web/overview) - registry.digitalocean.com/my-ship-app/web;

<Tip>
  Images for all environments will be uploaded to the same repository for each
  service.
</Tip>

## Kubernetes cluster

Now let's create [Managed Kubernetes](https://www.digitalocean.com/products/kubernetes) cluster.

<Steps>
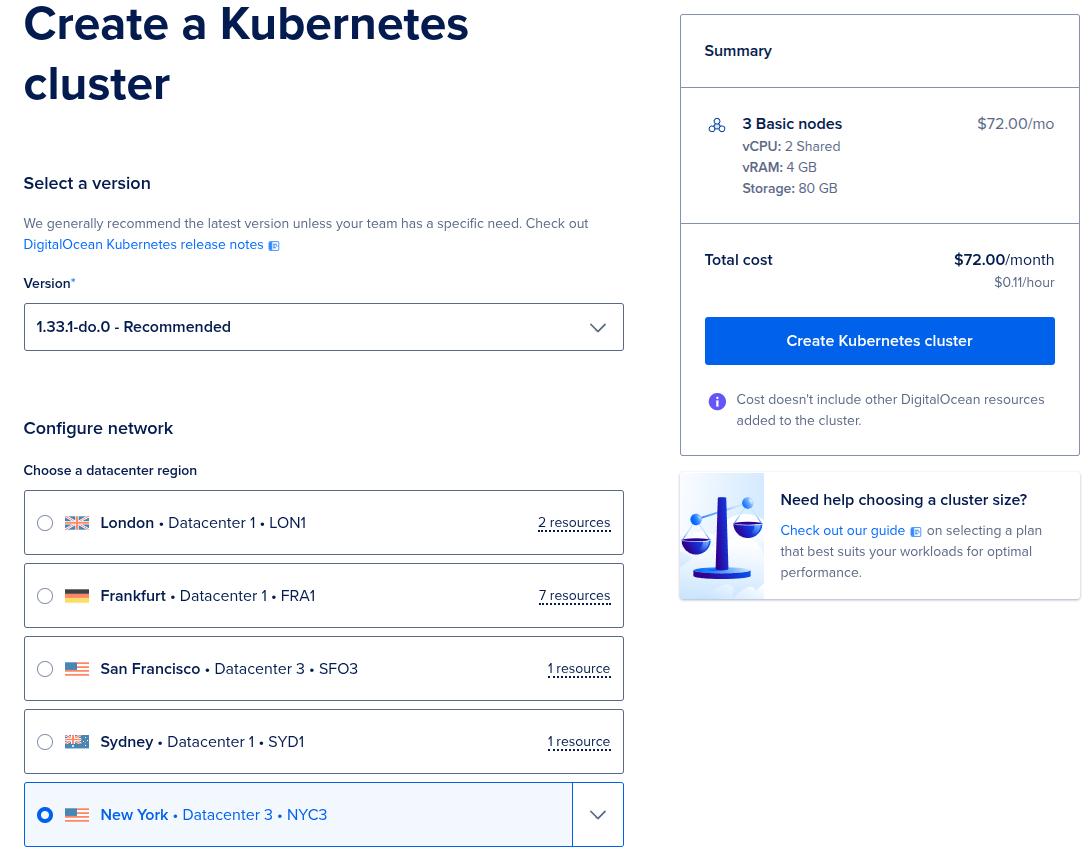
  <Step title="Select a region">
    Navigate to the cluster creation page [here](https://cloud.digitalocean.com/kubernetes/clusters/new)<br />

    <Tip>
      We recommend you to create a cluster in the region where your end-users are located, it will reduce response time to incoming requests to all services.
    </Tip>

    <Tip>
      Also, if your cluster will be located in one region with a Container Registry deployment process will be faster. You can find more information about regions [here](https://docs.digitalocean.com/products/platform/availability-matrix/).
    </Tip>

    <Frame>
      <img src="https://mintcdn.com/ship-jskiller1404-add-ommiting-private-fields-feature/bAV2JshmglZLw2nx/images/cluster-region.png?fit=max&auto=format&n=bAV2JshmglZLw2nx&q=85&s=07e4be4b9ee90d7fcd9ff5896c092ba8" alt="Cluster Region" width="1092" height="854" data-path="images/cluster-region.png" />
    </Frame>
  </Step>

  <Step title="Set Node pool name">
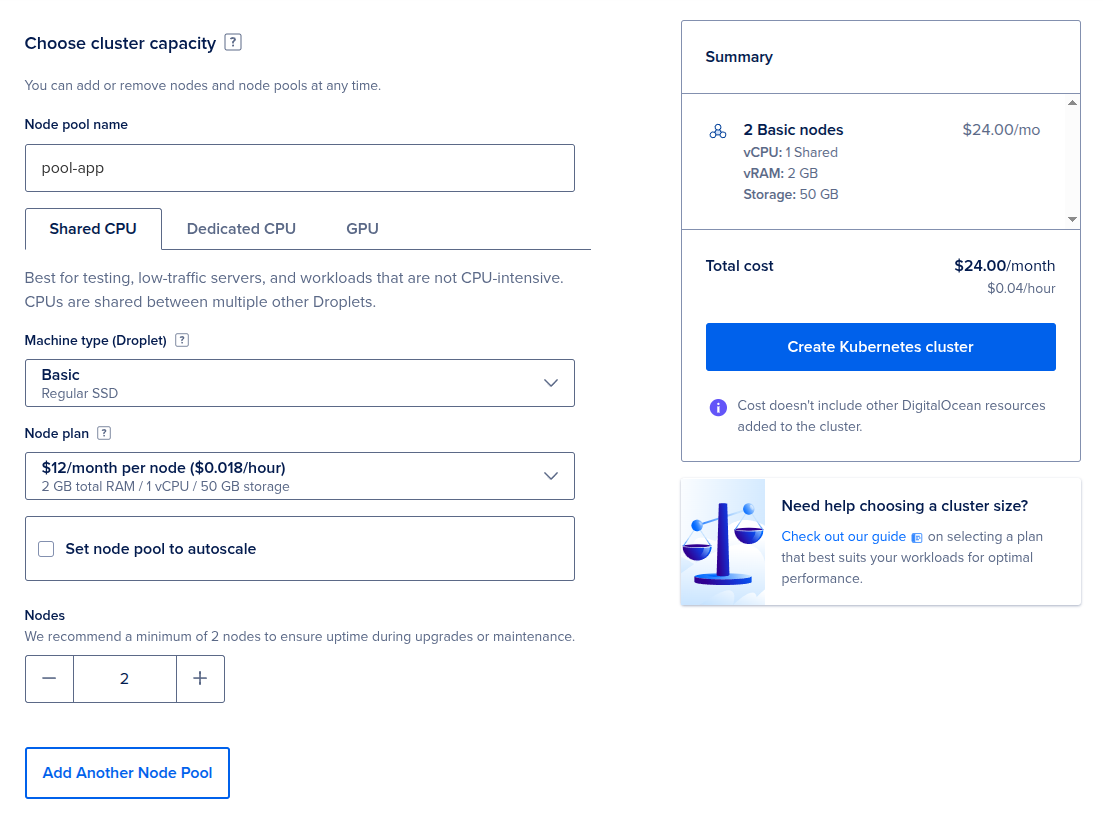
    Set Node pool name (e.g. `pool-app`) and configure Nodes.
    Digital Ocean recommends creating at least 2 nodes for the production environment. These settings will have an impact on the price of the cluster.

    <Frame>
      <img src="https://mintcdn.com/ship-jskiller1404-add-ommiting-private-fields-feature/bAV2JshmglZLw2nx/images/cluster-capacity.png?fit=max&auto=format&n=bAV2JshmglZLw2nx&q=85&s=a7f51a614fb0ee0c1db0770563de9541" alt="Cluster Capacity" width="1103" height="819" data-path="images/cluster-capacity.png" />
    </Frame>
  </Step>

  <Step title="Set cluster name">
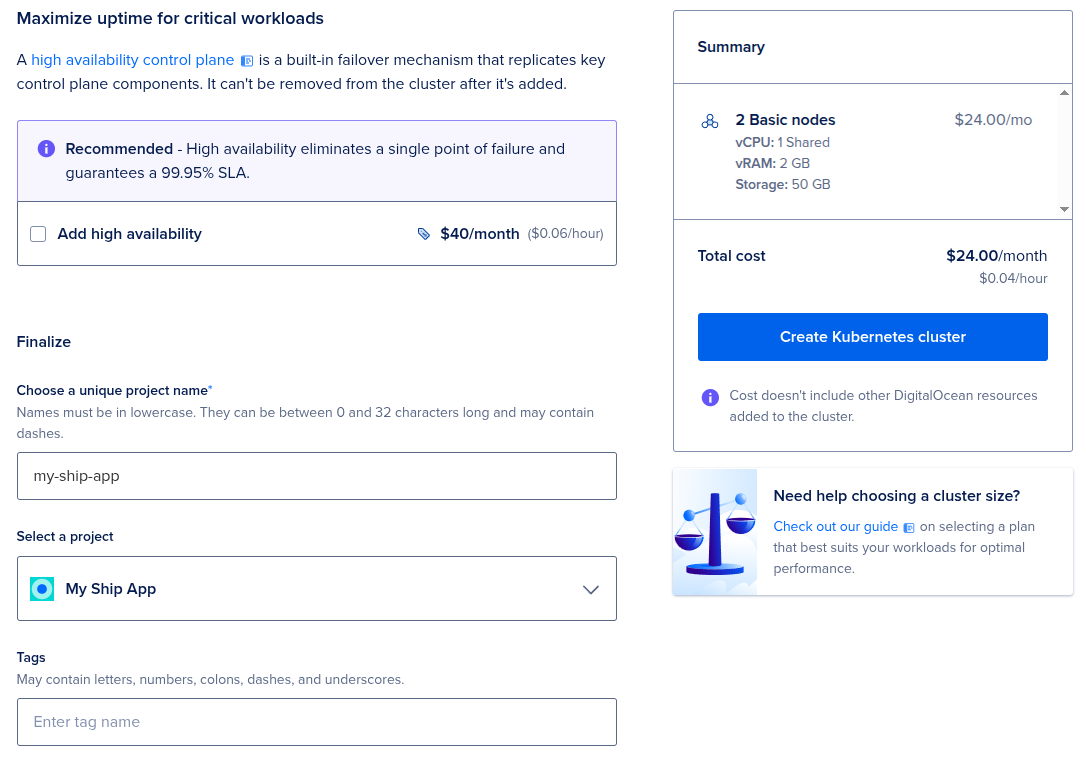
    Set cluster name (e.g. `my-ship-app`). A common practice is to use the project name for it.

    <Frame>
      <img src="https://mintcdn.com/ship-jskiller1404-add-ommiting-private-fields-feature/bAV2JshmglZLw2nx/images/cluster-name.png?fit=max&auto=format&n=bAV2JshmglZLw2nx&q=85&s=975cabb3859618919f2c45f4271d9bc6" alt="Cluster Name" width="1086" height="763" data-path="images/cluster-name.png" />
    </Frame>
  </Step>

  <Step title="Review and Create">
    Click on `Create Kubernetes Cluster` button to create a cluster and wait for cluster to be ready.
  </Step>

  <Step title="Integrate with created Container Registry">
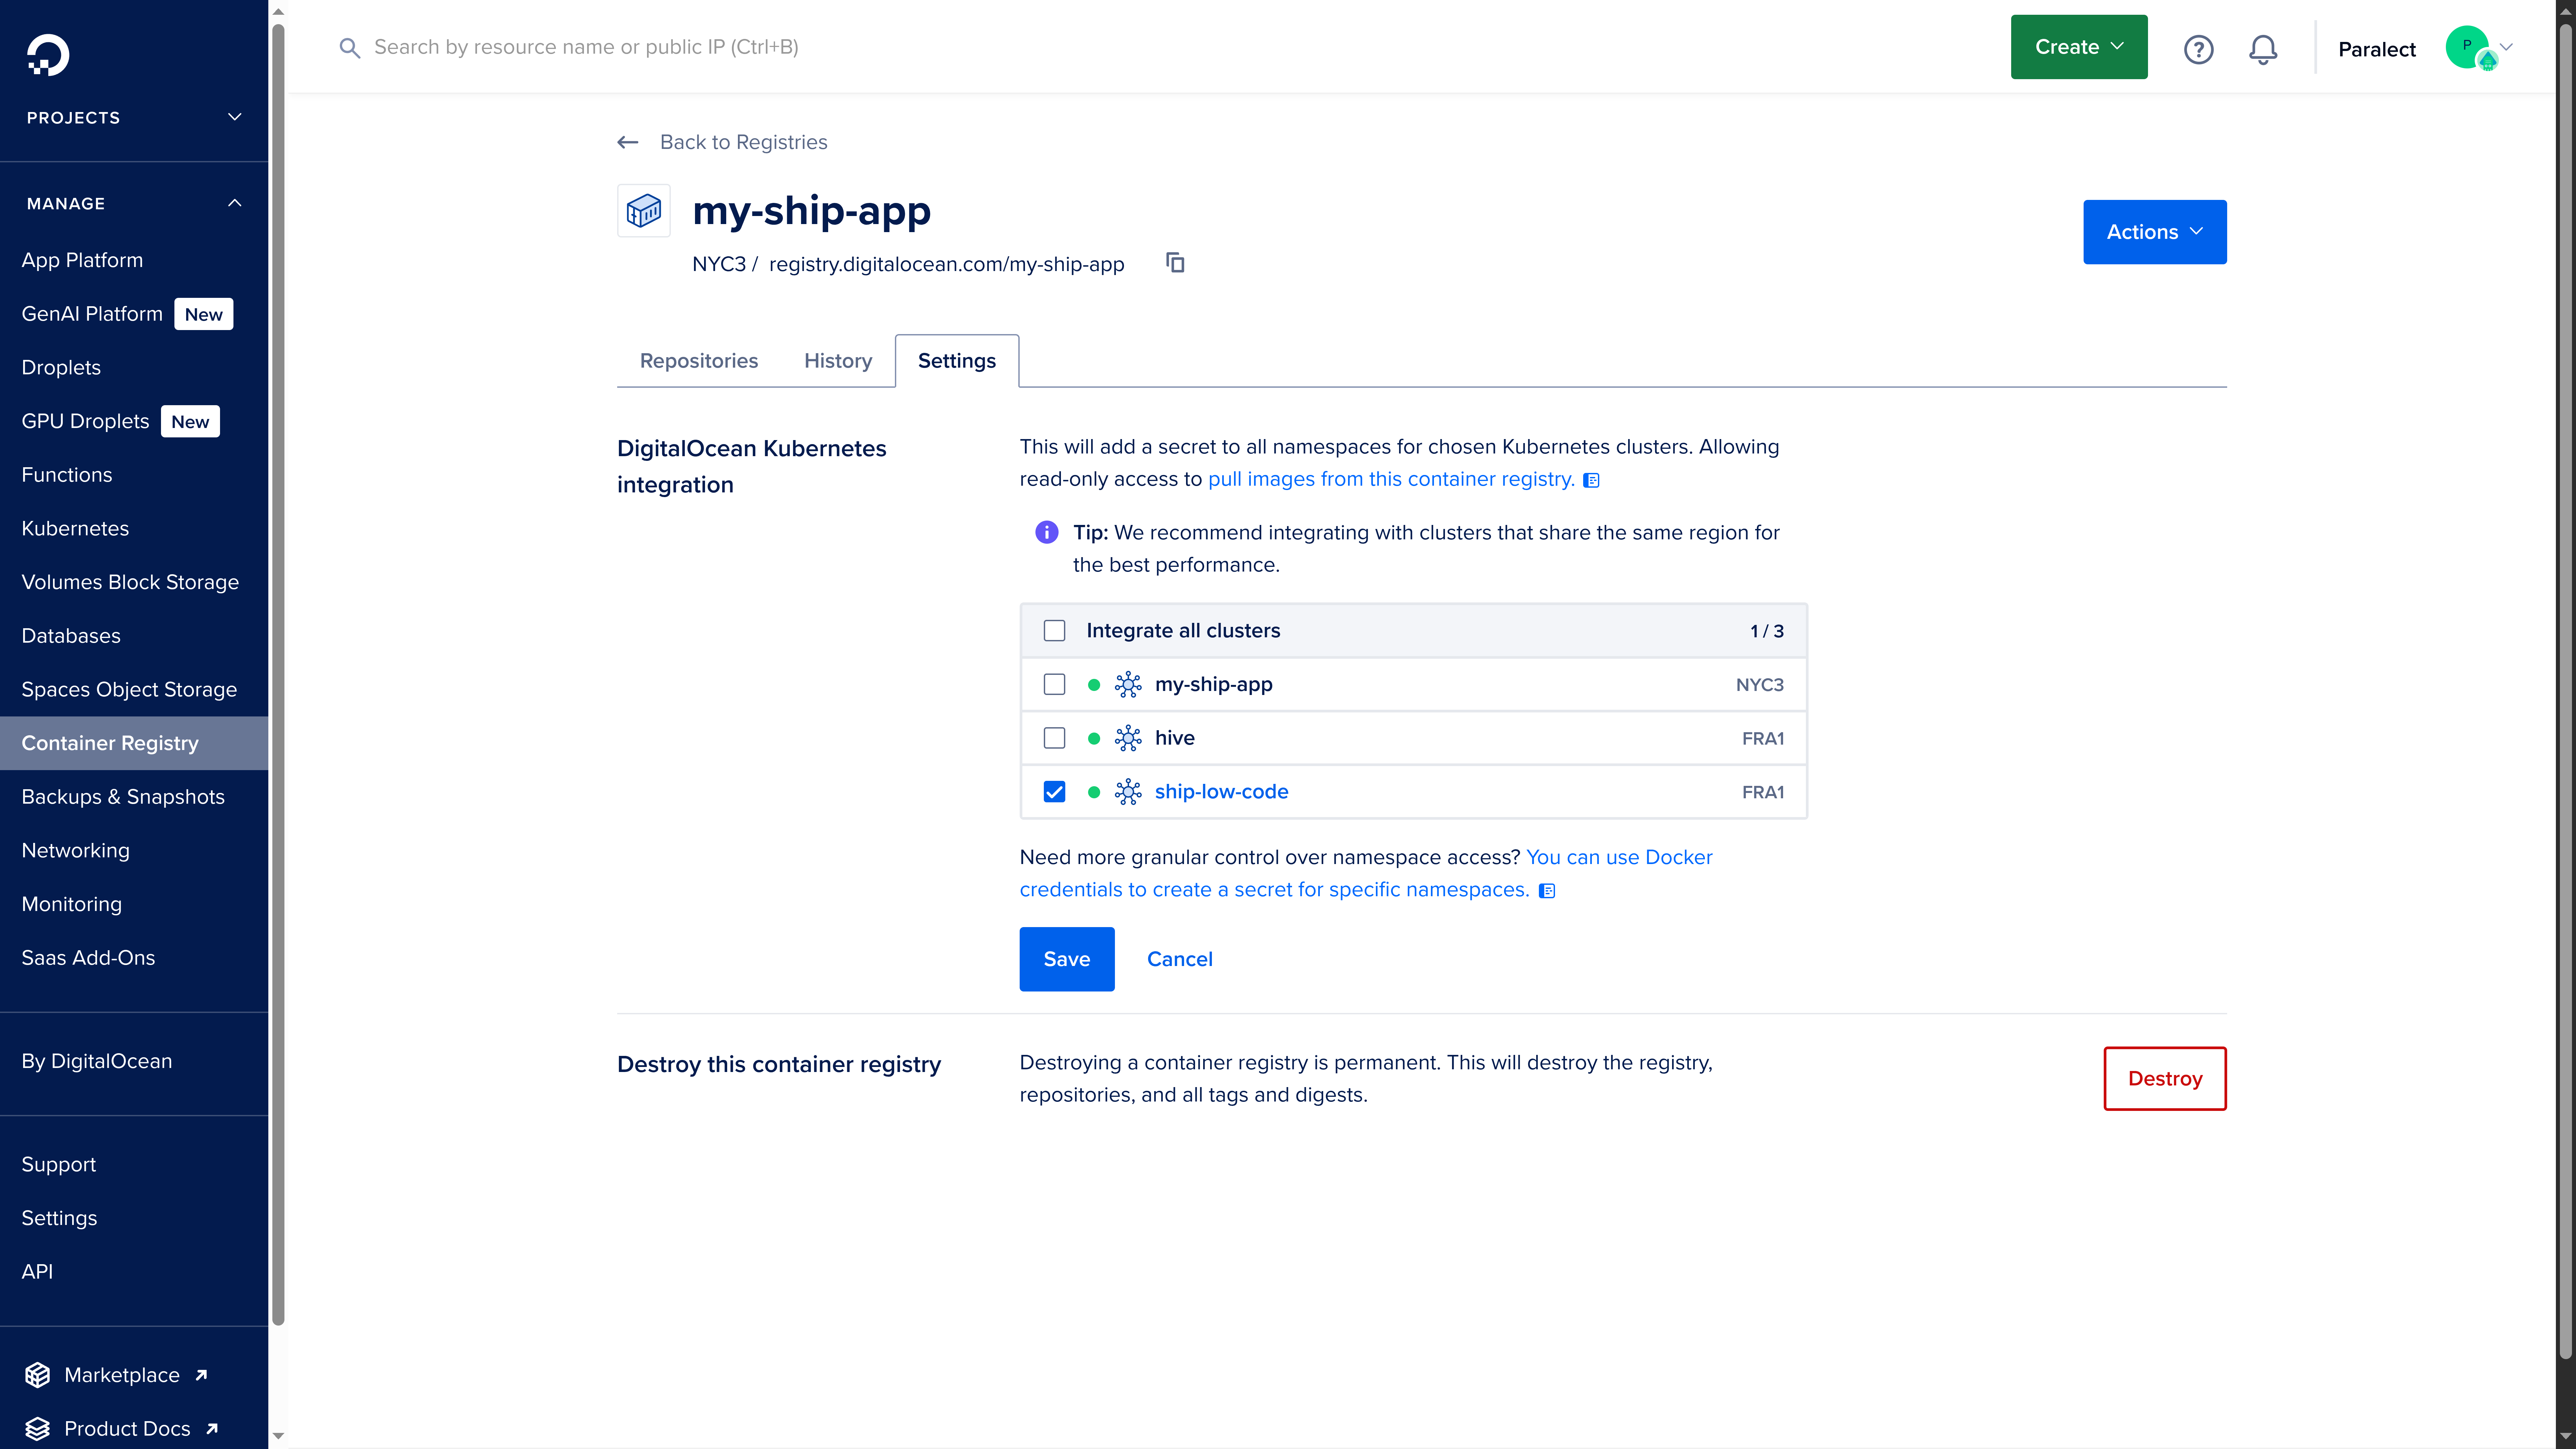
    After cluster is created, go to the Container Registry's settings and find `DigitalOcean Kubernetes integration` section.

    <Frame>
      <img src="https://mintcdn.com/ship-jskiller1404-add-ommiting-private-fields-feature/E9XBHl8mCOQjBjO1/images/do/registry-settings.png?fit=max&auto=format&n=E9XBHl8mCOQjBjO1&q=85&s=74a0bd9d7dac64931f3d6d30e971d0ec" alt="Registry Settings" width="7680" height="4320" data-path="images/do/registry-settings.png" />
    </Frame>

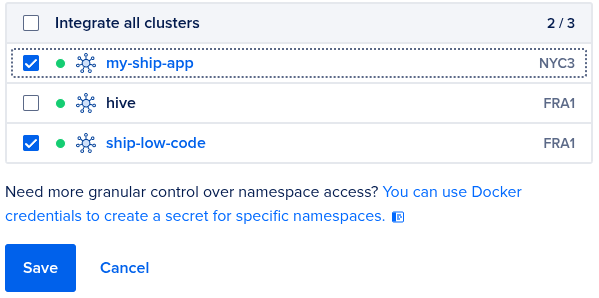
    You need to select your newly created `my-ship-app` cluster.
    <Frame>
      <img src="https://mintcdn.com/ship-jskiller1404-add-ommiting-private-fields-feature/E9XBHl8mCOQjBjO1/images/do/registry-check-cluster.png?fit=max&auto=format&n=E9XBHl8mCOQjBjO1&q=85&s=d9f380092b2f3ec2bdc36997da13753e" alt="Registry Check Cluster" width="599" height="298" data-path="images/do/registry-check-cluster.png" />
    </Frame>
  </Step>
</Steps>

## Personal access token

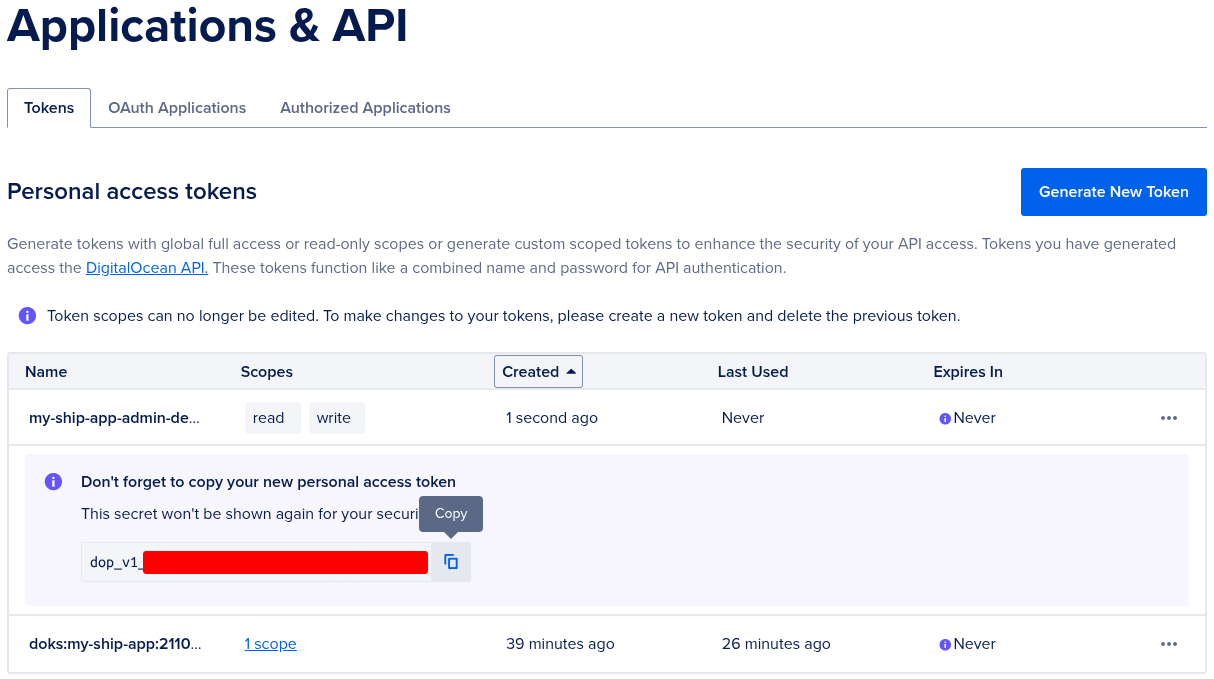
To upload docker images in Container Registry and pull them after from cluster we need Digital Ocean [Personal Access Token](https://cloud.digitalocean.com/account/api/tokens).
When you created cluster - one with **Read Only** scope was automatically created.

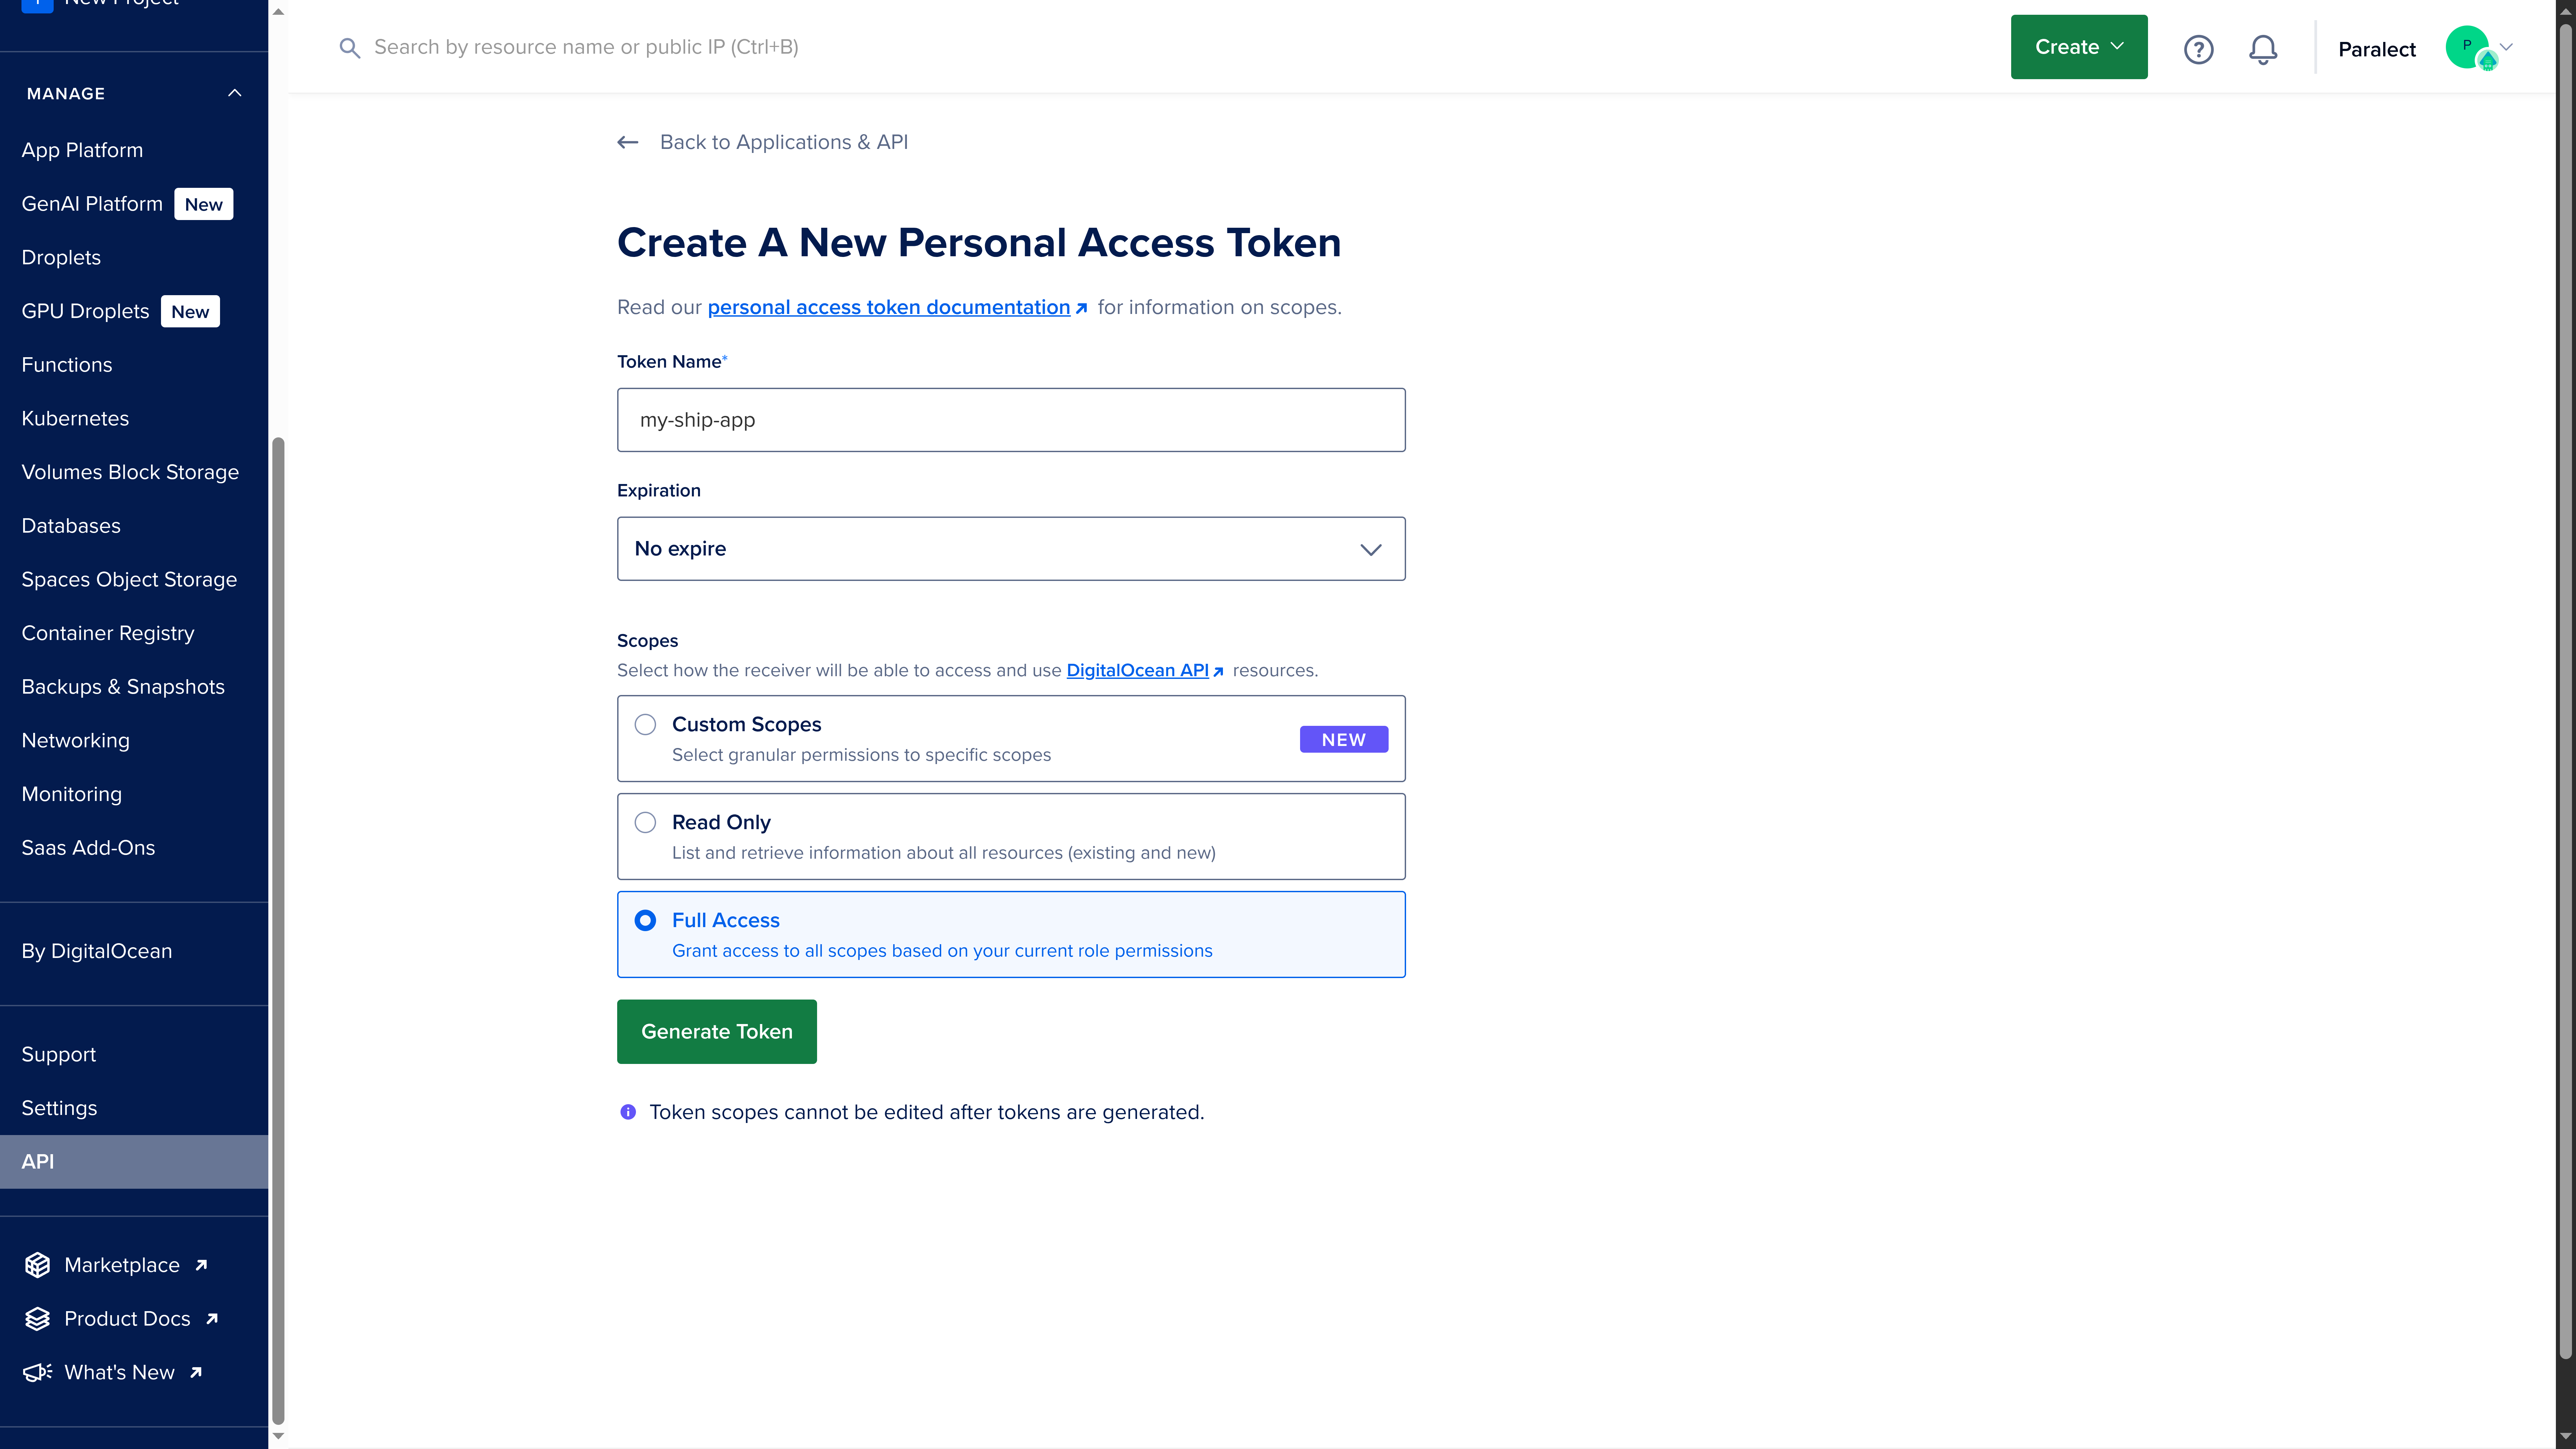
But we need to [generate](https://cloud.digitalocean.com/account/api/tokens/new) a new one with:

* Name (e.g. `my-ship-app-admin-deploy`)
* **Full Access** scope
* No expiration

<Tip>
  You cannot change scope of already generated token.
</Tip>

<img src="https://mintcdn.com/ship-jskiller1404-add-ommiting-private-fields-feature/E9XBHl8mCOQjBjO1/images/do-token.png?fit=max&auto=format&n=E9XBHl8mCOQjBjO1&q=85&s=991123a0d7253e6f056aaafe75d3a1d7" alt="Digital Ocean Token" width="7680" height="4320" data-path="images/do-token.png" />

We will need this token soon, so don't close this page yet.
<img src="https://mintcdn.com/ship-jskiller1404-add-ommiting-private-fields-feature/E9XBHl8mCOQjBjO1/images/do/full-access-token.png?fit=max&auto=format&n=E9XBHl8mCOQjBjO1&q=85&s=39eb30927e22107edac719af64bdbdae" alt="Digital Ocean Token" width="1214" height="679" data-path="images/do/full-access-token.png" />

<Warning>
  Be very careful with Personal Access Token, if someone steals it he will get access
  to all resources from your Digital Ocean account.
</Warning>

## Accessing cluster from a local machine

<Steps>
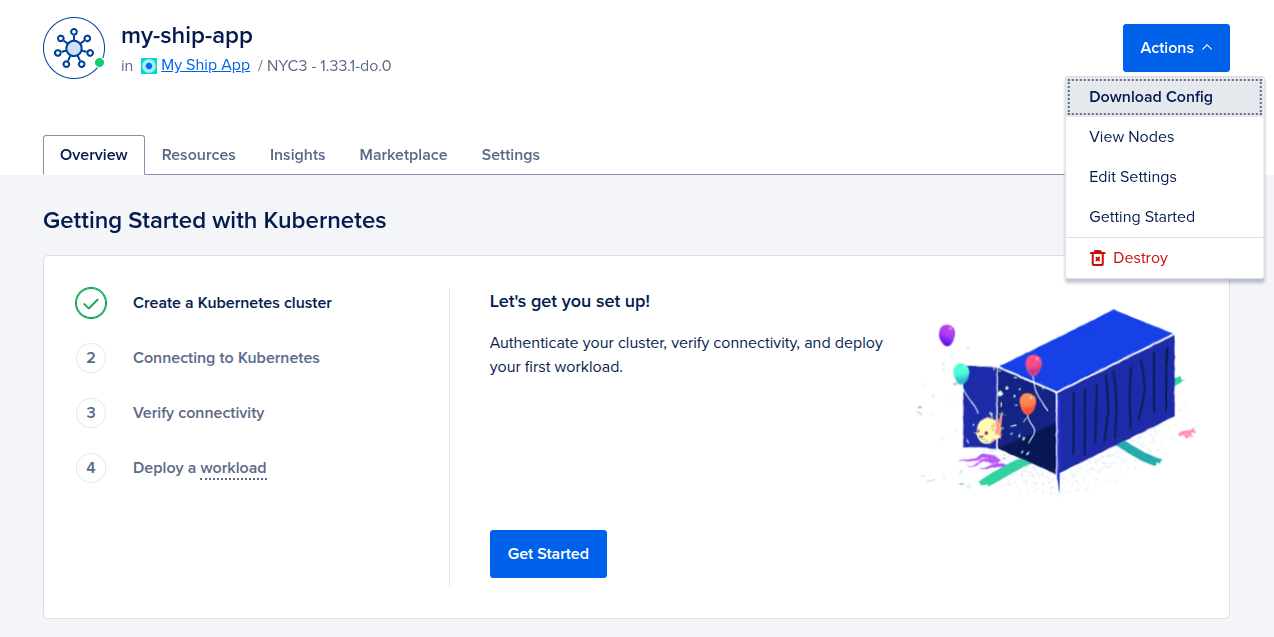
  <Step title="Download cluster's kubeconfig">
    Download cluster's kubeconfig, this file includes information for accessing cluster through `kubectl`.

    <Frame>
      <img src="https://mintcdn.com/ship-jskiller1404-add-ommiting-private-fields-feature/E9XBHl8mCOQjBjO1/images/kubeconfig-download.png?fit=max&auto=format&n=E9XBHl8mCOQjBjO1&q=85&s=9e8eab4a216b586f6e3220681944ee45" alt="Kubeconfig Download" width="1274" height="637" data-path="images/kubeconfig-download.png" />
    </Frame>

    <Accordion title="Expected structure of downloaded kubeconfig">
      ```yaml my-ship-app-kubeconfig.yaml theme={null}
      apiVersion: v1
      clusters:
      - cluster:
          certificate-authority-data: ...
          server: https://...
        name: do-nyc3-my-ship-app
      contexts:
      - context:
          cluster: do-nyc3-my-ship-app
          user: do-nyc3-my-ship-app-admin
        name: do-nyc3-my-ship-app
      current-context: do-nyc3-my-ship-app
      kind: Config
      preferences: {}
      users:
      - name: do-nyc3-my-ship-app-admin
        user:
          token: dop_v1_...
      ```
    </Accordion>

    And replace initial **Read only** token with new **Full access** token from [Personal access token](#personal-access-token) section.

    ```yaml my-ship-app-kubeconfig.yaml {18-19} theme={null}
    apiVersion: v1
    clusters:
    - cluster:
        certificate-authority-data: ...
        server: https://...
      name: do-nyc3-my-ship-app
    contexts:
    - context:
        cluster: do-nyc3-my-ship-app
        user: do-nyc3-my-ship-app-admin
      name: do-nyc3-my-ship-app
    current-context: do-nyc3-my-ship-app
    kind: Config
    preferences: {}
    users:
    - name: do-nyc3-my-ship-app-admin
      user:
        # replace this token for full access token
        token: dop_v1_...
    ```
  </Step>

  <Step title="Add cluster, context and user to kubeconfig">
    <Tip>
      [Kubeconfig](https://kubernetes.io/docs/concepts/configuration/organize-cluster-access-kubeconfig/) files contain information about several clusters, you have your own on the local machine, it should have been created after `kubectl` installation.
    </Tip>

    You need to add information about the new cluster to your kubeconfig.
    Find `.kube/config` file on your machine, and add `cluster`, `context` and `user` values from `my-ship-app-kubeconfig.yaml`.

    ```yaml ~/.kube/config {7-11, 17-21, 29-33} theme={null}
    apiVersion: v1
    clusters:
    - cluster:
        certificate-authority-data: ...
        server: https://...
      name: some-cluster
    # your new cluster from my-ship-app-kubeconfig.yaml goes here
    - cluster:
        certificate-authority-data: ...
        server: https://...
      name: do-nyc3-my-ship-app
    contexts:
    - context:
        cluster: some-cluster
        user: some-user
      name: some-cluster
    # your new context from my-ship-app-kubeconfig.yaml goes here
    - context:
        cluster: do-nyc3-my-ship-app
        user: do-nyc3-my-ship-app-admin
      name: do-nyc3-my-ship-app
    current-context: some-cluster
    kind: Config
    preferences: {}
    users:
    - name: some-user
      user:
        token: dop_v1_...
    # your new user from my-ship-app-kubeconfig.yaml goes here
    - name: do-nyc3-my-ship-app-admin
      user:
        token: dop_v1_...
    ```
  </Step>

  <Step title="Switch to cluster context">
    Execute kubectx in your terminal and select your cluster from the list.

    ```shell theme={null}
    kubectx
    ```

    You will see the list of available clusters.

    ```shell theme={null}
    some-cluster
    do-nyc3-my-ship-app
    ```

    Select your cluster from the list:

    ```shell theme={null}
    kubectx do-nyc3-my-ship-app
    ```
  </Step>

  <Step title="Verify cluster access">
    Check the installed pods by running:

    ```shell theme={null}
    kubectl get pods -A
    ```

    You should see a list of system pods in your cluster:

    ```shell theme={null}
    NAMESPACE     NAME                            READY   STATUS    RESTARTS   AGE
    kube-system   cilium-tb8td                    1/1     Running   0          18m
    kube-system   cilium-x5w8n                    1/1     Running   0          19m
    kube-system   coredns-5679ffb5c8-b7dzj        1/1     Running   0          17m
    kube-system   coredns-5679ffb5c8-d465r        1/1     Running   0          17m
    kube-system   cpc-bridge-proxy-ebpf-2gzfr     1/1     Running   0          17m
    kube-system   cpc-bridge-proxy-ebpf-jknzh     1/1     Running   0          17m
    kube-system   csi-do-node-jcqd2               2/2     Running   0          17m
    kube-system   csi-do-node-rpx6q               2/2     Running   0          17m
    kube-system   do-node-agent-ldhxq             1/1     Running   0          17m
    kube-system   do-node-agent-pdksz             1/1     Running   0          17m
    kube-system   hubble-relay-66f54dcd57-l7xjb   1/1     Running   0          21m
    kube-system   hubble-ui-785bdbc45b-6xd57      2/2     Running   0          18m
    kube-system   konnectivity-agent-h79mt        1/1     Running   0          17m
    kube-system   konnectivity-agent-hvv67        1/1     Running   0          17m
    ```
  </Step>
</Steps>

## Ingress NGINX Controller

[ingress-nginx](https://github.com/kubernetes/ingress-nginx) is an Ingress controller for Kubernetes using [NGINX](https://nginx.org) as a reverse proxy and load balancer.

<Tip>
  Learn more about ingress-nginx functionality in the **[official documentation](https://docs.nginx.com/nginx-ingress-controller/intro/how-nginx-ingress-controller-works/)**.
</Tip>

<Steps>
  <Step title="Navigate to dependencies directory">
    Change to the `deploy/dependencies` directory in your terminal.
  </Step>

  <Step title="Configure Helm Values (Optional)">
    This step is required **only if** you specified a custom node pool name in your Digital Ocean Kubernetes cluster.

    If you did, update the `doks.digitalocean.com/node-pool` value in `values.yaml.gotmpl`:

    ```yaml deploy/dependencies/ingress-nginx/values.yaml.gotmpl {5} theme={null}
    controller:
      publishService:
        enabled: true
      nodeSelector:
        doks.digitalocean.com/node-pool: pool-app

    rbac:
      create: true

    defaultBackend:
      enabled: false
    ```
  </Step>

  <Step title="Install dependencies">
    Install helm dependencies using helmfile:

    ```bash theme={null}
    helmfile deps
    ```
  </Step>

  <Step title="Review and apply changes">
    Preview the changes first:

    ```bash theme={null}
    helmfile diff
    ```

    If the preview looks correct, apply the configuration:

    ```bash theme={null}
    helmfile apply
    ```
  </Step>
</Steps>

## DNS and SSL

<Steps>
  <Step title="Get Load Balancer Address">
    After deploying ingress-nginx, retrieve the Load Balancer's external ip:

    ```bash theme={null}
    kubectl get svc ingress-nginx-controller -n ingress-nginx
    ```

    Copy the value from the `EXTERNAL-IP` column.

    ```shell theme={null}
    NAME                       TYPE           CLUSTER-IP       EXTERNAL-IP      PORT(S)                      AGE
    ingress-nginx-controller   LoadBalancer   10.245.201.160   138.68.124.241   80:30186/TCP,443:32656/TCP   28m
    ```

    <Tip>
      It take some time while **ingress-nginx** will configure everything and
      provide `EXTERNAL-IP`.
    </Tip>
  </Step>

  <Step title="Domain Naming Convention">
    You can follow this recommended naming pattern for different environments:

    | Environment | API Domain           | Web Domain           |
    | ----------- | -------------------- | -------------------- |
    | Production  | api.ship.com         | app.ship.com         |
    | Staging     | api.staging.ship.com | app.staging.ship.com |
  </Step>

  <Step title="Configure DNS in Cloudflare">
    1. First, ensure you have a domain in Cloudflare. You can either:

    * [Register a new domain](https://developers.cloudflare.com/registrar/get-started/register-domain/)
    * [Transfer an existing domain](https://developers.cloudflare.com/registrar/get-started/transfer-domain-to-cloudflare/)

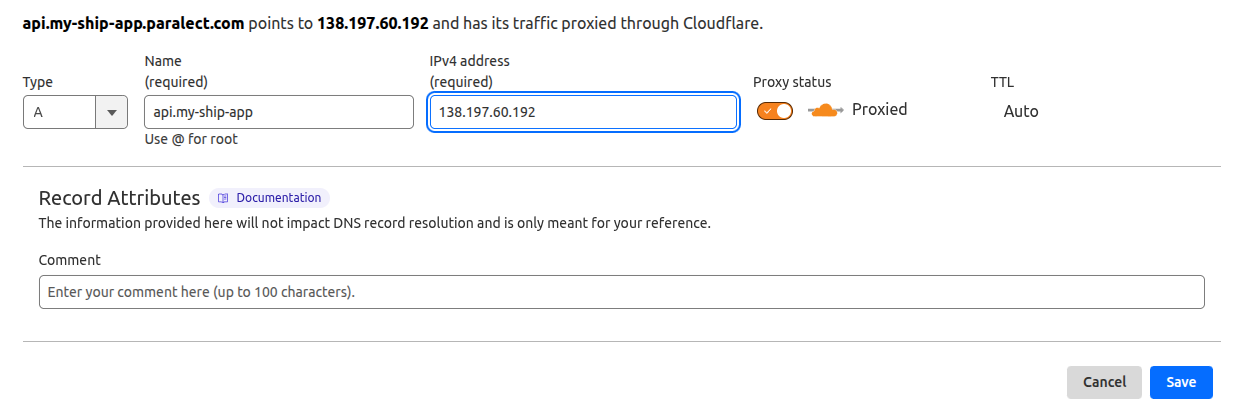
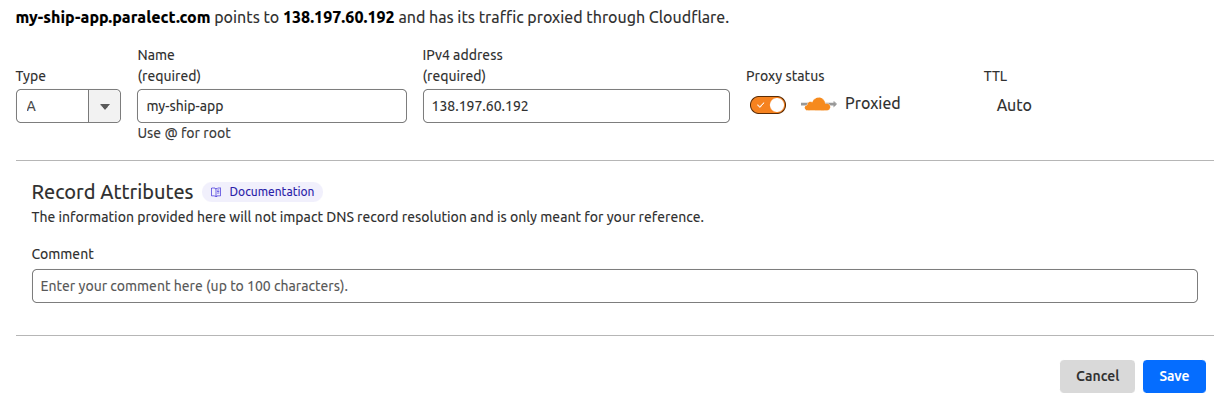
    2. In the Cloudflare DNS tab, create 2 `A` records:

    * One for Web interface
    * One for API endpoint

    Both should point to your Load Balancer's external hostname.

    Enable the **Proxied** option to:

    * Route traffic through Cloudflare
    * Generate SSL certificates automatically

    <Frame>
      <img src="https://mintcdn.com/ship-jskiller1404-add-ommiting-private-fields-feature/E9XBHl8mCOQjBjO1/images/do/cloudflare-api.png?fit=max&auto=format&n=E9XBHl8mCOQjBjO1&q=85&s=932863b1d994ef200039c7f1dc532b14" alt="CloudFlare API DNS Configuration" width="1242" height="411" data-path="images/do/cloudflare-api.png" />
    </Frame>

    <br />

    <Frame>
      <img src="https://mintcdn.com/ship-jskiller1404-add-ommiting-private-fields-feature/E9XBHl8mCOQjBjO1/images/do/cloudflare-web.png?fit=max&auto=format&n=E9XBHl8mCOQjBjO1&q=85&s=7f907158aab930e367a8995d08e4590b" alt="CloudFlare Web DNS Configuration" width="1226" height="402" data-path="images/do/cloudflare-web.png" />
    </Frame>

    <Note>
      Cloudflare's free Universal SSL certificates only cover the apex domain and one subdomain level. For multiple subdomain levels, you'll need an [Advanced Certificate](https://developers.cloudflare.com/ssl/edge-certificates/advanced-certificate-manager/manage-certificates/).
    </Note>
  </Step>

  <Step title="Update Configuration Files">
    Update your domain settings in the appropriate environment configuration files:

    For API service:

    <CodeGroup>
      ```yaml deploy/app/api/production.yaml theme={null}
      service: api
      port: 3001
      domain: api.my-ship-app.paralect.com
      ```

      ```yaml deploy/app/api/staging.yaml theme={null}
      service: api
      port: 3001
      domain: api.my-ship-app.staging.paralect.com
      ```
    </CodeGroup>

    For Web service:

    <CodeGroup>
      ```yaml deploy/app/web/production.yaml theme={null}
      service: web
      port: 3002
      domain: my-ship-app.paralect.com
      ```

      ```yaml deploy/app/web/staging.yaml theme={null}
      service: web
      port: 3002
      domain: my-ship-app.staging.paralect.com
      ```
    </CodeGroup>
  </Step>
</Steps>

## MongoDB Atlas

[MongoDB Atlas](https://cloud.mongodb.com/) is a fully managed cloud database service that provides automated backups, scaling, and security features. It offers 99.995% availability with global deployment options and seamless integration with AWS infrastructure.

### Cluster Creation

<Steps>
  <Step title="Access MongoDB Atlas">
    Sign in to your [MongoDB Atlas account](https://cloud.mongodb.com/) and create a new project if needed.
  </Step>

  <Step title="Deploy New Cluster">
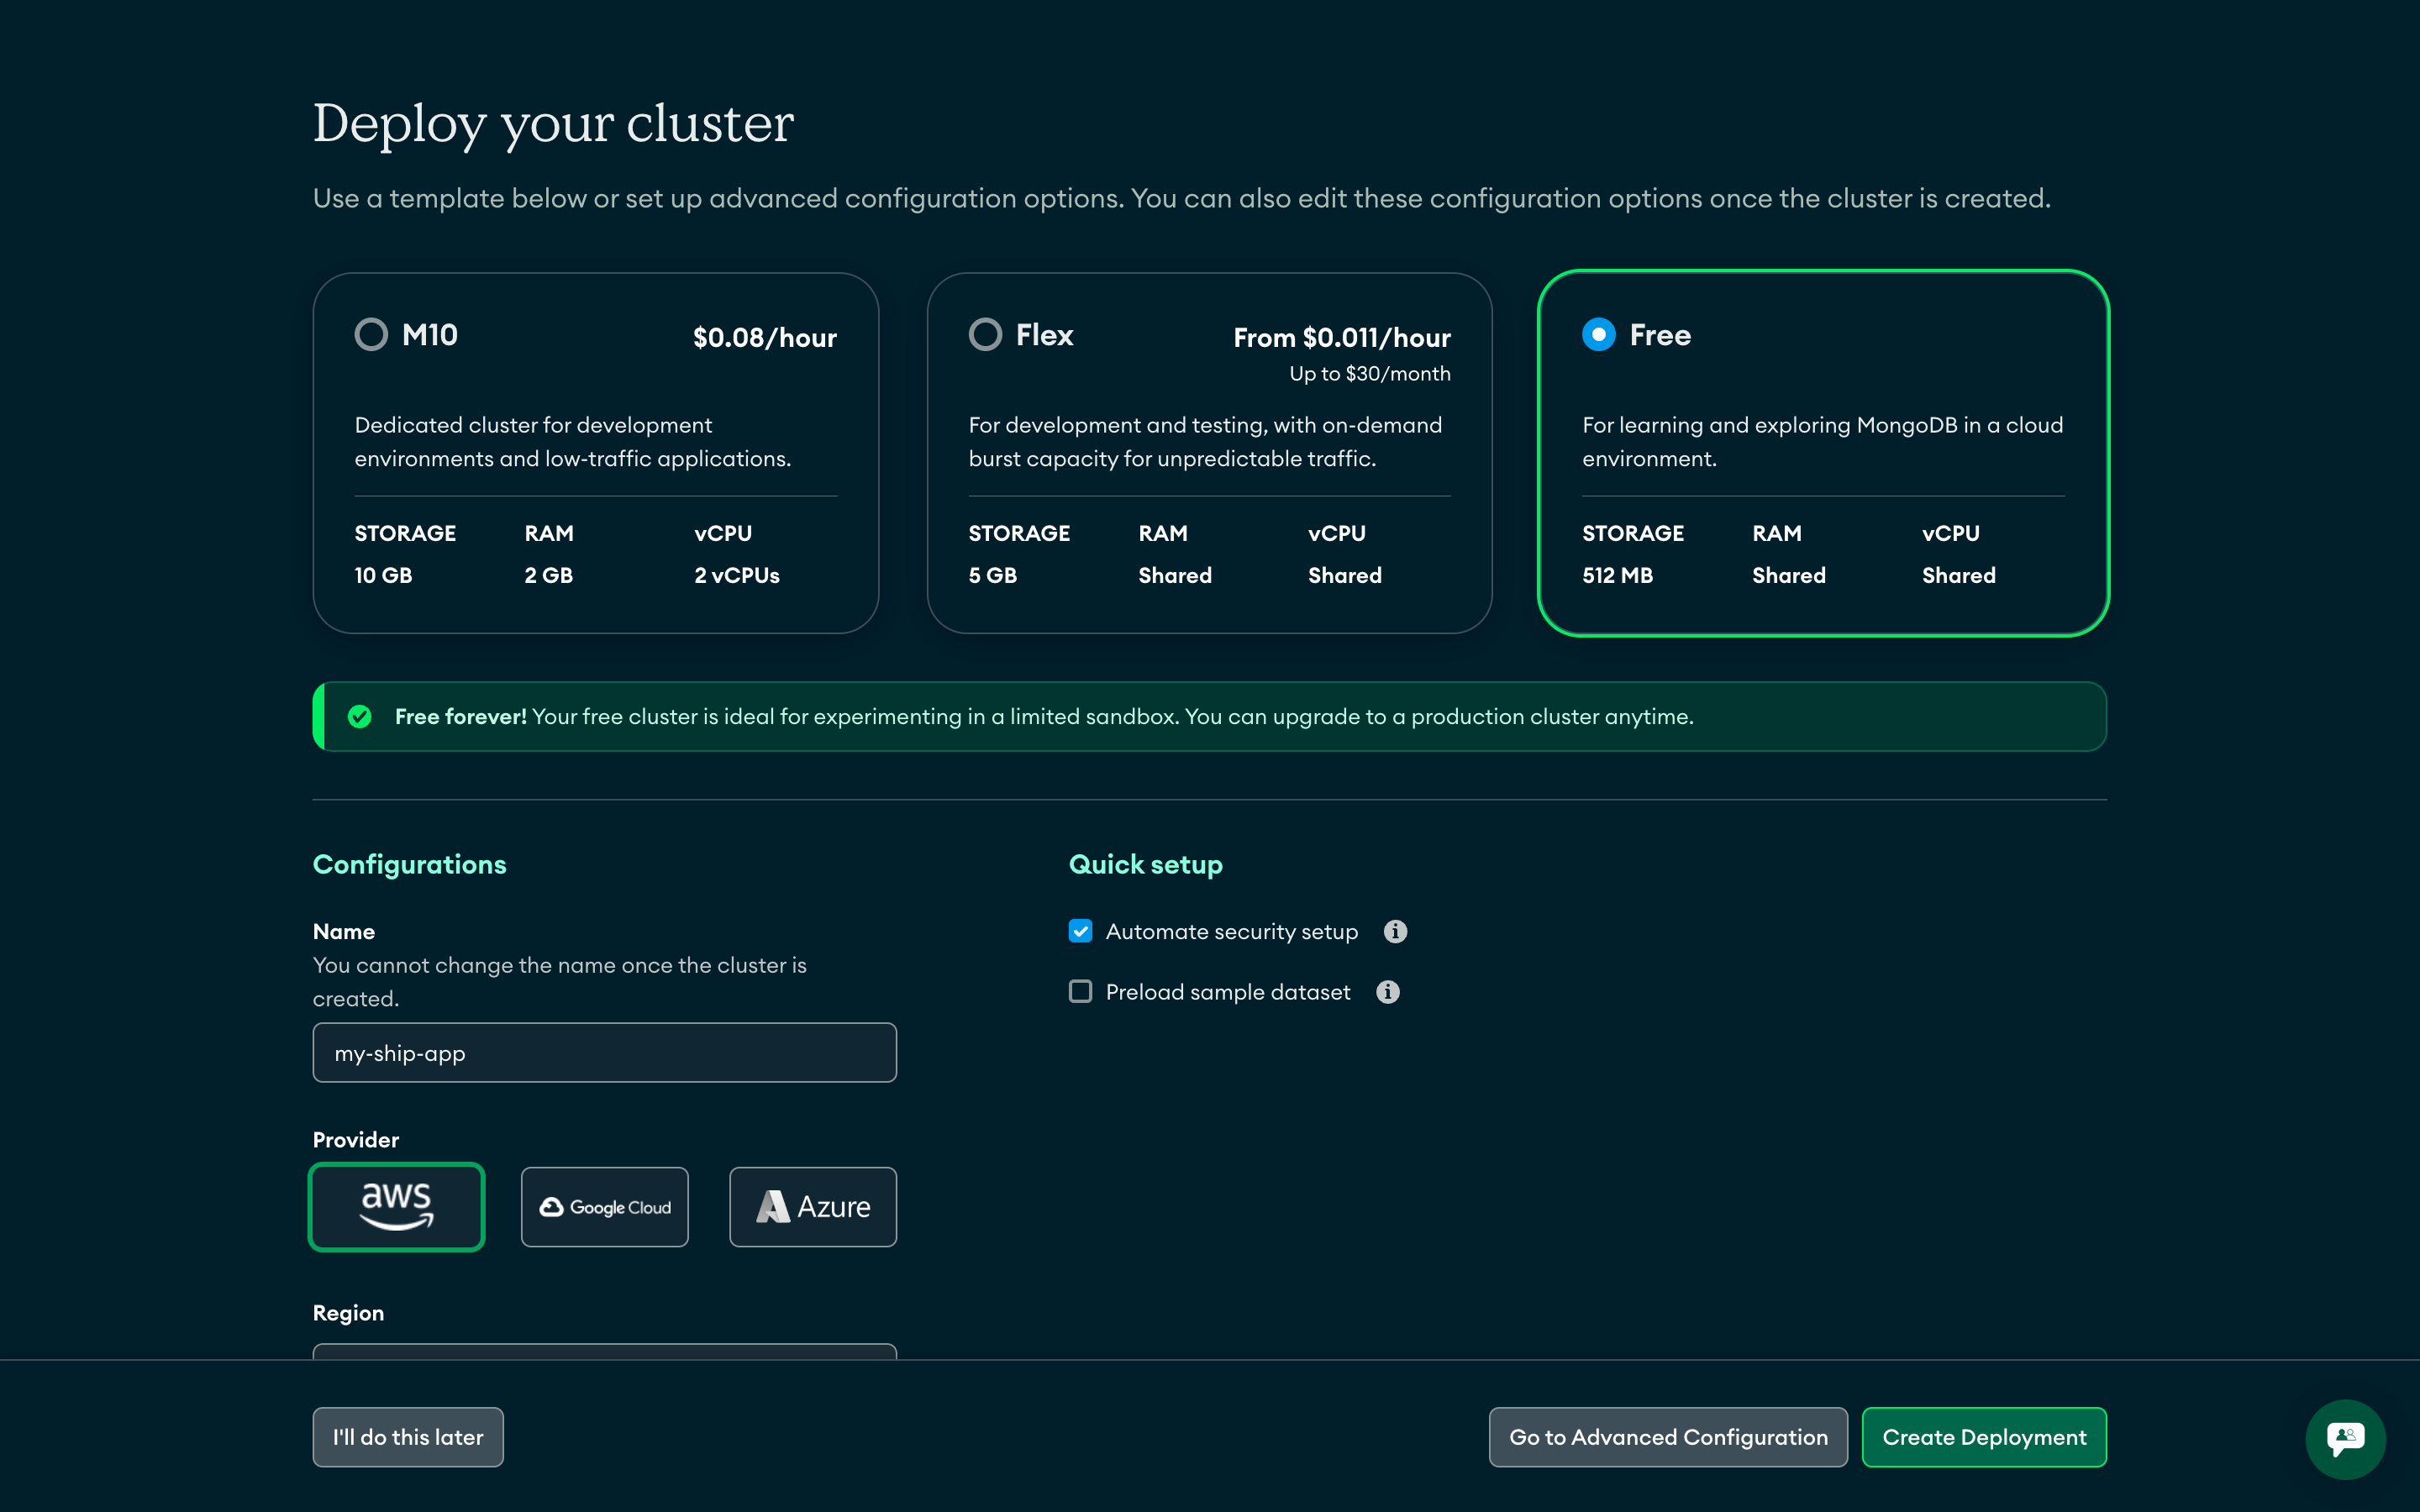
    Click **Create** to start cluster deployment.

    **Cluster Tier Selection:**

    * **Staging**: `M0` (Free tier) - Suitable for development and testing
    * **Production**: `M10` or higher - Includes automated backups and advanced features

    {provider_1 === 'aws' && (
            <div>
              <p><strong>Provider & Region:</strong></p>
              <ul>
                <li>Select <strong>AWS</strong> as your cloud provider</li>
                <li>Choose the <strong>same region</strong> as your EKS cluster for optimal performance</li>
              </ul>
            </div>
          )}

    {provider_1 === 'do' && (
            <div>
              <p><strong>Provider & Region:</strong></p>
              <ul>
                <li>Select <strong>AWS</strong> as your cloud provider</li>
                <li>Choose the <strong>region closest</strong> to your Digital Ocean cluster for optimal performance</li>
              </ul>
            </div>
          )}

    <Frame>
      <img src="https://mintcdn.com/ship-jskiller1404-add-ommiting-private-fields-feature/Dwvni7a5iTfmtLdI/images/mongodb-cloud/deploy-cluster.png?fit=max&auto=format&n=Dwvni7a5iTfmtLdI&q=85&s=780a004aaa863194098da56e5da9a00b" alt="Deploy MongoDB Atlas cluster" width="2880" height="1800" data-path="images/mongodb-cloud/deploy-cluster.png" />
    </Frame>
  </Step>

  <Step title="Configure Cluster Name">
    Enter a descriptive cluster name (e.g., `ship-production-cluster`, `ship-staging-cluster`)
  </Step>
</Steps>

### Security Configuration

<Steps>
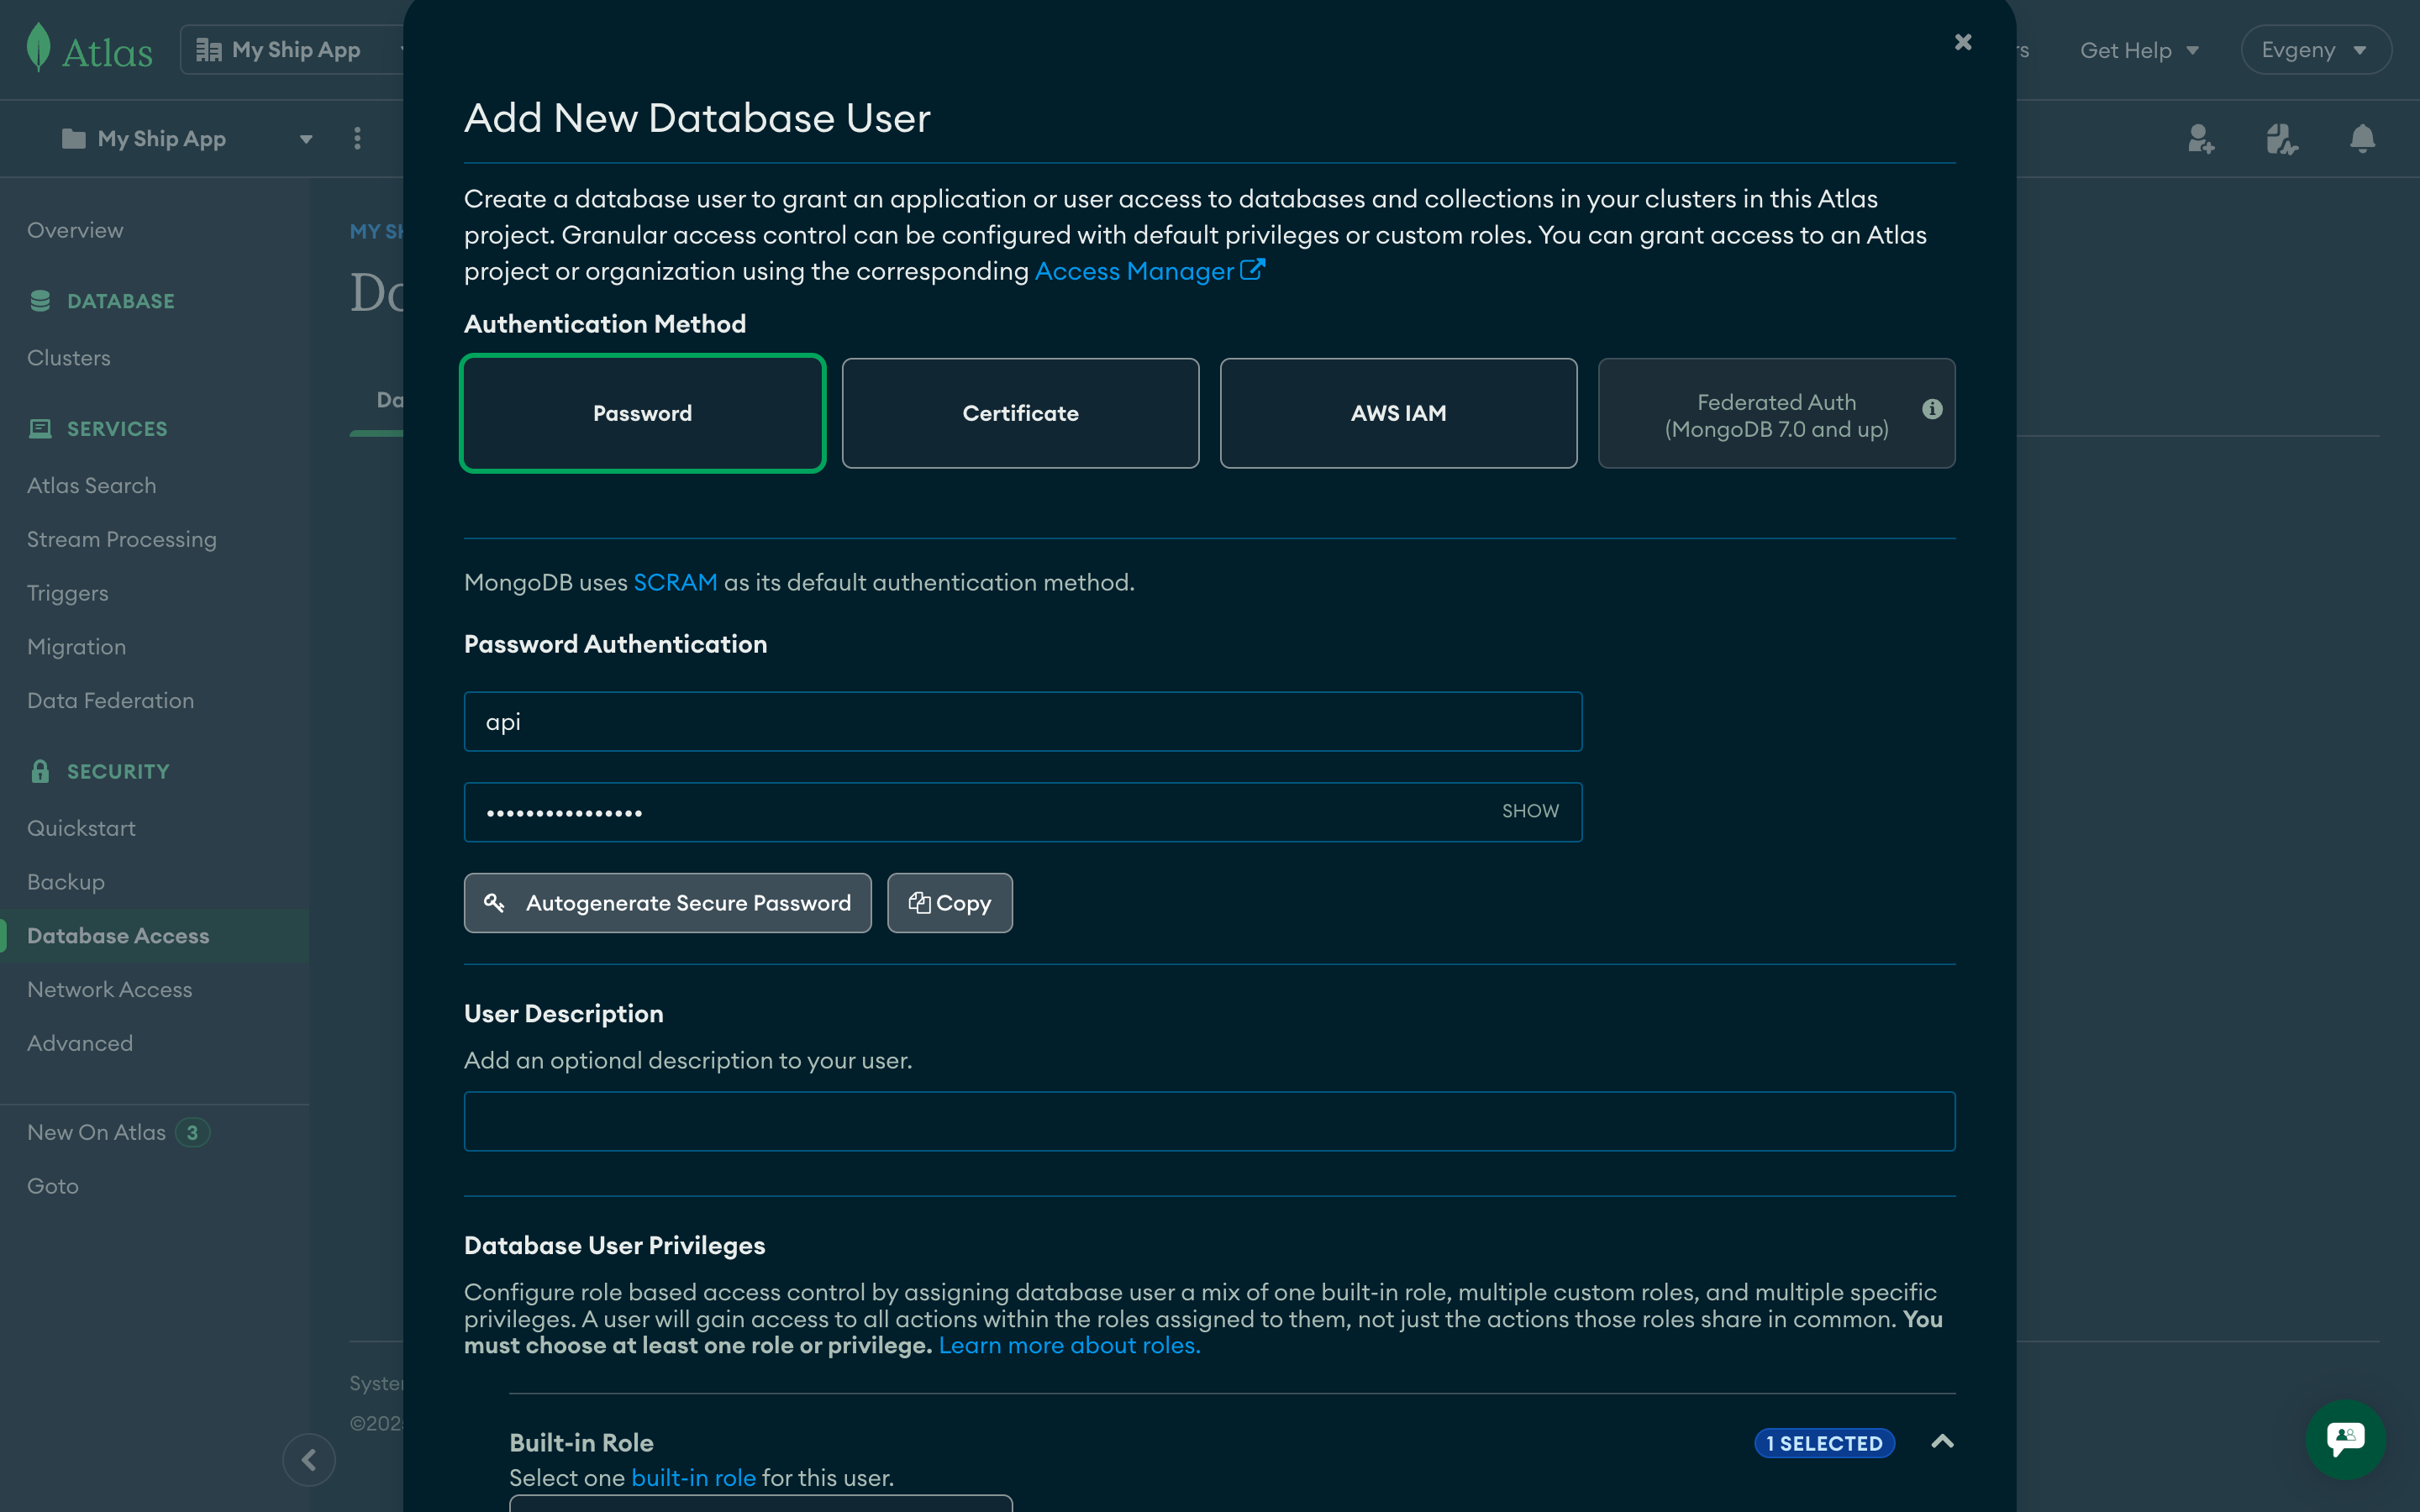
  <Step title="Create Database User">
    Navigate to **Database Access** → **Add New Database User**

    * **Authentication Method**: Password
    * **Username**: Use environment-specific names (e.g., `api-production`, `api-staging`)
    * **Password**: Generate a strong password
    * **Database User Privileges**: **Read and write to any database**

    <Frame>
      <img src="https://mintcdn.com/ship-jskiller1404-add-ommiting-private-fields-feature/Dwvni7a5iTfmtLdI/images/mongodb-cloud/add-database-user.png?fit=max&auto=format&n=Dwvni7a5iTfmtLdI&q=85&s=88d2856f2eca90914790d60ddfa56c2c" alt="Add MongoDB database user" width="2880" height="1800" data-path="images/mongodb-cloud/add-database-user.png" />
    </Frame>

    <Warning>
      **Password Requirements**: Ensure the password starts with a letter and contains only alphanumeric characters and common symbols. Special characters at the beginning can cause URI parsing issues.
    </Warning>
  </Step>

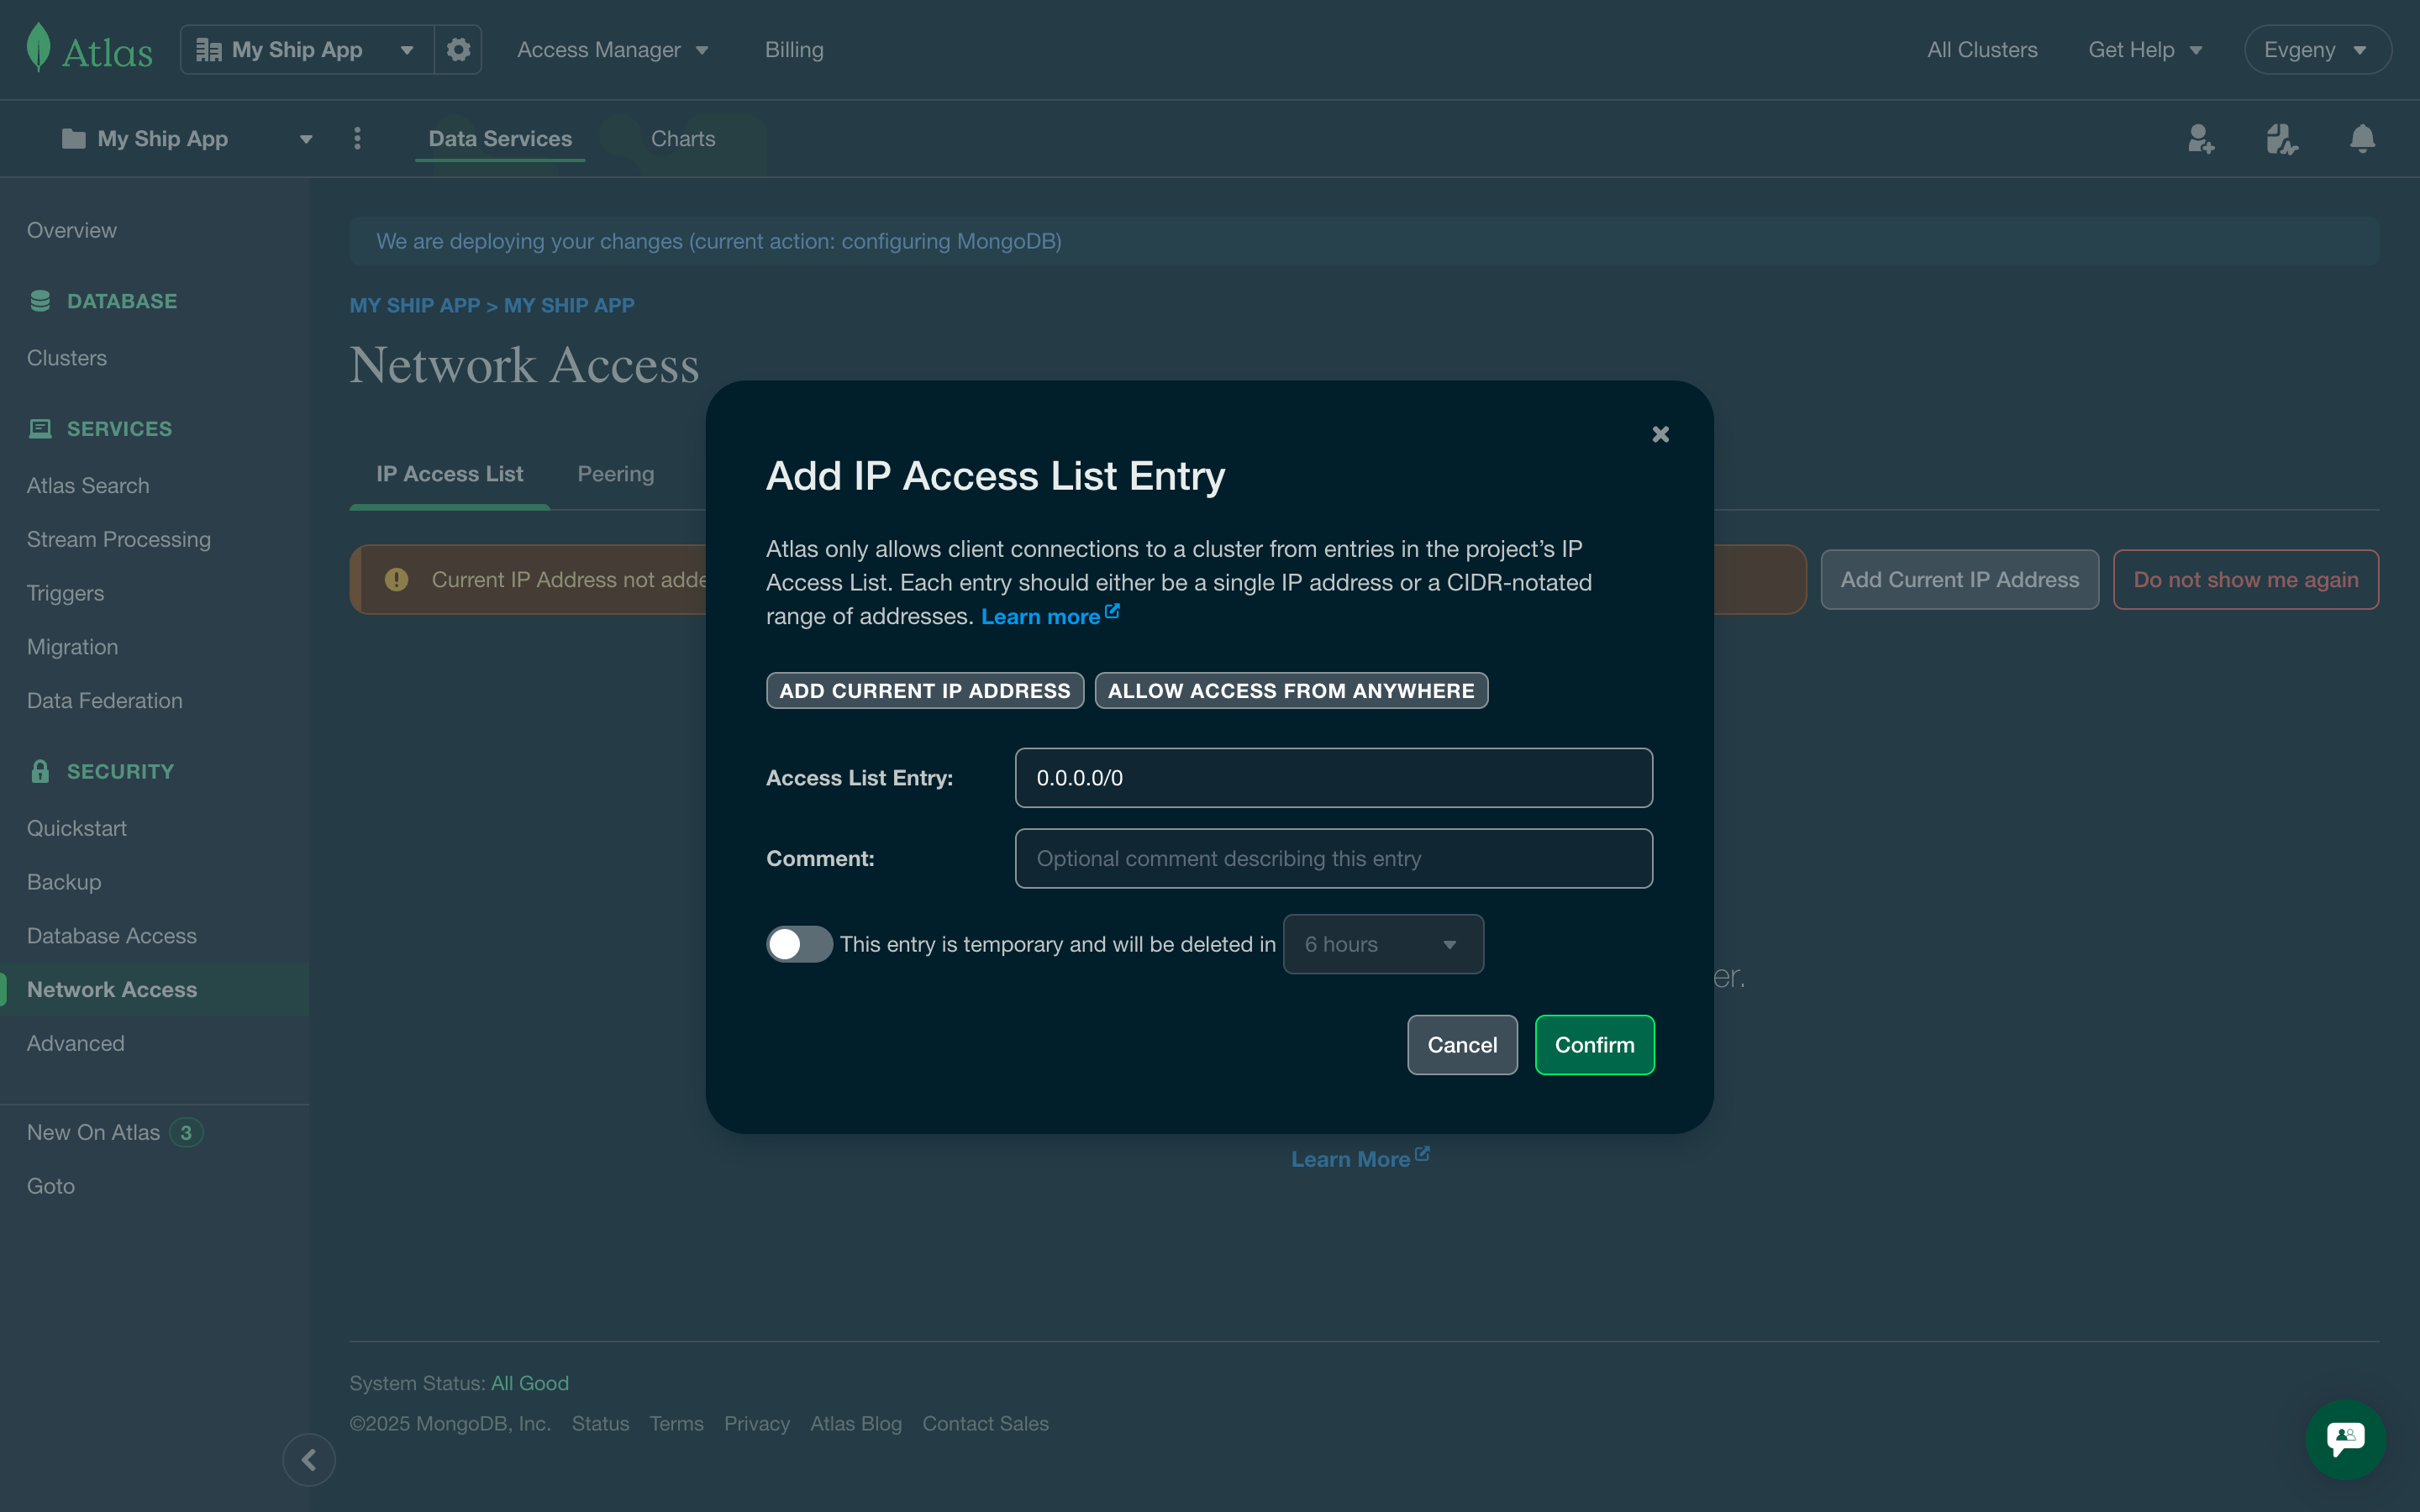
  <Step title="Configure Network Access">
    Navigate to **Network Access** → **Add IP Address**

    * Click **Allow access from anywhere** to allow connections from any IP with valid credentials
    * For production, consider restricting to specific IP ranges for enhanced security

    <Frame>
      <img src="https://mintcdn.com/ship-jskiller1404-add-ommiting-private-fields-feature/Dwvni7a5iTfmtLdI/images/mongodb-cloud/network-access.png?fit=max&auto=format&n=Dwvni7a5iTfmtLdI&q=85&s=7f164a7088c3d674432a3f89bfe4eec0" alt="Configure MongoDB network access" width="2880" height="1800" data-path="images/mongodb-cloud/network-access.png" />
    </Frame>
  </Step>
</Steps>

### Get Connection String

<Steps>
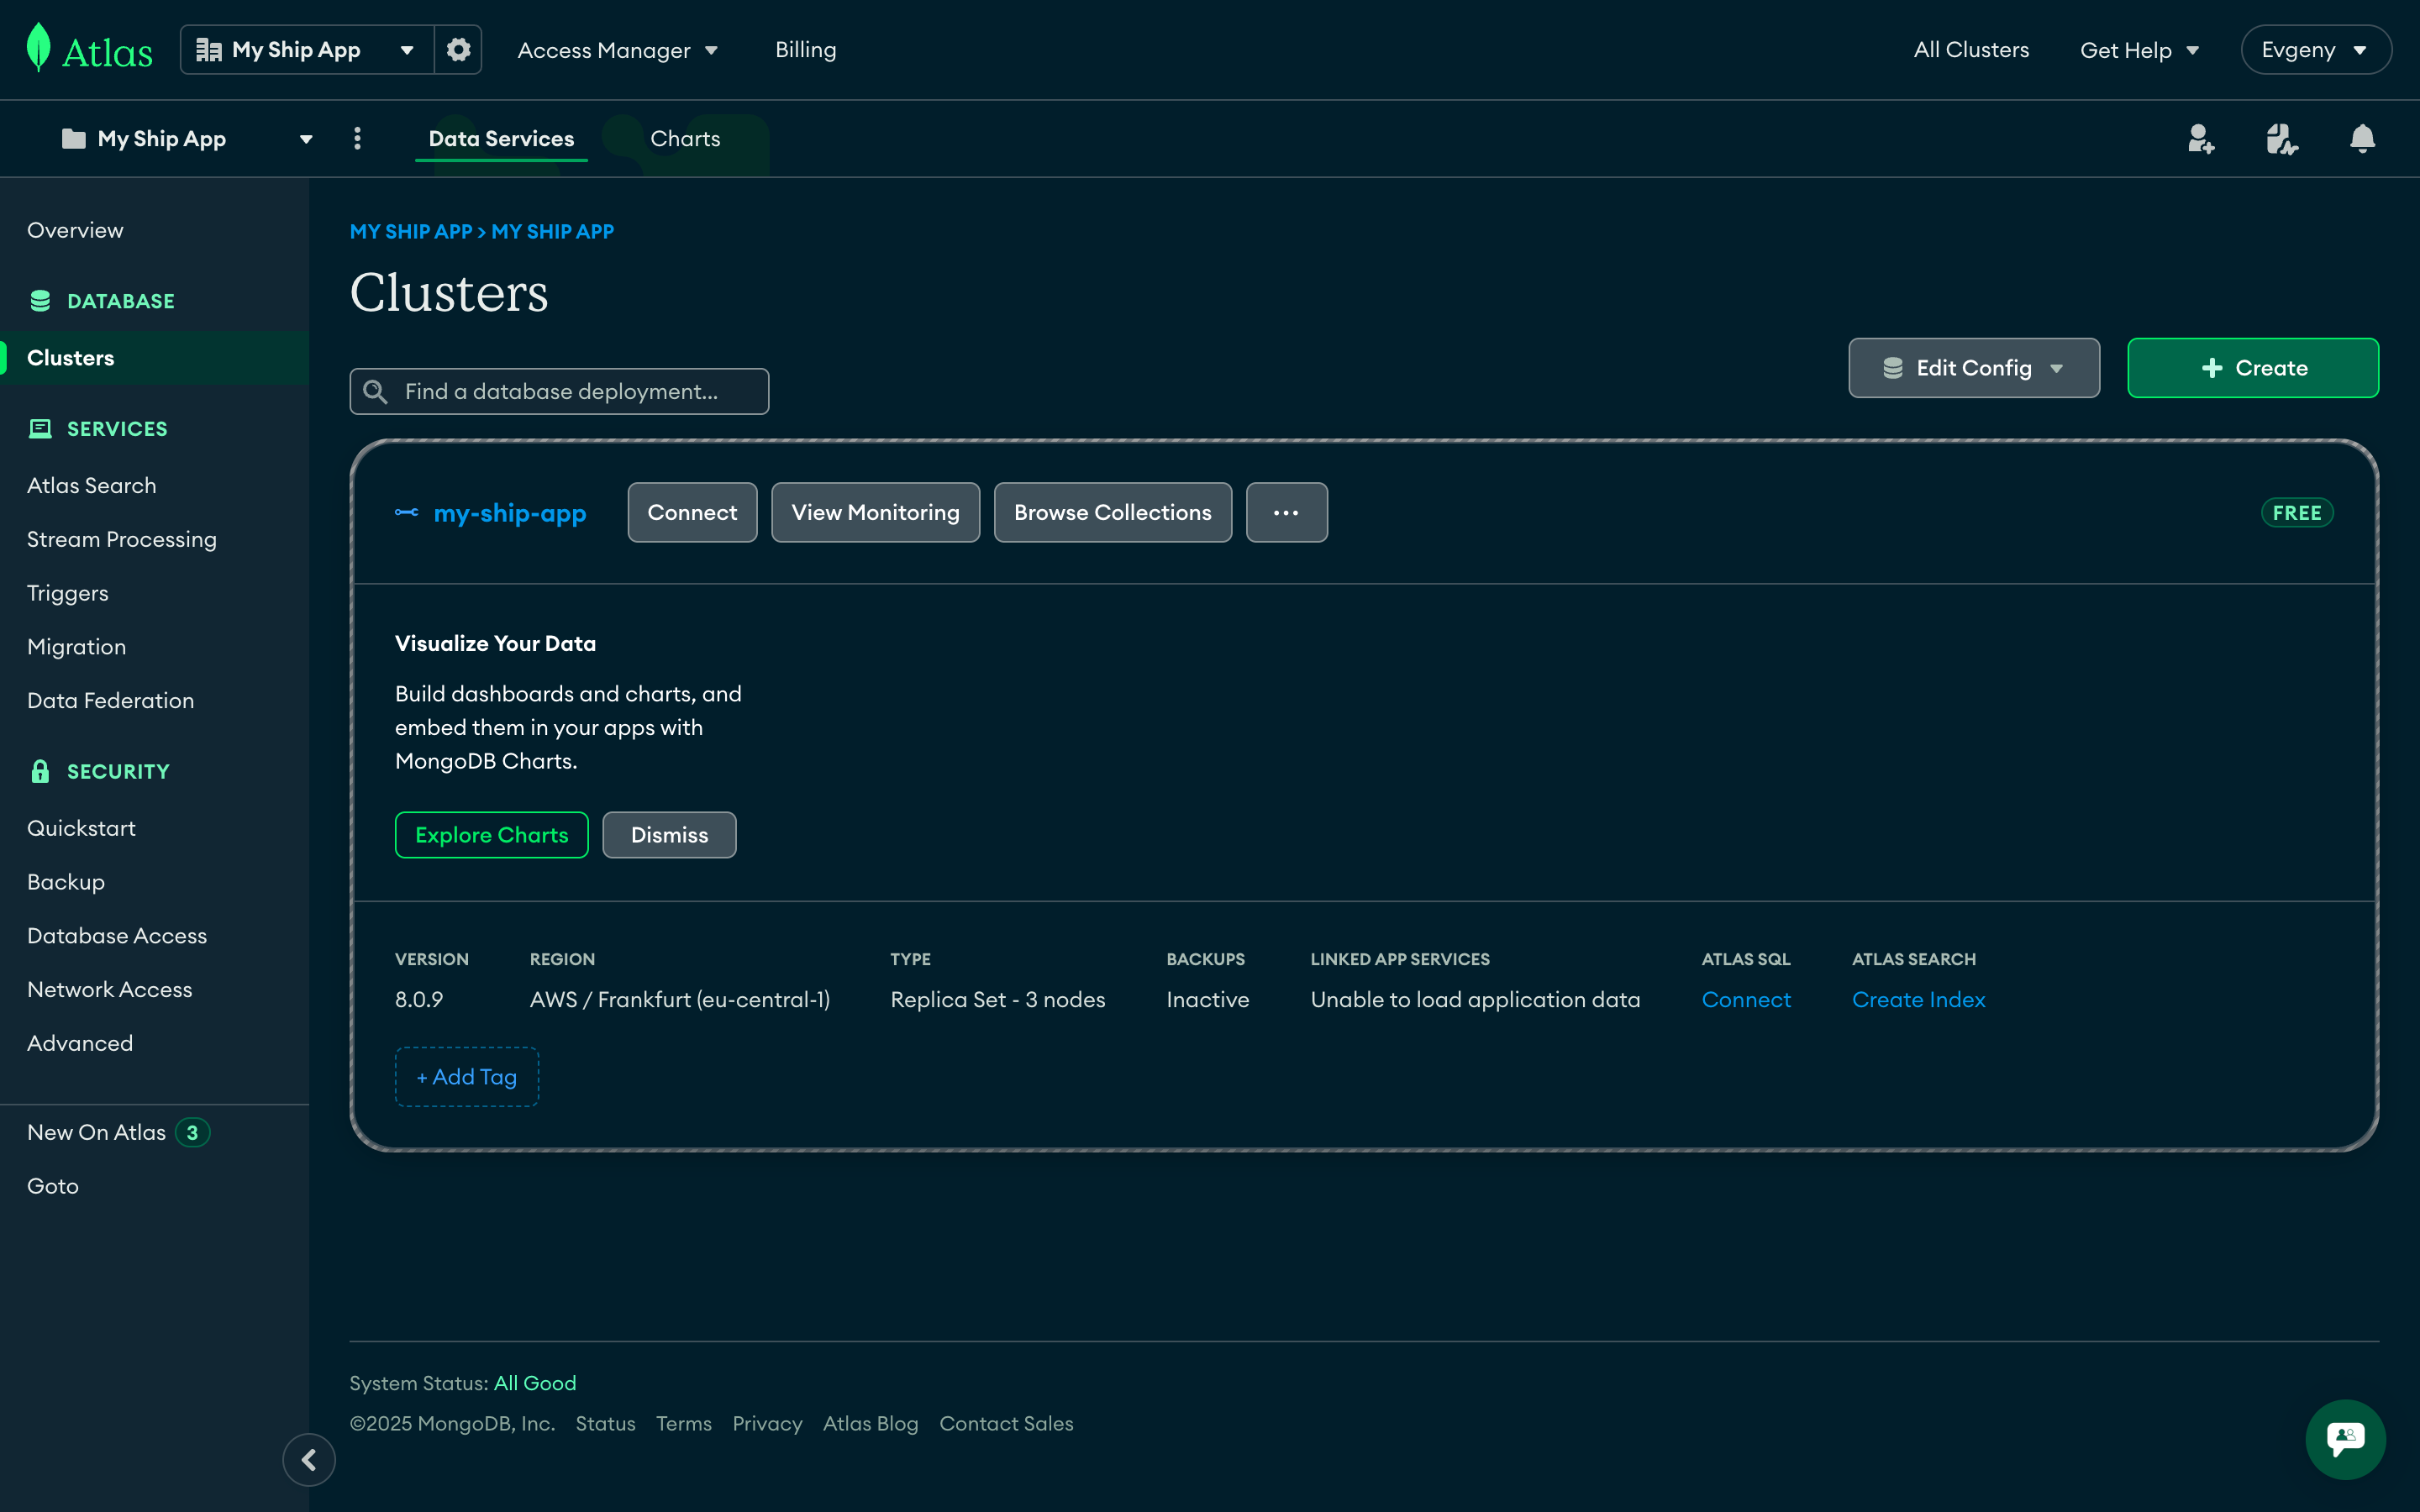
  <Step title="Access Connection Details">
    Go to your cluster dashboard and click the **Connect** button.

    <Frame>
      <img src="https://mintcdn.com/ship-jskiller1404-add-ommiting-private-fields-feature/Dwvni7a5iTfmtLdI/images/mongodb-cloud/dashboard.png?fit=max&auto=format&n=Dwvni7a5iTfmtLdI&q=85&s=038320ca396d15a373cbb4f697e26e6d" alt="MongoDB Atlas dashboard" width="2880" height="1800" data-path="images/mongodb-cloud/dashboard.png" />
    </Frame>
  </Step>

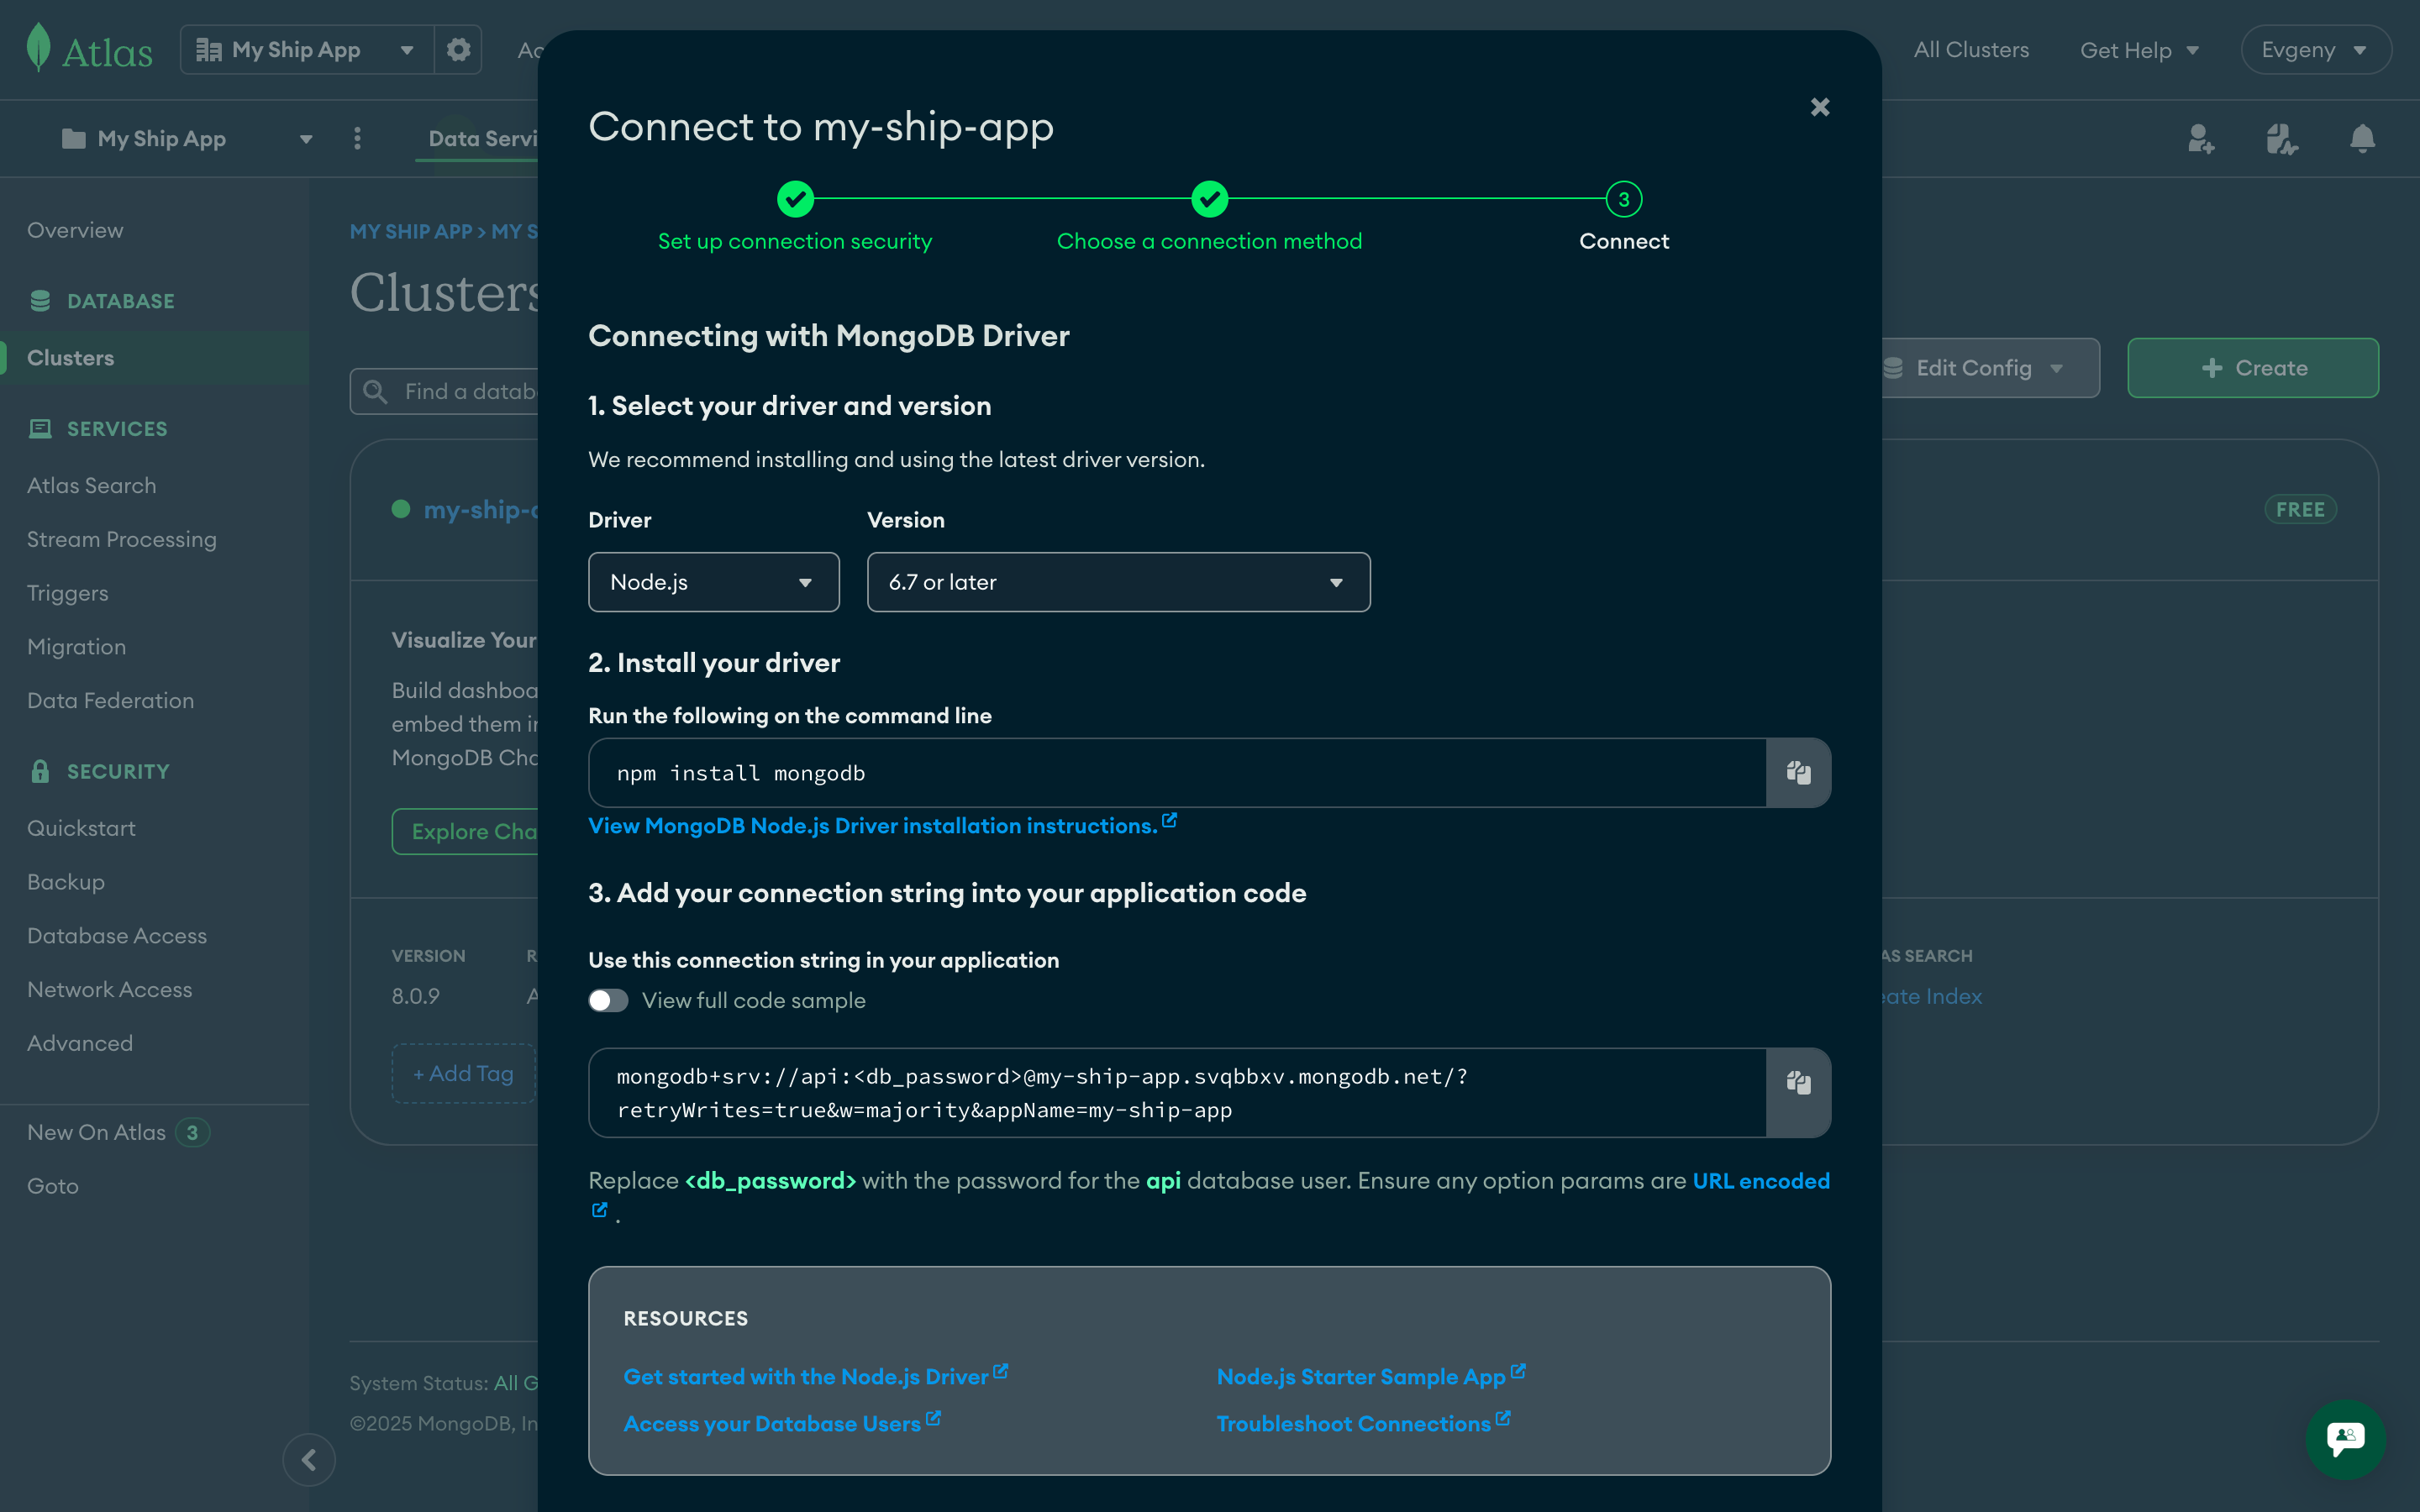
  <Step title="Copy Connection String">
    1. Select **Drivers** in the "Connect your application" section
    2. Choose **Node.js** driver and latest version
    3. Copy the connection string and replace `<db_password>` with your actual password

    <Frame>
      <img src="https://mintcdn.com/ship-jskiller1404-add-ommiting-private-fields-feature/Dwvni7a5iTfmtLdI/images/mongodb-cloud/cluster-connect.png?fit=max&auto=format&n=Dwvni7a5iTfmtLdI&q=85&s=a832e44c28fe130812d3c34daad424f5" alt="MongoDB connection string" width="2880" height="1800" data-path="images/mongodb-cloud/cluster-connect.png" />
    </Frame>

    **Example Connection String:**

    ```bash theme={null}
    mongodb+srv://api-production:your-password@cluster0.xxxxx.mongodb.net/?retryWrites=true&w=majority
    ```
  </Step>

  <Step title="Save Connection Details">
    Store the connection string securely - you'll need it for environment configuration later
  </Step>
</Steps>

<Tip>
  Before deploying to production, configure [automated backups](https://www.mongodb.com/docs/atlas/backup-restore-cluster/) in the Atlas console to ensure data recovery capabilities.
</Tip>

# Environment variables

Kubernetes applications require proper environment variable configuration for both API and Web components. This section covers how to set up and manage environment variables securely using Kubernetes secrets and configuration files.

### API Environment Variables

For the API deployment, you need to set up environment variables using Kubernetes secrets to securely manage sensitive configuration data.

<Info>
  **Secrets** in Kubernetes are used to store sensitive information, such as passwords, API tokens, and keys.
  They are encoded in Base64 format to provide a level of security.
  These can be mounted into containers as data volumes or used as environment variables.
</Info>

Before deploying the app, make sure all necessary variables from the API config are exist. Here are the minimal set of required variables:

| Name            | Description                | Example value                                      |
| --------------- | -------------------------- | -------------------------------------------------- |
| `APP_ENV`       | Application environment    | `production`                                       |
| `MONGO_URI`     | Database connection string | `mongodb://<username>:<password>@ship.mongodb.net` |
| `MONGO_DB_NAME` | Database name              | `api-production`                                   |
| `API_URL`       | API domain URL             | `https://api.my-ship-app.paralect.com`             |
| `WEB_URL`       | Web app domain URL         | `https://my-ship-app.paralect.com`                 |

#### Environment Variable Details

<Accordion title="APP_ENV">
  Specifies the application environment (development, staging, production). This controls logging levels, debugging features, error reporting, and other environment-specific behaviors. The API uses this to determine which configuration settings to load.
</Accordion>

<Accordion title="MONGO_URI">
  MongoDB connection string including authentication credentials and cluster information. This is the primary database connection for the API. Format: `mongodb+srv://username:password@cluster.mongodb.net`. Each environment should use a separate database cluster or at minimum separate credentials.
</Accordion>

<Accordion title="MONGO_DB_NAME">
  Name of the MongoDB database to use for this environment. Each environment (development, staging, production) should have its own database to prevent data conflicts and ensure proper isolation.
</Accordion>

<Accordion title="API_URL">
  The fully qualified domain name where the API will be accessible. This must be a valid HTTPS URL and should match your Kubernetes ingress configuration. Used for CORS settings and internal service communication.
</Accordion>

<Accordion title="WEB_URL">
  The fully qualified domain name where the web application will be accessible. Used for CORS configuration, redirect URLs, email templates, and social sharing metadata. Must be a valid HTTPS URL.
</Accordion>

#### Setting up Kubernetes Secrets

<Steps>
  <Step title="Create namespaces and secret objects">
    Create Kubernetes namespaces and secret objects for staging and production environments:

    ```bash theme={null}
    kubectl create namespace staging
    kubectl create secret generic api-staging-secret -n staging
    kubectl create namespace production
    kubectl create secret generic api-production-secret -n production
    ```
  </Step>

  <Step title="Initialize secret storage">
    First, create an `APP_ENV` variable to initialize secret storage for k8sec:

    <CodeGroup>
      ```bash production theme={null}
      k8sec set api-production-secret APP_ENV=production -n production
      ```

      ```bash staging theme={null}
      k8sec set api-staging-secret APP_ENV=staging -n staging
      ```
    </CodeGroup>
  </Step>

  <Step title="Verify secret creation">
    Run the following command to check the created secret:

    <CodeGroup>
      ```bash production theme={null}
      k8sec list api-production-secret -n production
      ```

      ```bash staging theme={null}
      k8sec list api-staging-secret -n staging
      ```
    </CodeGroup>
  </Step>

  <Step title="Prepare environment file">
    Create a `.env.production` file with all required variables:

    <CodeGroup>
      ```bash .env.production theme={null}
      APP_ENV=production
      MONGO_URI=mongodb://username:password@ship.mongodb.net
      MONGO_DB_NAME=api-production
      API_URL=https://api.my-ship-app.paralect.com
      WEB_URL=https://my-ship-app.paralect.com
      ```

      ```bash .env.staging theme={null}
      APP_ENV=staging
      MONGO_URI=mongodb://username:password@ship.mongodb.net
      MONGO_DB_NAME=api-staging
      API_URL=https://api.my-ship-app.staging.paralect.com
      WEB_URL=https://my-ship-app.staging.paralect.com
      ```
    </CodeGroup>

    <Warning>
      Replace all example values with your actual configuration. Never use production secrets in documentation or version control.
    </Warning>
  </Step>

  <Step title="Import secrets to Kubernetes">
    Import secrets from the .env file to Kubernetes secret using k8sec:

    <CodeGroup>
      ```bash production theme={null}
      k8sec load -f .env.production api-production-secret -n production
      ```

      ```bash staging theme={null}
      k8sec load -f .env.staging api-staging-secret -n staging
      ```
    </CodeGroup>
  </Step>
</Steps>

<Warning>
  After updating environment variables, you must initiate a new deployment for changes to take effect.
  Kubernetes pods cache variable values during startup, requiring a pod restart or rolling update to apply changes.
</Warning>

### Web Environment Variables

The web application uses Next.js environment variables that are embedded at build time and made available in the browser. Unlike API secrets, these variables are stored directly in the GitHub repository.

<Info>
  **Why Web Environment Variables Are Safe in Git**: Web environment variables (prefixed with `NEXT_PUBLIC_`) contain only public configuration like URLs and API endpoints. They don't include sensitive data like passwords or API keys, making them safe to store in version control. These values are already exposed to users in the browser, so repository storage doesn't create additional security risks.
</Info>

<Warning>
  **Security Notice**: Never store sensitive information (passwords, API keys, secrets) in web environment files as they will be accessible on the client side. Only use public configuration values that are safe to expose to end users.
</Warning>

#### Configuration Files

Web environment variables are stored in separate files for each deployment environment:

<CodeGroup>
  ```bash apps/web/.env.production theme={null}
  NEXT_PUBLIC_API_URL=https://api.my-ship-app.paralect.com
  NEXT_PUBLIC_WS_URL=https://api.my-ship-app.paralect.com
  NEXT_PUBLIC_WEB_URL=https://my-ship-app.paralect.com
  ```

  ```bash apps/web/.env.staging theme={null}
  NEXT_PUBLIC_API_URL=https://api.my-ship-app.staging.paralect.com
  NEXT_PUBLIC_WS_URL=https://api.my-ship-app.staging.paralect.com
  NEXT_PUBLIC_WEB_URL=https://my-ship-app.staging.paralect.com
  ```
</CodeGroup>

#### Environment Variables Reference

| Variable              | Description                          | Example                                |
| --------------------- | ------------------------------------ | -------------------------------------- |
| `NEXT_PUBLIC_API_URL` | Base URL for API requests            | `https://api.my-ship-app.paralect.com` |
| `NEXT_PUBLIC_WS_URL`  | WebSocket server URL for real-time   | `https://api.my-ship-app.paralect.com` |
| `NEXT_PUBLIC_WEB_URL` | App's own URL for redirects/metadata | `https://my-ship-app.paralect.com`     |

<Tip>
  **Best Practice**: Keep web environment files in your repository and ensure all values are non-sensitive. If you need to reference sensitive data from the frontend, create a secure API endpoint that returns the necessary information after proper authentication.
</Tip>

## Setting up GitHub Actions CI/CD

To automate deployment through Github Actions you need to configure [Github Secrets](https://docs.github.com/en/actions/security-guides/encrypted-secrets) inside workflow files.

### Configuring GitHub Actions secrets and variables

<Note>
  Before starting, make sure you have created a GitHub repository for your project.
</Note>

GitHub Secrets and variables allow you to manage reusable configuration data.

Secrets are encrypted and are used for sensitive data. [Learn more about encrypted secrets](https://docs.github.com/actions/automating-your-workflow-with-github-actions/creating-and-using-encrypted-secrets).

Variables are shown as plain text and are used for non-sensitive data. [Learn more about variables](https://docs.github.com/actions/learn-github-actions/variables).

<Tip>
  The deployment will be triggered on each commit:

  * Commits to **main** branch → deploy to **staging** environment
  * Commits to **production** branch → deploy to **production** environment
</Tip>

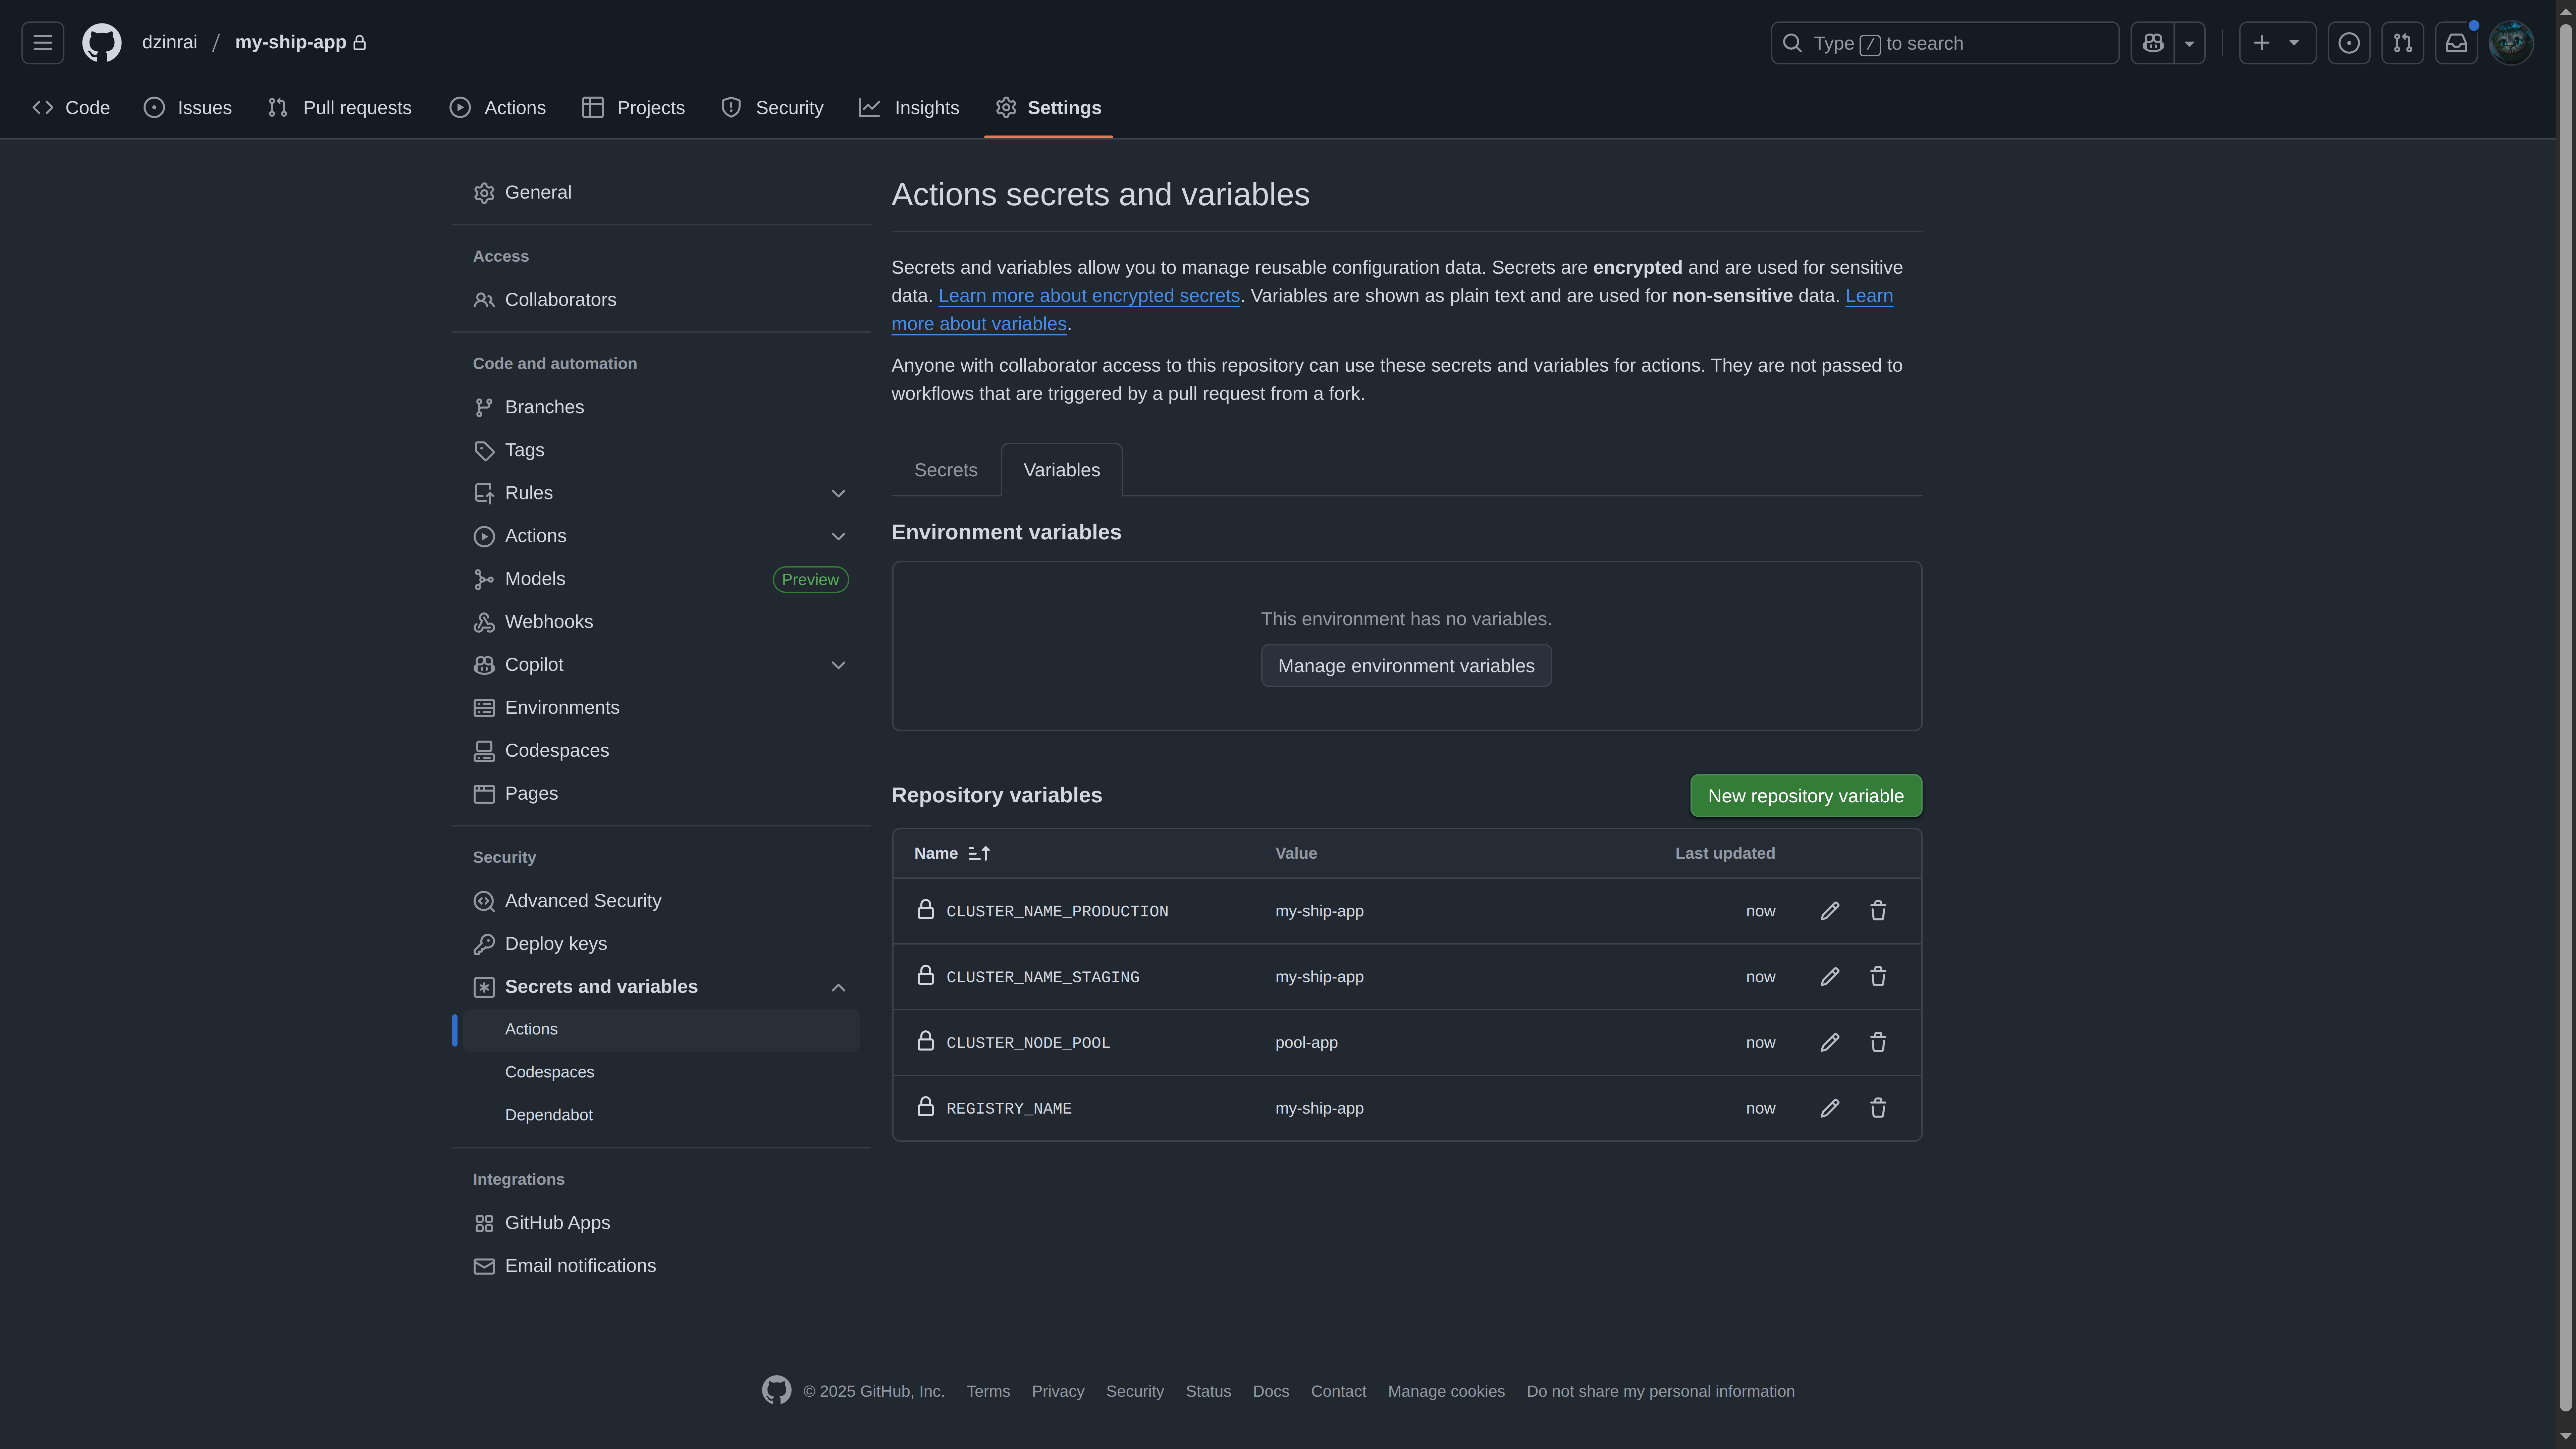
[Configure](https://docs.github.com/en/actions/security-for-github-actions/security-guides/using-secrets-in-github-actions#creating-secrets-for-a-repository) the following secrets and variables in your GitHub repository:

| Name                        | Type     | Description                                                                                                       |
| --------------------------- | -------- | ----------------------------------------------------------------------------------------------------------------- |
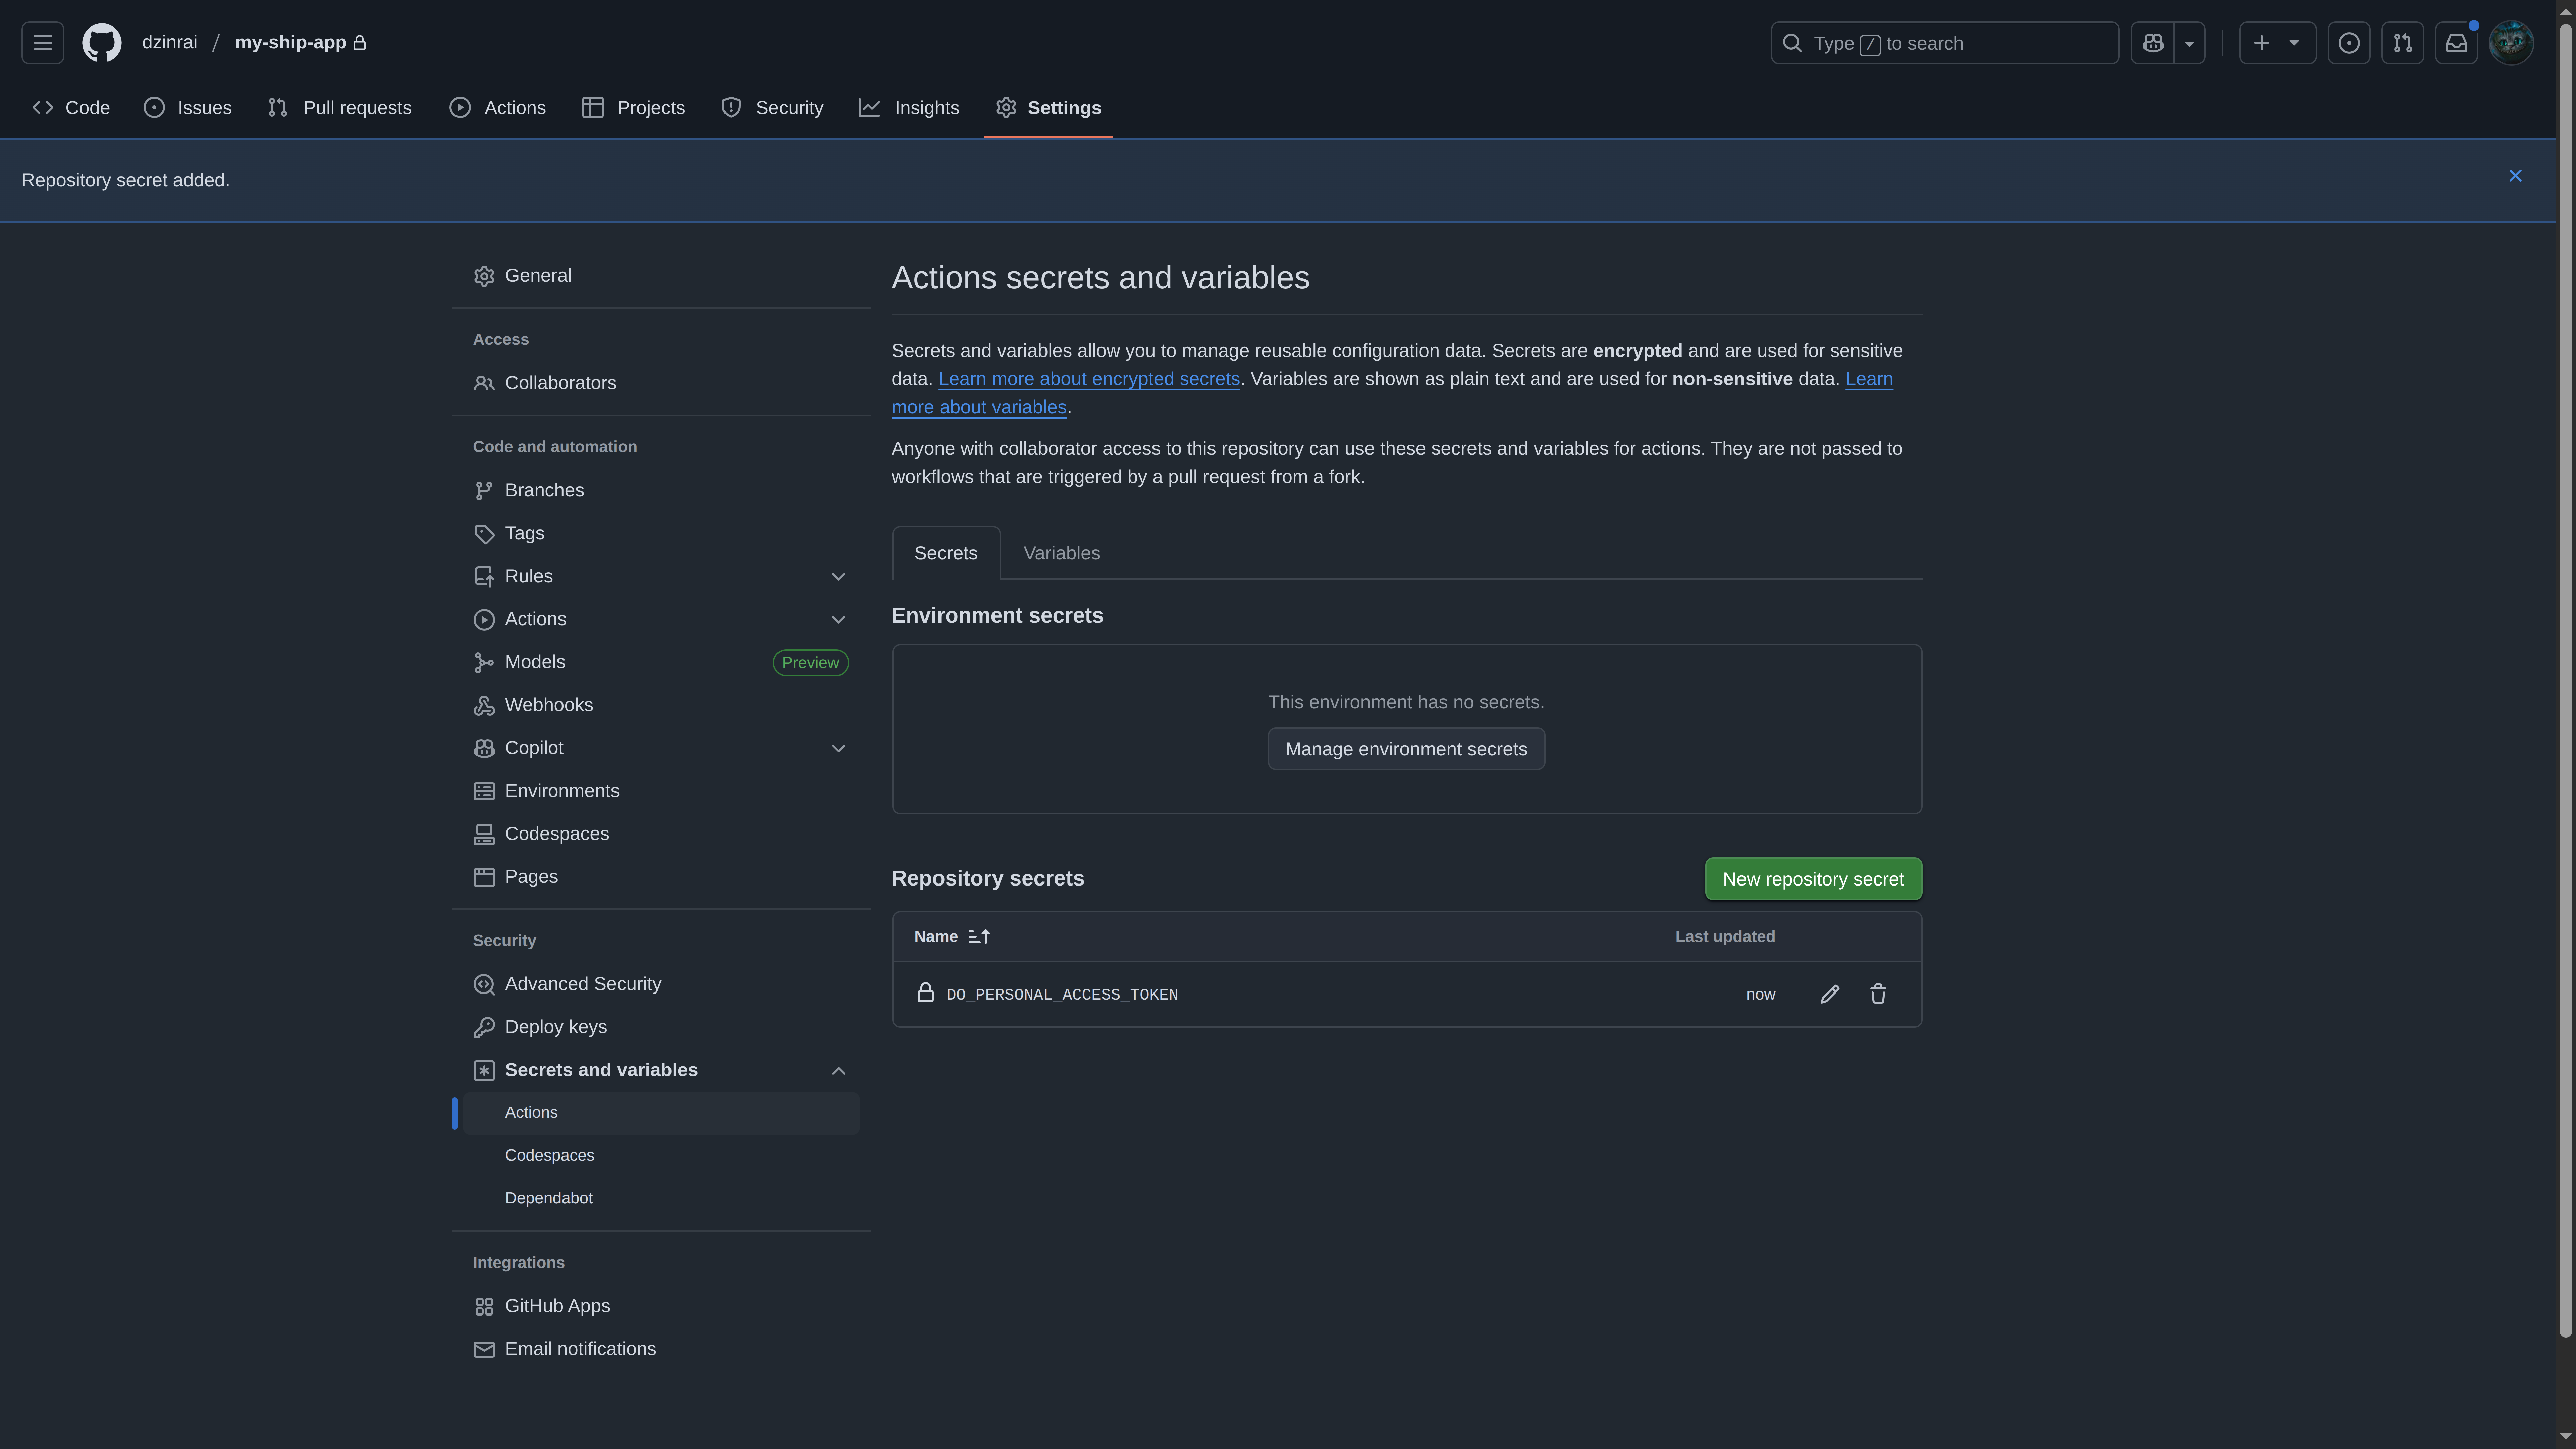
| DO\_PERSONAL\_ACCESS\_TOKEN | secret   | The secret access user created for CI/CD. This allows GitHub Actions to authenticate with DO services             |
| CLUSTER\_NAME\_STAGING      | variable | Name of the staging cluster. (our case: `my-ship-app`)                                                            |
| CLUSTER\_NAME\_PRODUCTION   | variable | Name of the production cluster. (our case: `my-ship-app`, same as staging cluster since we have only one cluster) |
| CLUSTER\_NODE\_POOL         | variable | Name of the node pool. (our case: `pool-app`)                                                                     |
| REGISTRY\_NAME              | variable | Name of the Digital Ocean Container Registry. (our case: `my-ship-app`)                                           |

<Warning>
  Never commit sensitive credentials directly to your repository. <br />
  Always use GitHub Secrets for sensitive information like DO keys.
</Warning>

<Note>
  Variables (unlike secrets) are visible in logs and can be used for non-sensitive configuration values that may need to be referenced or modified.
</Note>

<Note>
  We set up **DO\_PERSONAL\_ACCESS\_TOKEN** to be universal for both production and staging environments with **Full access** scope.
</Note>

<Note>
  Your **KUBE\_CONFIG\_PRODUCTION** and **KUBE\_CONFIG\_STAGING** will be the same if you have only one cluster for both environments.
</Note>

<Frame>
  <img src="https://mintcdn.com/ship-jskiller1404-add-ommiting-private-fields-feature/E9XBHl8mCOQjBjO1/images/do/gh-secrets.png?fit=max&auto=format&n=E9XBHl8mCOQjBjO1&q=85&s=a07405a8764893cf7d3a24fd78ba8cc0" alt="GitHub Secrets" width="7680" height="4320" data-path="images/do/gh-secrets.png" />
</Frame>

<Frame>
  <img src="https://mintcdn.com/ship-jskiller1404-add-ommiting-private-fields-feature/E9XBHl8mCOQjBjO1/images/do/gh-variables.png?fit=max&auto=format&n=E9XBHl8mCOQjBjO1&q=85&s=a617cd5825f3a98bd44f6dfef3ab2a7c" alt="GitHub Variables" width="7680" height="4320" data-path="images/do/gh-variables.png" />
</Frame>

Now commit all changes to GitHub that will trigger deployment, or you can [run a workflow manually](https://docs.github.com/en/actions/managing-workflow-runs-and-deployments/managing-workflow-runs/manually-running-a-workflow)
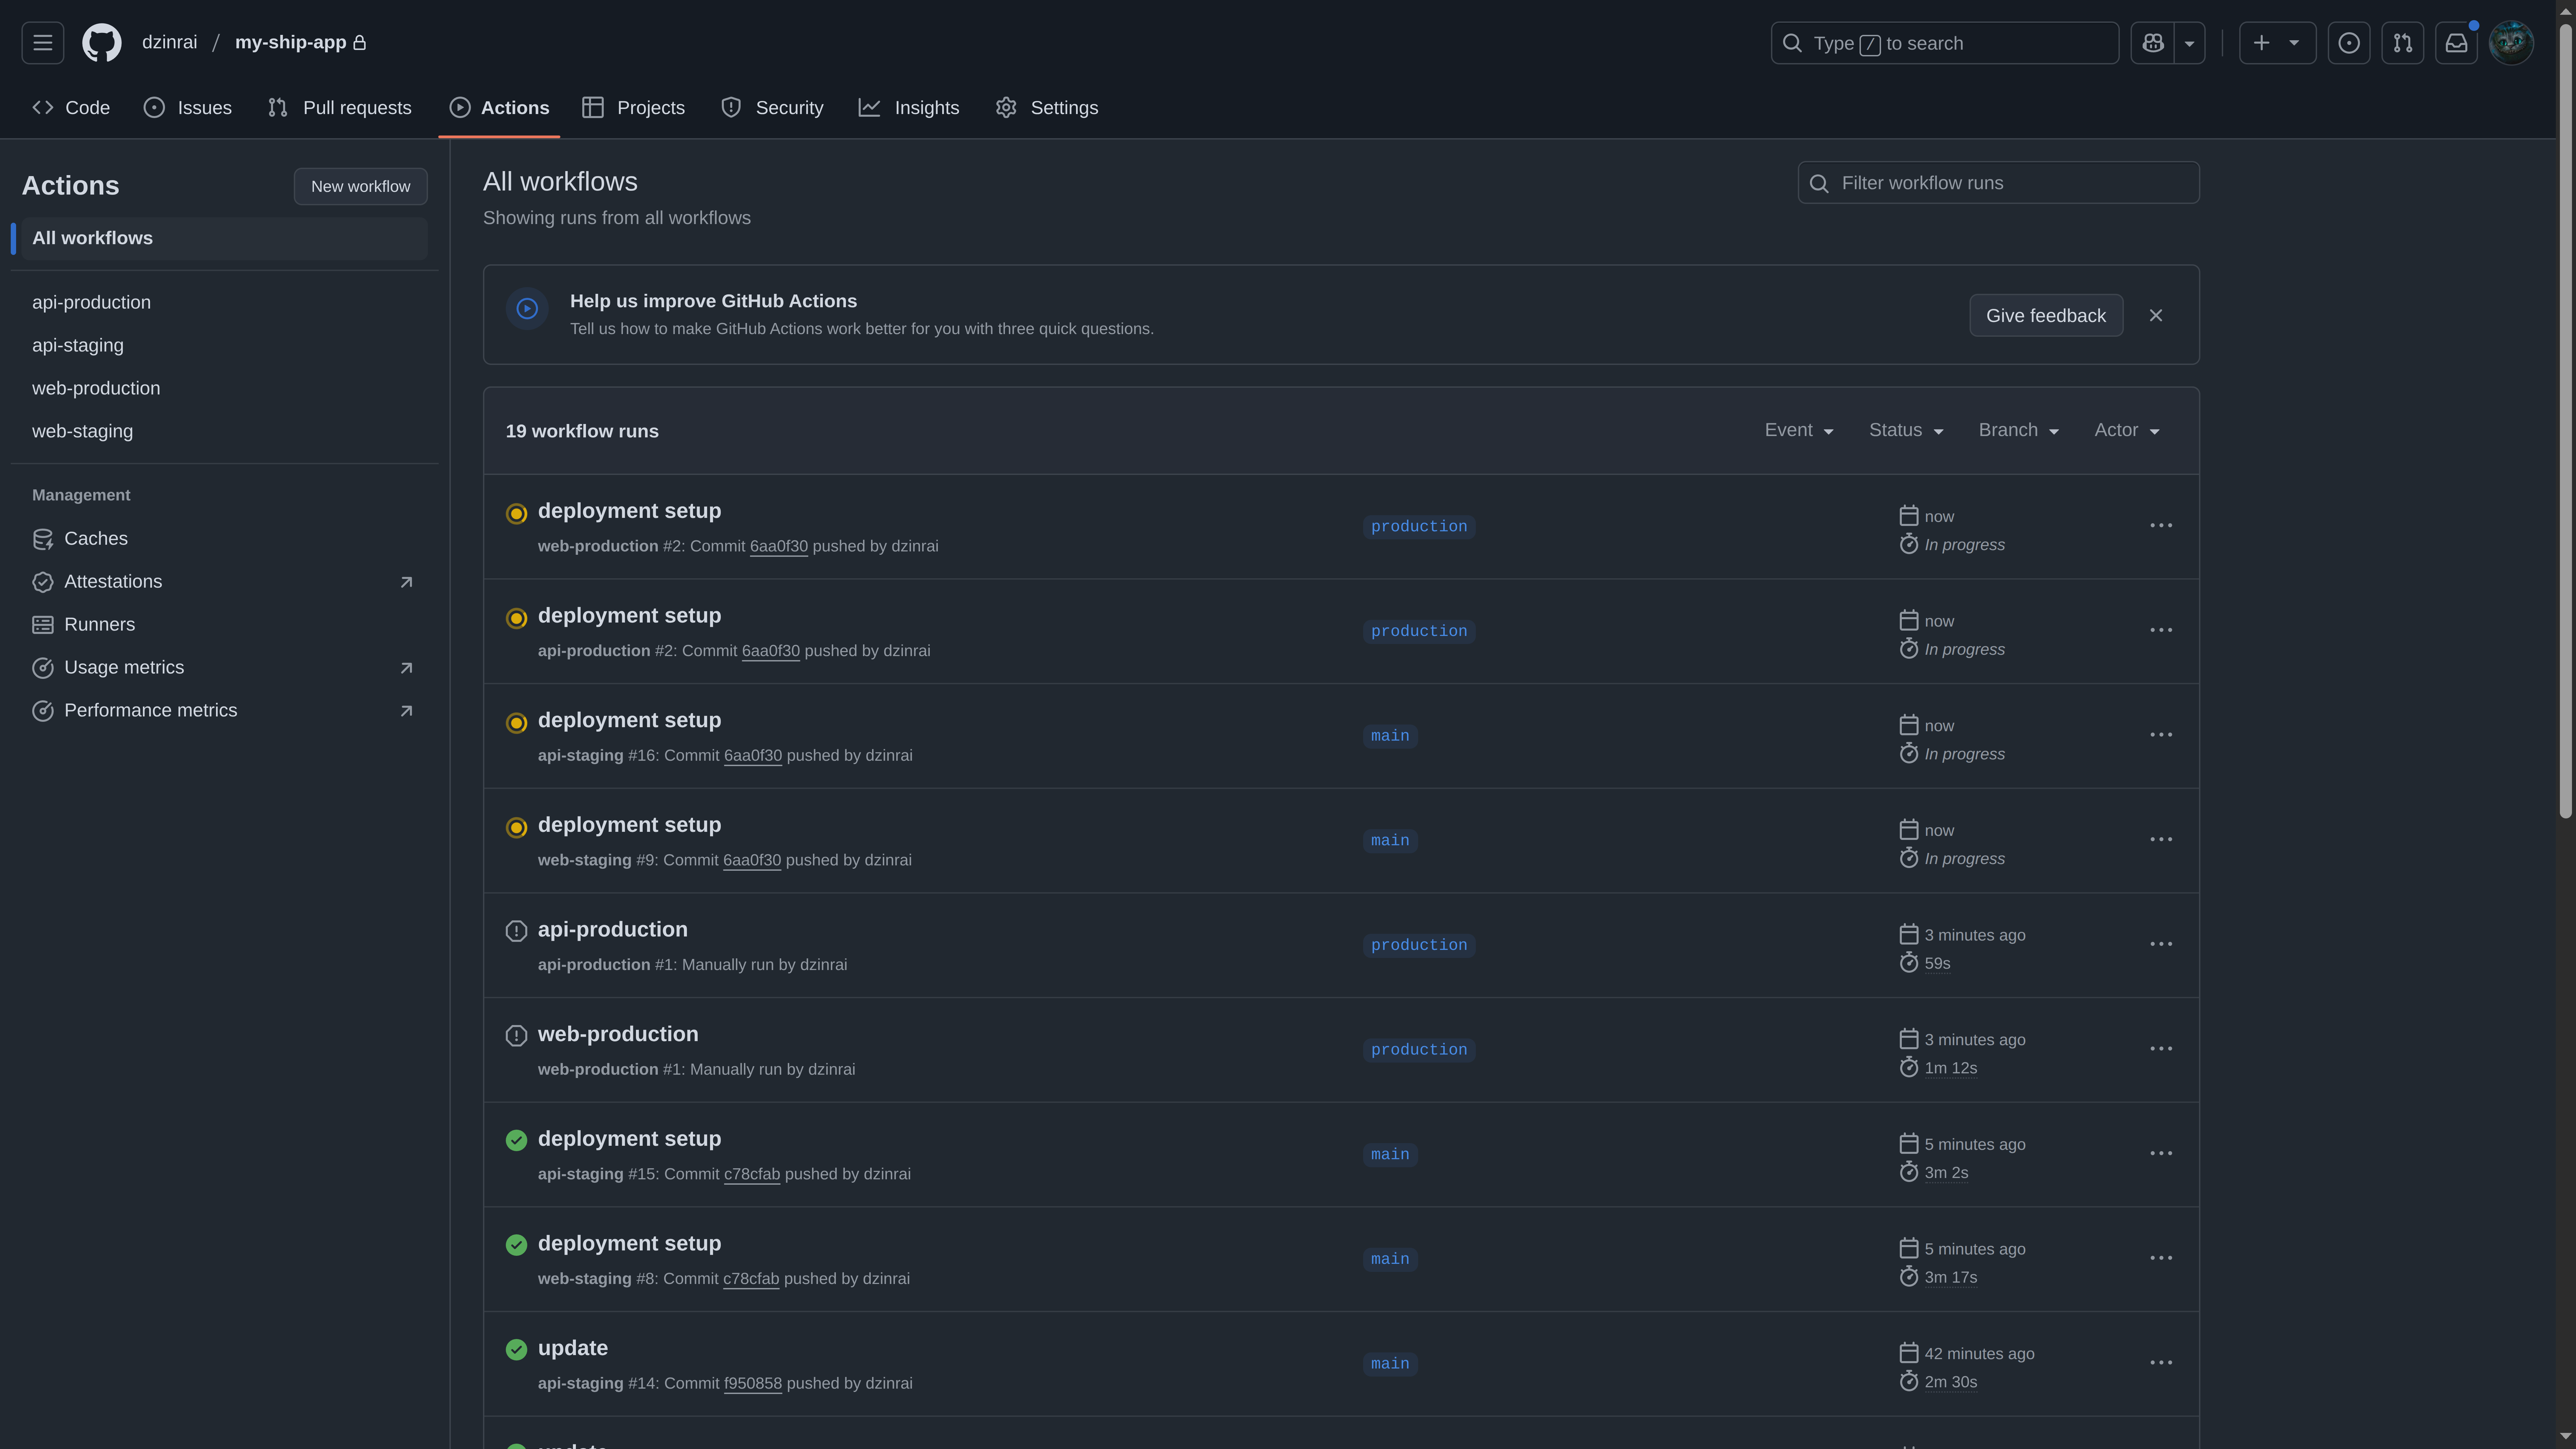
<Frame>
  <img src="https://mintcdn.com/ship-jskiller1404-add-ommiting-private-fields-feature/E9XBHl8mCOQjBjO1/images/do/ci-start.png?fit=max&auto=format&n=E9XBHl8mCOQjBjO1&q=85&s=a7e12267b175f8d447b28eff95058af0" alt="CI start" width="7680" height="4320" data-path="images/do/ci-start.png" />
</Frame>

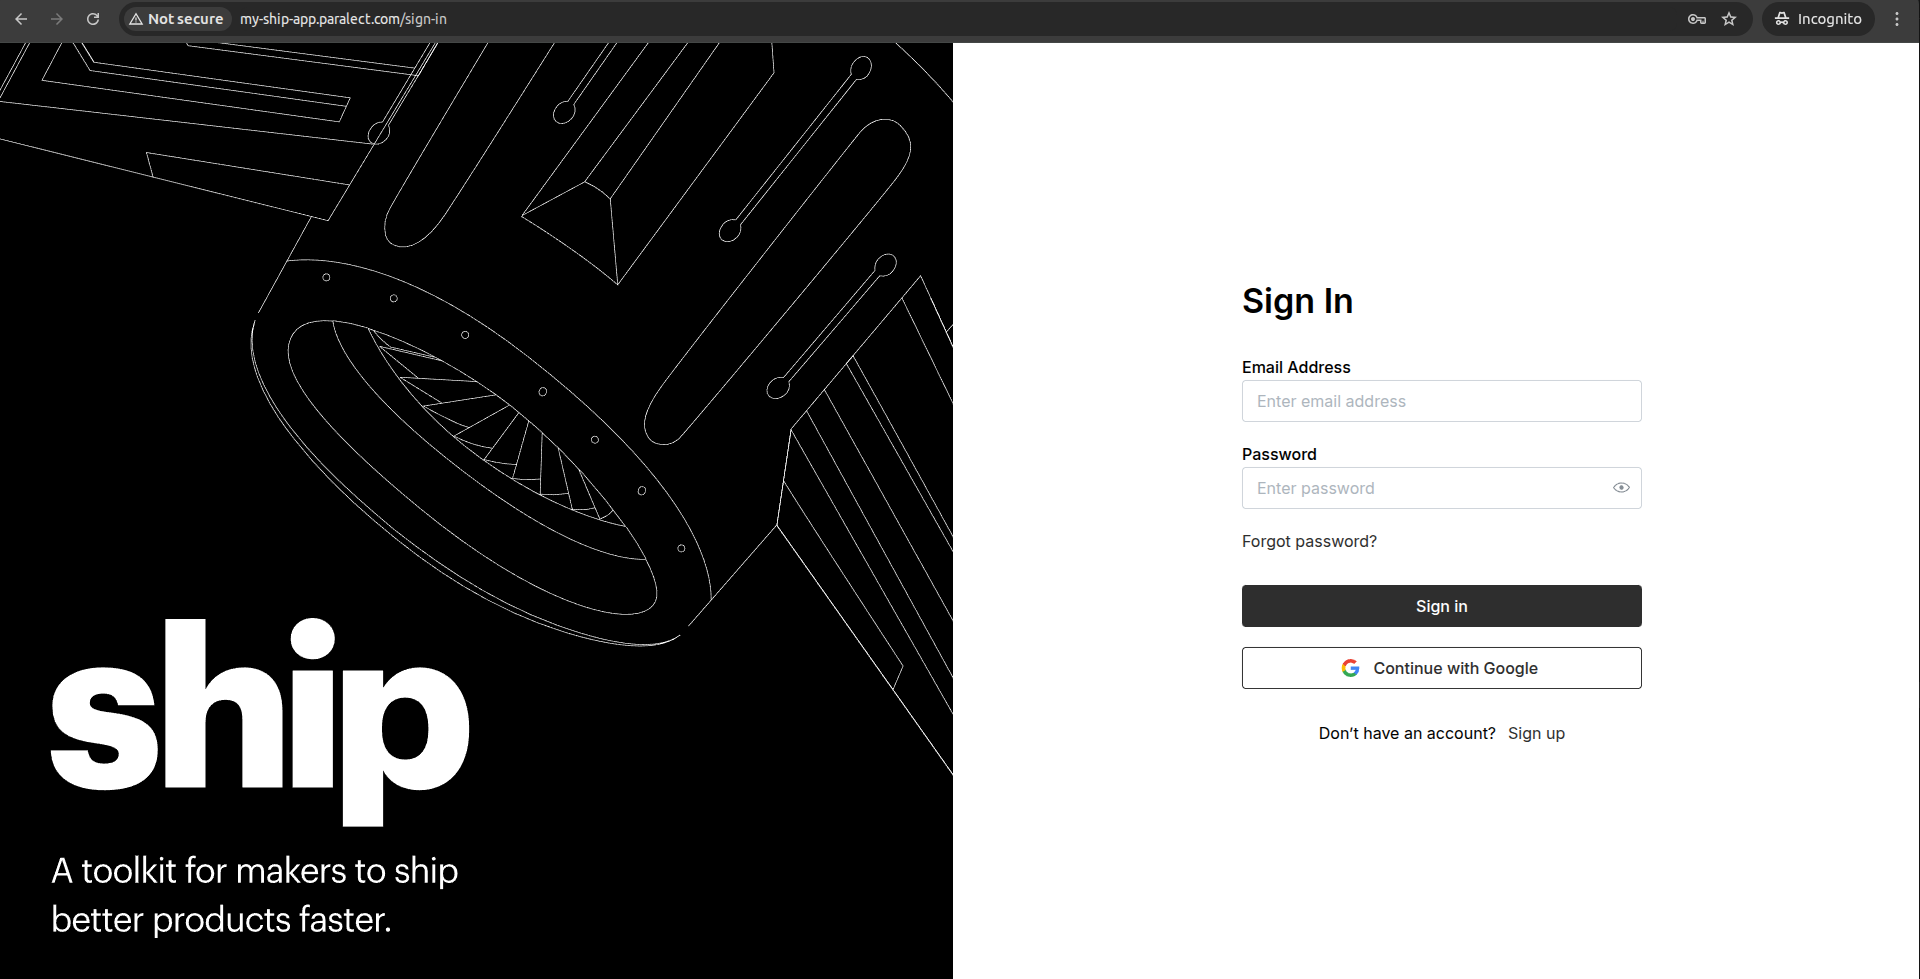
Done! Application deployed and can be accessed by the provided domain.
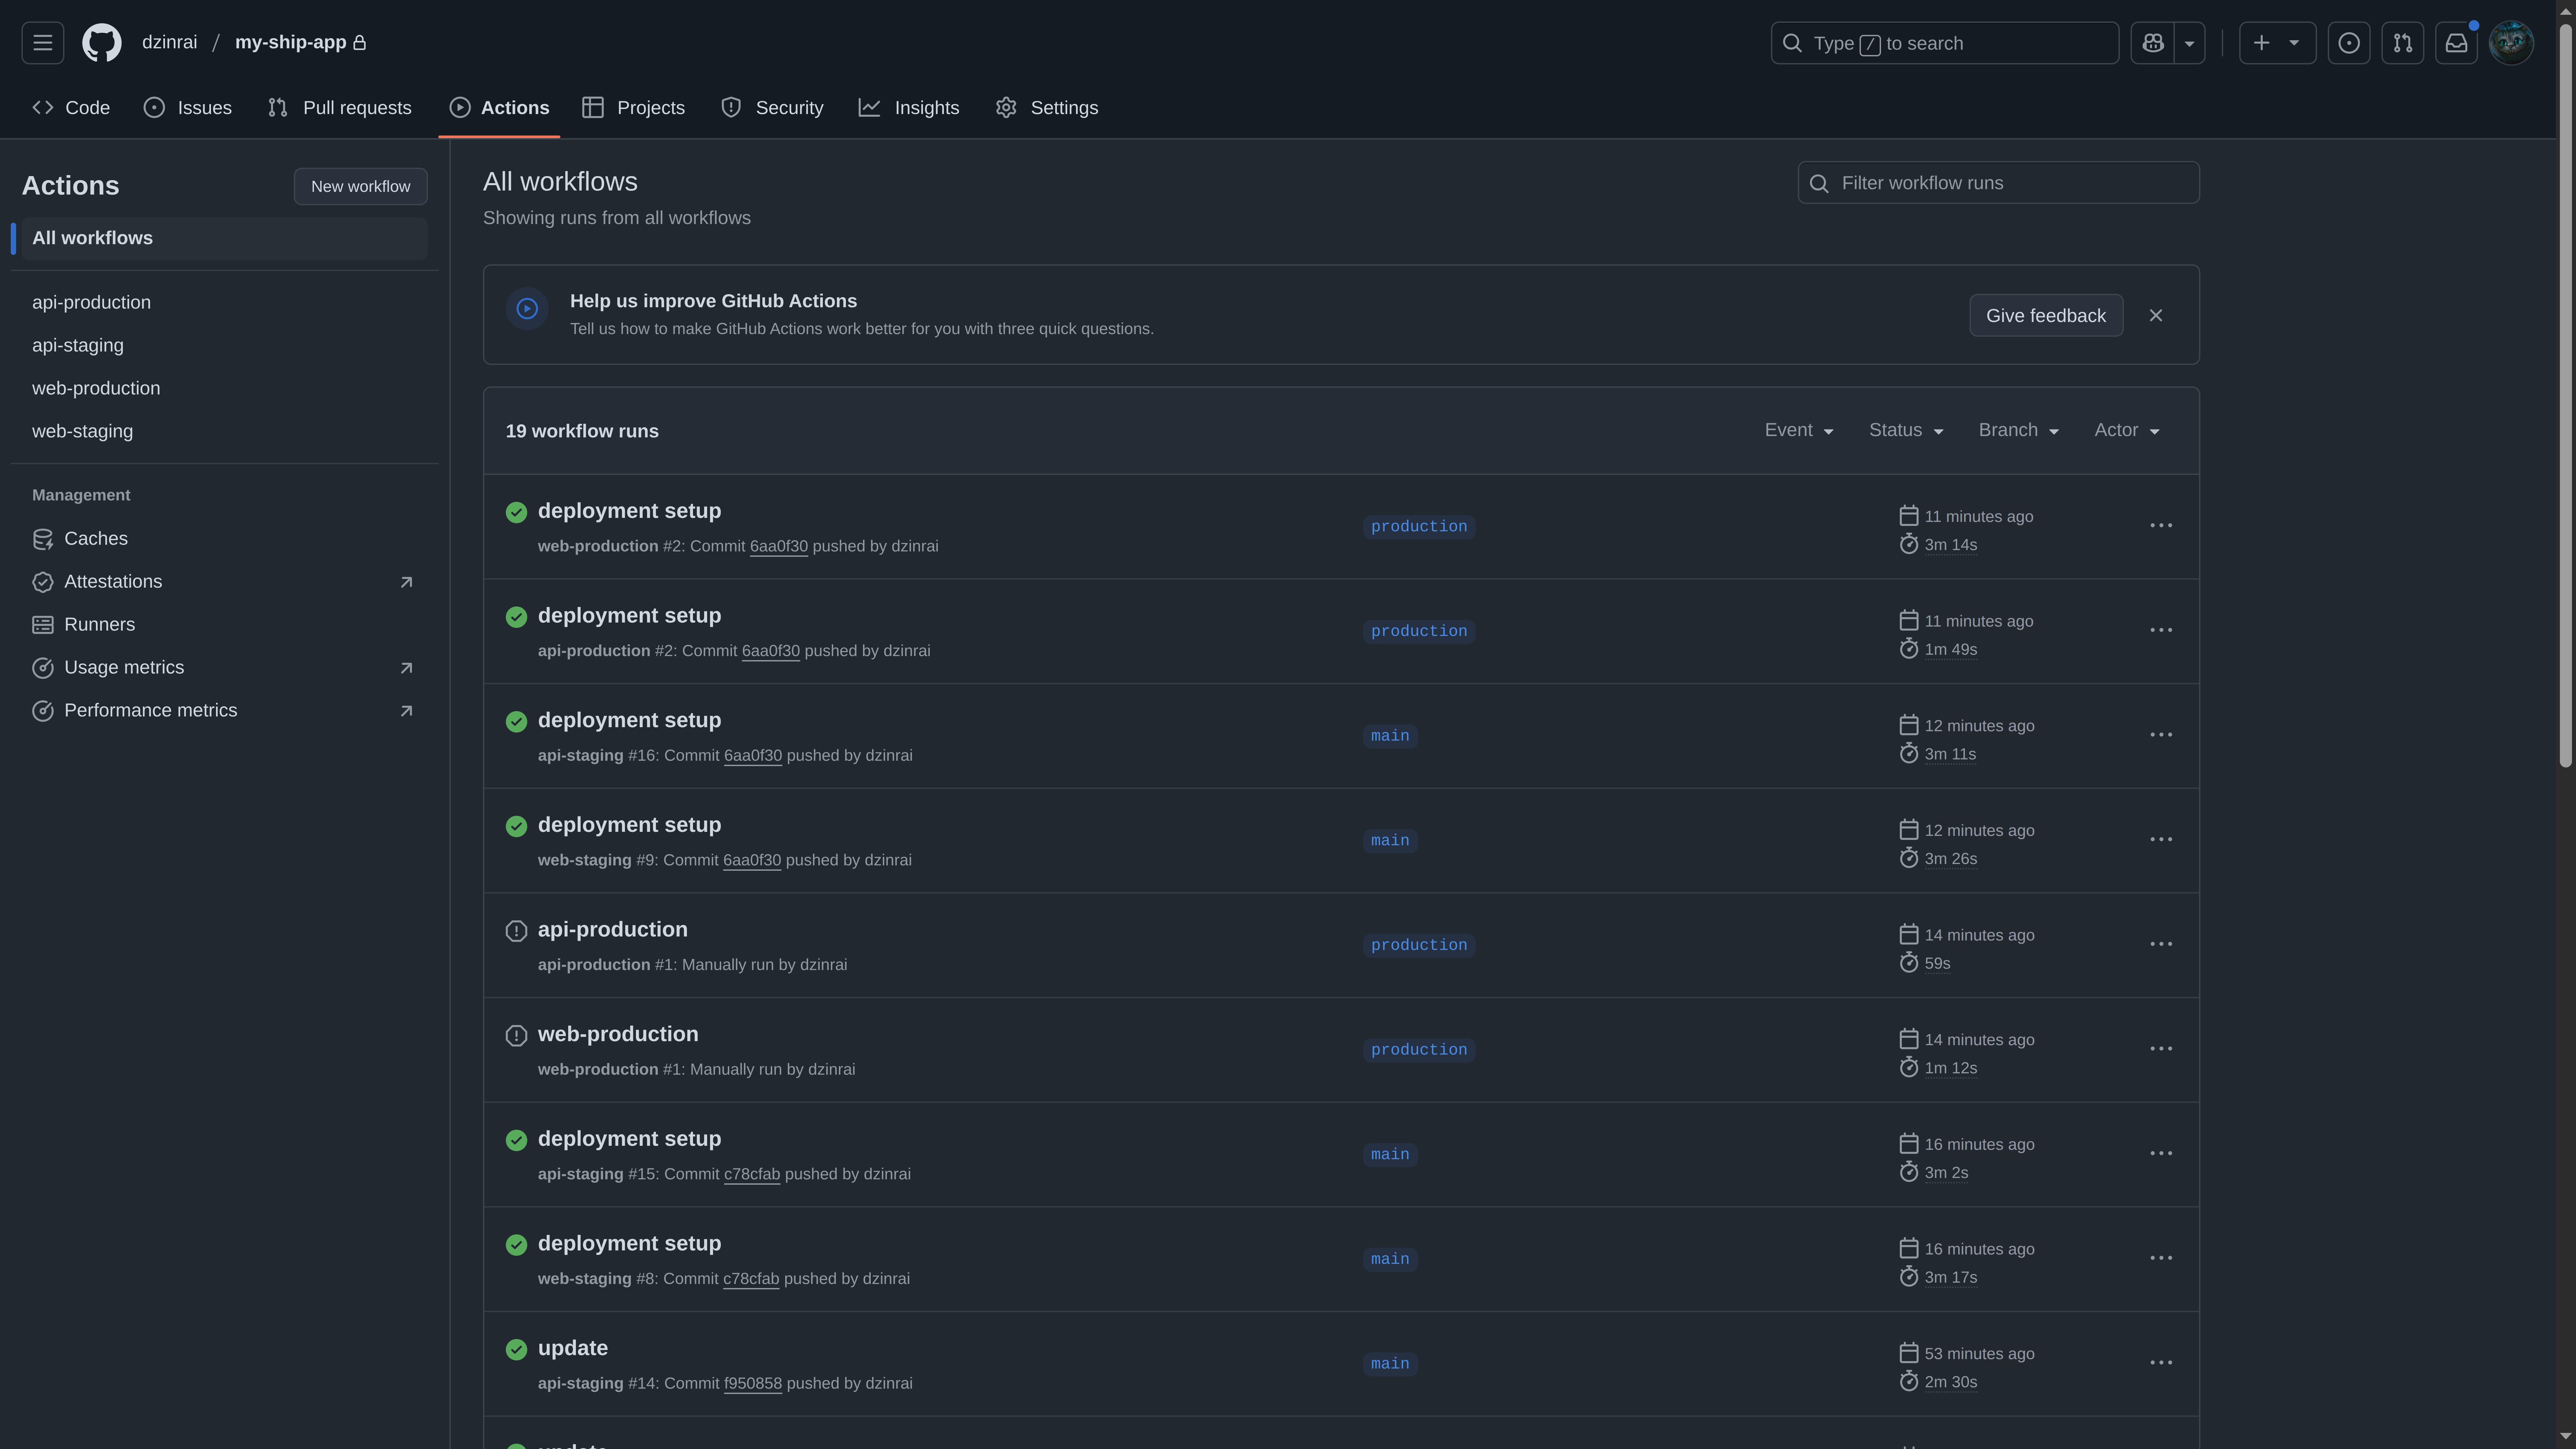
<Frame>
  <img src="https://mintcdn.com/ship-jskiller1404-add-ommiting-private-fields-feature/E9XBHl8mCOQjBjO1/images/do/ci-finish.png?fit=max&auto=format&n=E9XBHl8mCOQjBjO1&q=85&s=95bb5412ca62ba5716d492e484f28ba2" alt="CI finish" width="7680" height="4320" data-path="images/do/ci-finish.png" />
</Frame>

<Frame>
  <img src="https://mintcdn.com/ship-jskiller1404-add-ommiting-private-fields-feature/E9XBHl8mCOQjBjO1/images/do/deployment-finish.png?fit=max&auto=format&n=E9XBHl8mCOQjBjO1&q=85&s=863ddd02218527c46fafd6904437ee93" alt="Deployment finish" width="1920" height="979" data-path="images/do/deployment-finish.png" />
</Frame>

```shell theme={null}
kubectl get pods -A

NAMESPACE       NAME                                        READY   STATUS      RESTARTS   AGE
ingress-nginx   ingress-nginx-controller-6bdff8c8fd-kwxcn   1/1     Running     0          6h50m
kube-system     cilium-tb8td                                1/1     Running     0          8h
kube-system     cilium-x5w8n                                1/1     Running     0          8h
kube-system     coredns-5679ffb5c8-b7dzj                    1/1     Running     0          8h
kube-system     coredns-5679ffb5c8-d465r                    1/1     Running     0          8h
kube-system     cpc-bridge-proxy-ebpf-2gzfr                 1/1     Running     0          8h
kube-system     cpc-bridge-proxy-ebpf-jknzh                 1/1     Running     0          8h
kube-system     csi-do-node-jcqd2                           2/2     Running     0          8h
kube-system     csi-do-node-rpx6q                           2/2     Running     0          8h
kube-system     do-node-agent-ldhxq                         1/1     Running     0          8h
kube-system     do-node-agent-pdksz                         1/1     Running     0          8h
kube-system     hubble-relay-66f54dcd57-l7xjb               1/1     Running     0          8h
kube-system     hubble-ui-785bdbc45b-6xd57                  2/2     Running     0          8h
kube-system     konnectivity-agent-h79mt                    1/1     Running     0          8h
kube-system     konnectivity-agent-hvv67                    1/1     Running     0          8h
production      api-57d7787d98-cj75s                        1/1     Running     0          2m15s
production      migrator-286bq                              0/1     Completed   0          2m54s
production      scheduler-6c497dfbcc-n6b5l                  1/1     Running     0          2m6s
production      web-54c6674974-lv94b                        1/1     Running     0          71m
redis           redis-master-0                              1/1     Running     0          6h49m
staging         api-689b75c786-97c4l                        1/1     Running     0          71m
staging         scheduler-57b984f6c-zcc44                   1/1     Running     0          71m
staging         web-55bdd955b-chswp                         1/1     Running     0          70m
```
<Tip>
  If something went wrong you can check the workflows logs on GitHub and use [**kubectl logs**](https://kubernetes.io/docs/reference/kubectl/cheatsheet/#interacting-with-running-pods), [**kubectl describe**](https://kubernetes.io/docs/reference/kubectl/cheatsheet/#viewing-finding-resources) commands.
</Tip>

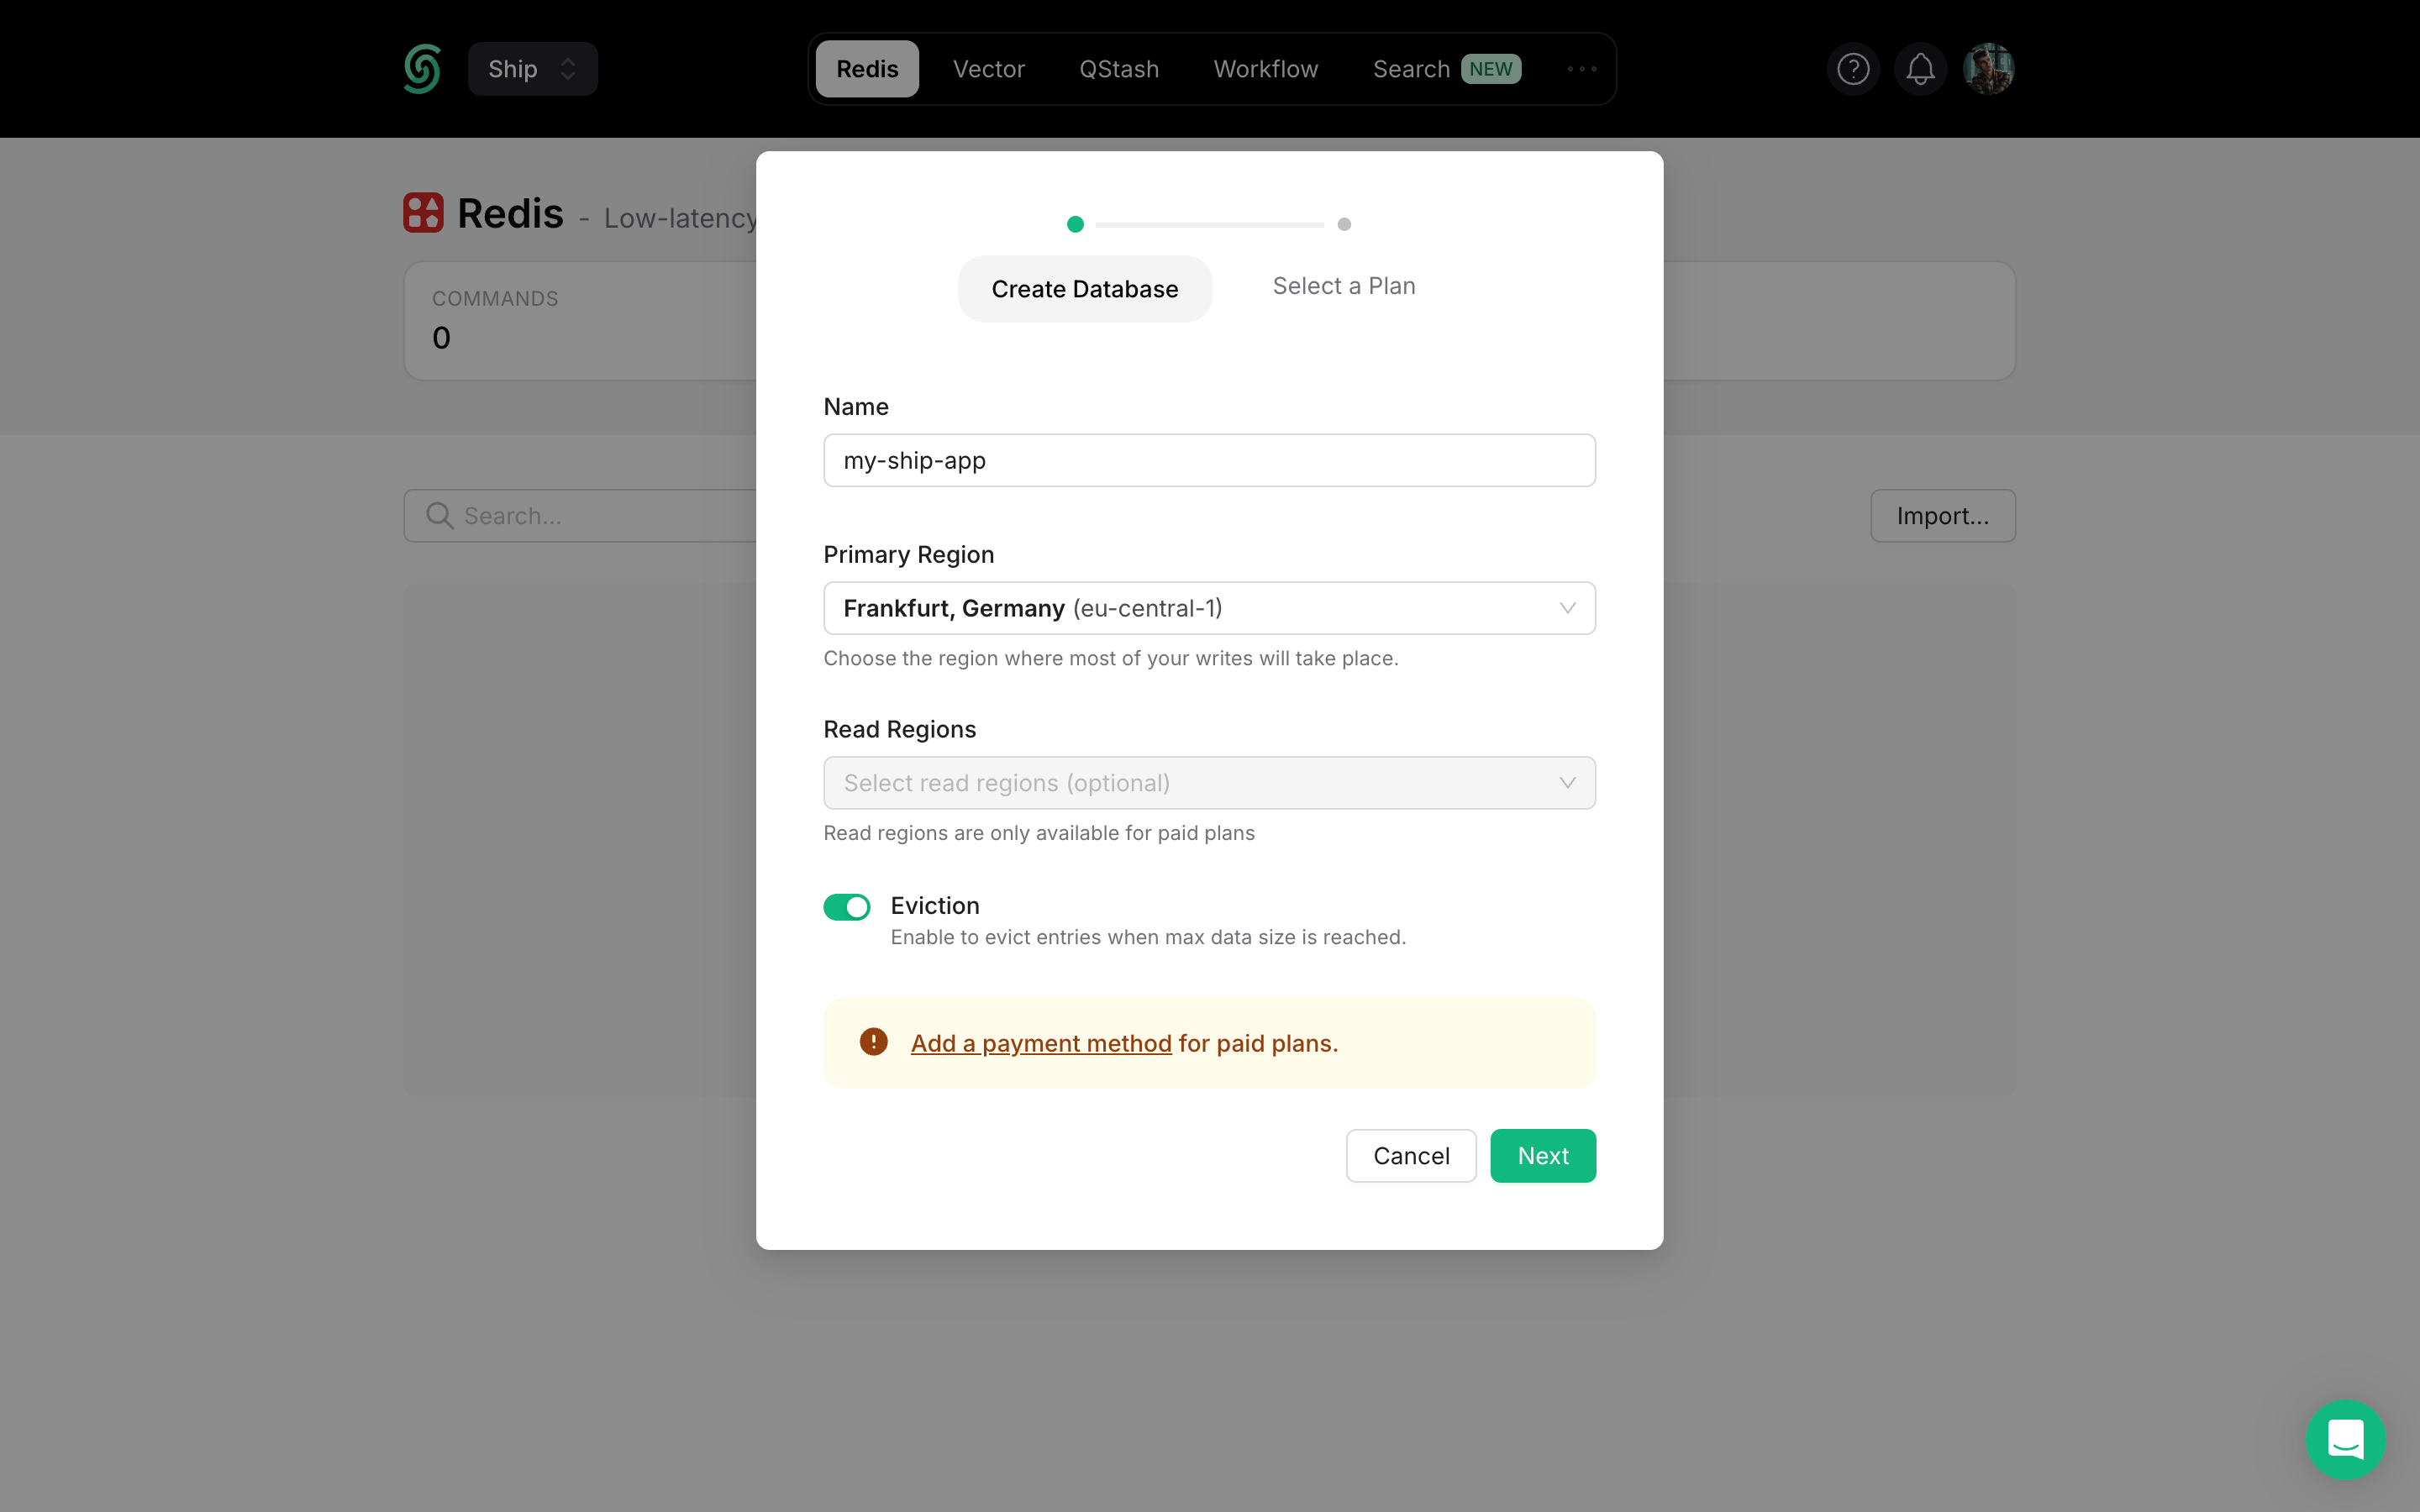
## Setting up Upstash Redis database (recommended)

# Upstash Redis Integration

[Upstash Redis](https://upstash.com/) is a **highly available, infinitely scalable** Redis-compatible database that provides enterprise-grade features without the operational complexity.

## How Ship Uses Redis

Ship leverages Redis for several critical functionalities:

| Use Case                    | Description                                       | Implementation                                                      |
| --------------------------- | ------------------------------------------------- | ------------------------------------------------------------------- |
| **Real-time Communication** | Pub/Sub mechanism for WebSocket functionality     | [Socket.io Redis Adapter](https://socket.io/docs/v4/redis-adapter/) |
| **Rate Limiting**           | API request throttling and abuse prevention       | Redis counters with TTL                                             |
| **Caching**                 | Application data caching for improved performance | Key-value storage with expiration                                   |

<Info>
  **Redis as a Message Broker**: When scaling to multiple server instances, Redis acts as a message broker between Socket.io servers, ensuring real-time messages reach all connected clients regardless of which server they're connected to.
</Info>

## Setting Up Upstash Redis

### Create Your Database

<Steps>
  <Step title="Access Upstash Console">
    Log in to your [Upstash account](https://console.upstash.com/) and navigate to the Redis section.
  </Step>

  <Step title="Create New Database">
    Click **Create Database** in the upper right corner to open the configuration dialog.

    <Frame>
      <img src="https://mintcdn.com/ship-jskiller1404-add-ommiting-private-fields-feature/Dwvni7a5iTfmtLdI/images/upstash-redis/create-global.png?fit=max&auto=format&n=Dwvni7a5iTfmtLdI&q=85&s=81f1822886cca4b277ed9923c2be4455" alt="Create Upstash Redis Database" width="2880" height="1800" data-path="images/upstash-redis/create-global.png" />
    </Frame>
  </Step>

  <Step title="Configure Database Settings">
    **Database Name:** Choose a descriptive name for your database (e.g., `my-ship-app-production`)

    **Primary Region:** Select the region closest to your main application deployment for optimal write performance.

    **Read Regions:** Choose additional regions where you expect high read traffic for better global performance.
  </Step>

  <Step title="Select Plan & Deploy">
    Choose your pricing plan based on expected usage and click **Create** to deploy your database.
  </Step>
</Steps>

<Tip>
  {provider_0 === 'aws' && (
      <p>
        <strong>Region Selection:</strong> For Kubernetes deployments on AWS, choose the same AWS region as your EKS cluster to minimize latency and data transfer costs.
      </p>
    )}

  {provider_0 === 'do' && (
      <p>
        <strong>Region Selection:</strong> For Kubernetes deployments on Digital Ocean, choose the same region as your cluster to minimize latency and data transfer costs.
      </p>
    )}
</Tip>

Once your database is created, you'll need the connection string for your application:

<Steps>
  <Step title="Navigate to Connection Info">
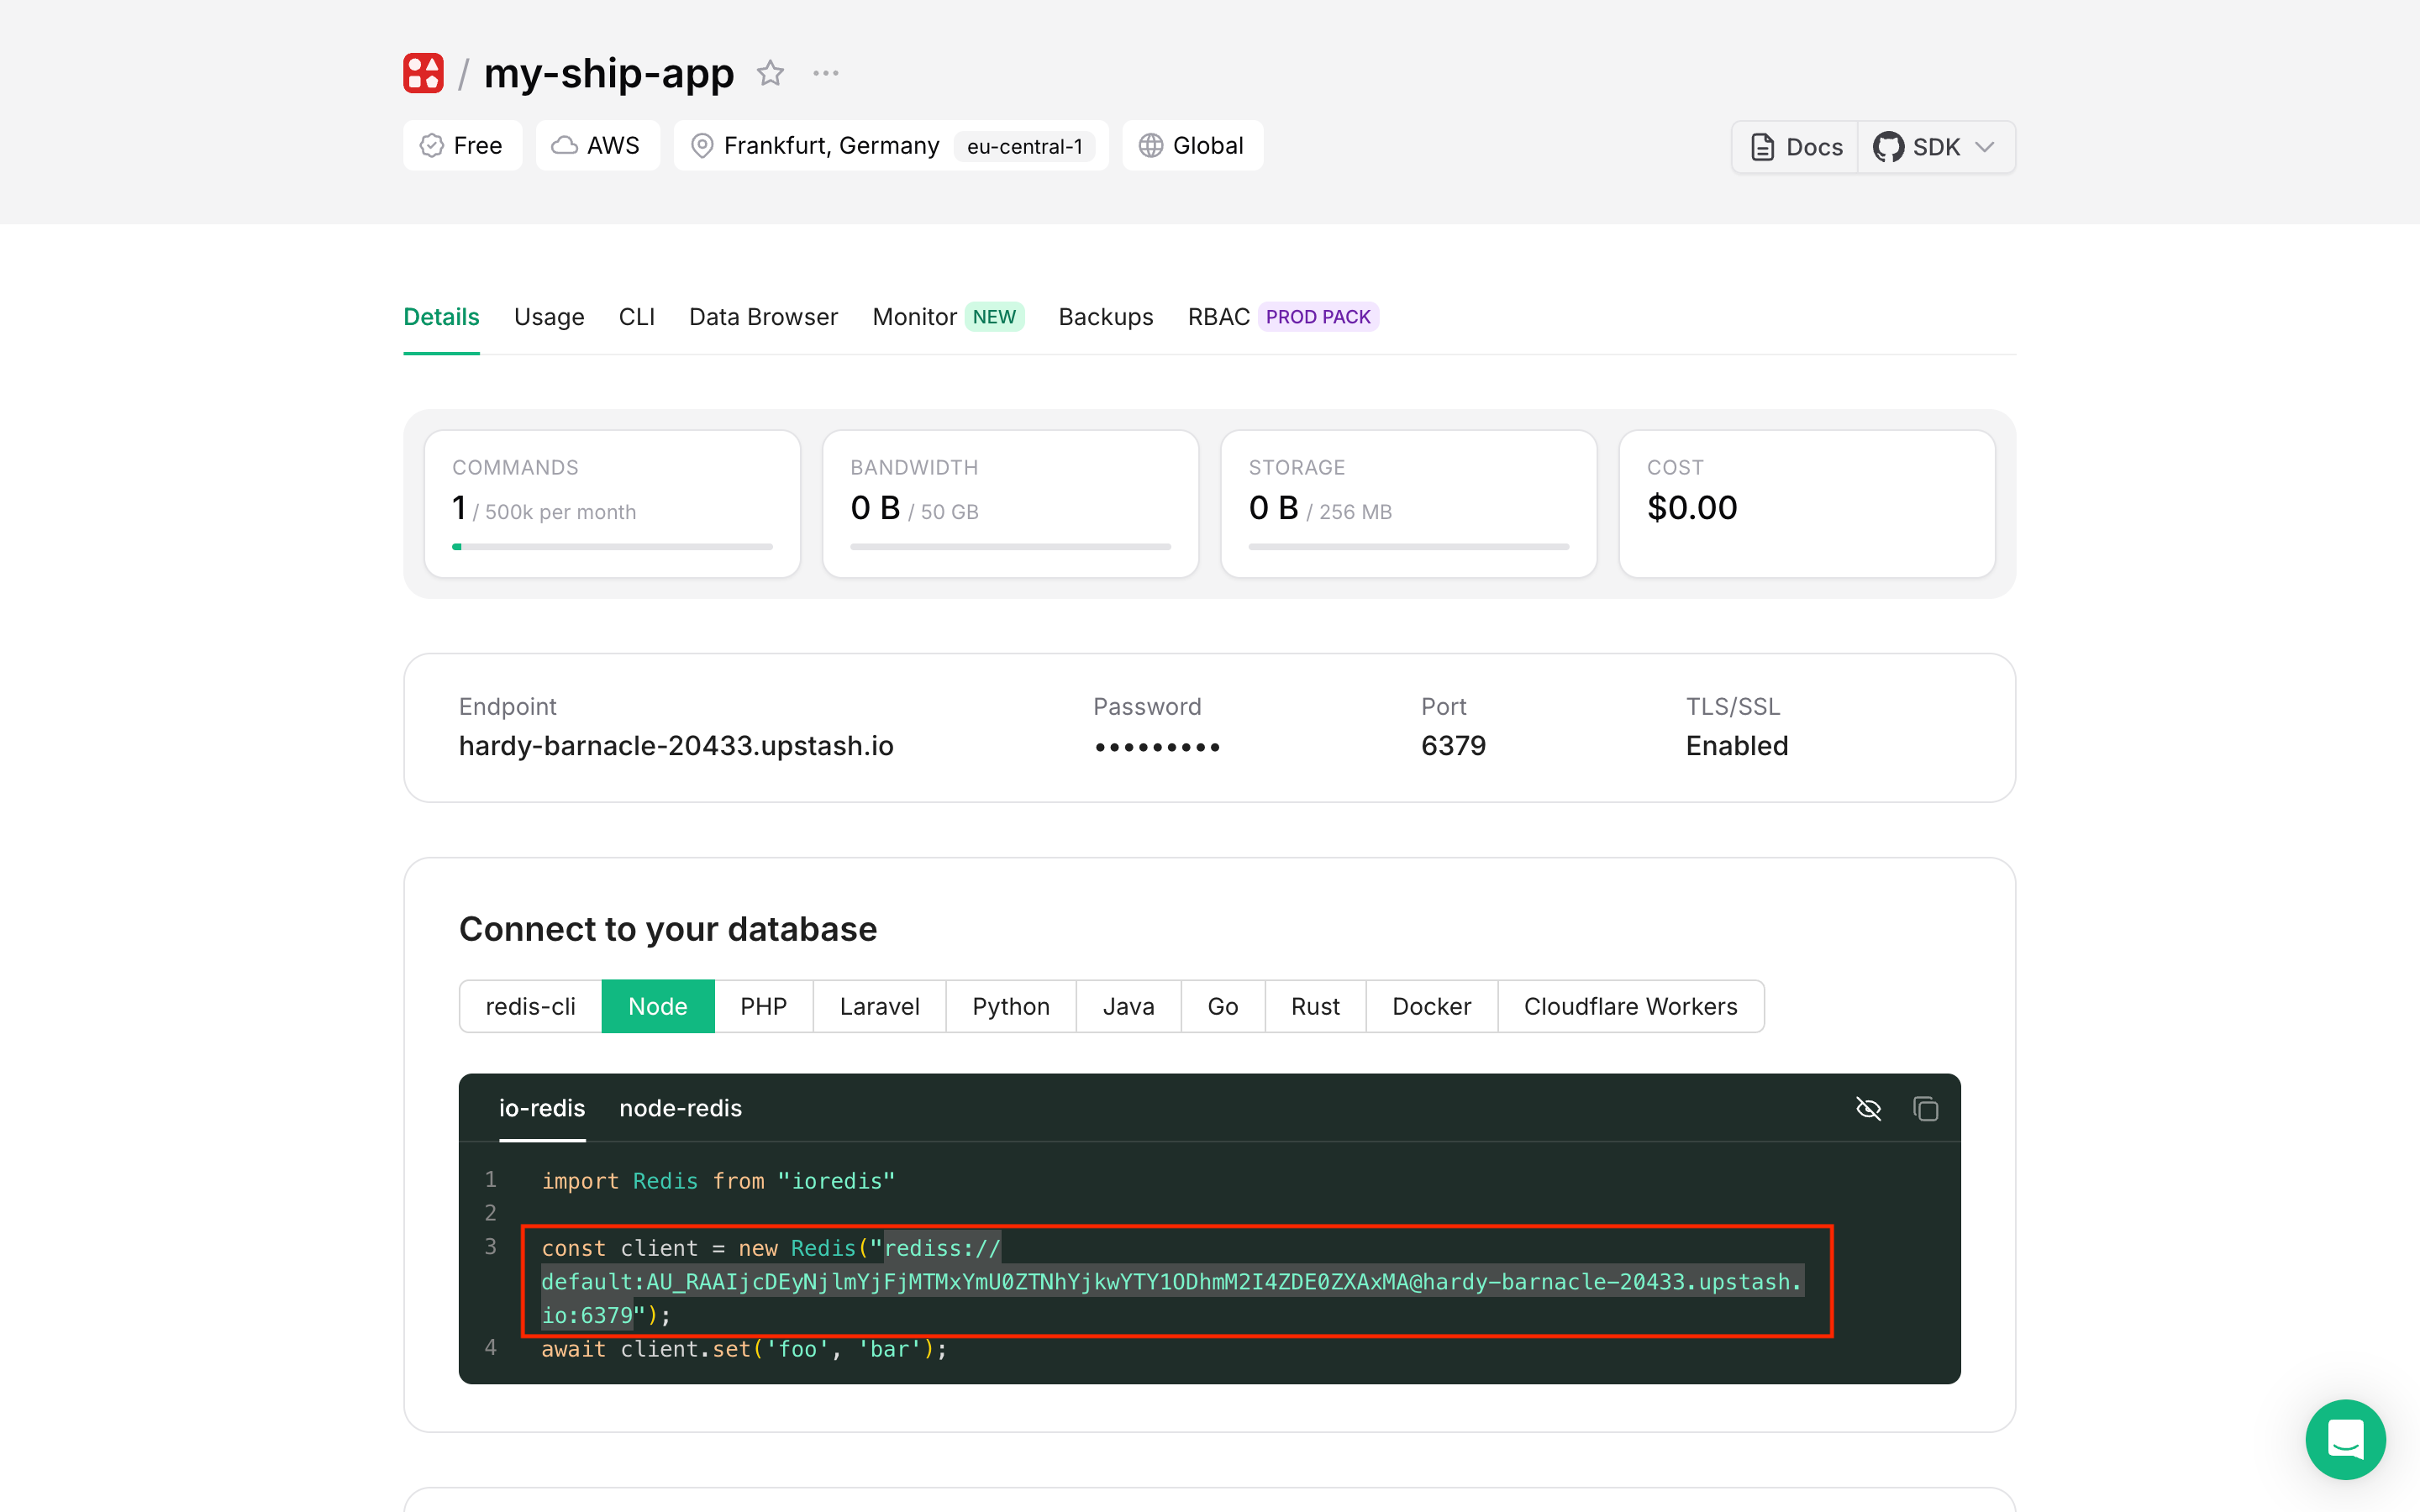
    Go to your database dashboard and find the **Connect to your database** section.

    <Frame>
      <img src="https://mintcdn.com/ship-jskiller1404-add-ommiting-private-fields-feature/Dwvni7a5iTfmtLdI/images/upstash-redis/database.png?fit=max&auto=format&n=Dwvni7a5iTfmtLdI&q=85&s=1bb1bffa2b14dcf1411dca860243d6f0" alt="Upstash Redis Connection Details" width="2880" height="1800" data-path="images/upstash-redis/database.png" />
    </Frame>
  </Step>

  <Step title="Copy Connection String">
    1. Select the **Node** tab for the appropriate connection string format
    2. Click **Reveal** to show the hidden password
    3. Copy the complete Redis URI (format: `rediss://username:password@host:port`)
  </Step>

  <Step title="Add to Environment Variables through k8sec">
    Using `k8sec`, add the Redis connection string to your environment configuration:

    <CodeGroup>
      ```bash production theme={null}
      k8sec set api-production-secret -n production REDIS_URI=$REDIS_URI
      ```

      ```bash staging theme={null}
      k8sec set api-staging-secret -n staging REDIS_URI=$REDIS_URI
      ```
    </CodeGroup>

    <Note>
      After updating environment variables, restart your API pod using:

      ```bash theme={null}
      kubectl delete pod <pod-name> -n <namespace>
      ```

      This will trigger Kubernetes to create a new pod with the updated environment variables.
    </Note>
  </Step>
</Steps>

### Verify Connection with Redis Insight

Redis Insight is a powerful GUI tool for managing and debugging Redis databases.

<Steps>
  <Step title="Install Redis Insight">
    Download and install [Redis Insight](https://redis.io/insight/) on your local machine.
  </Step>

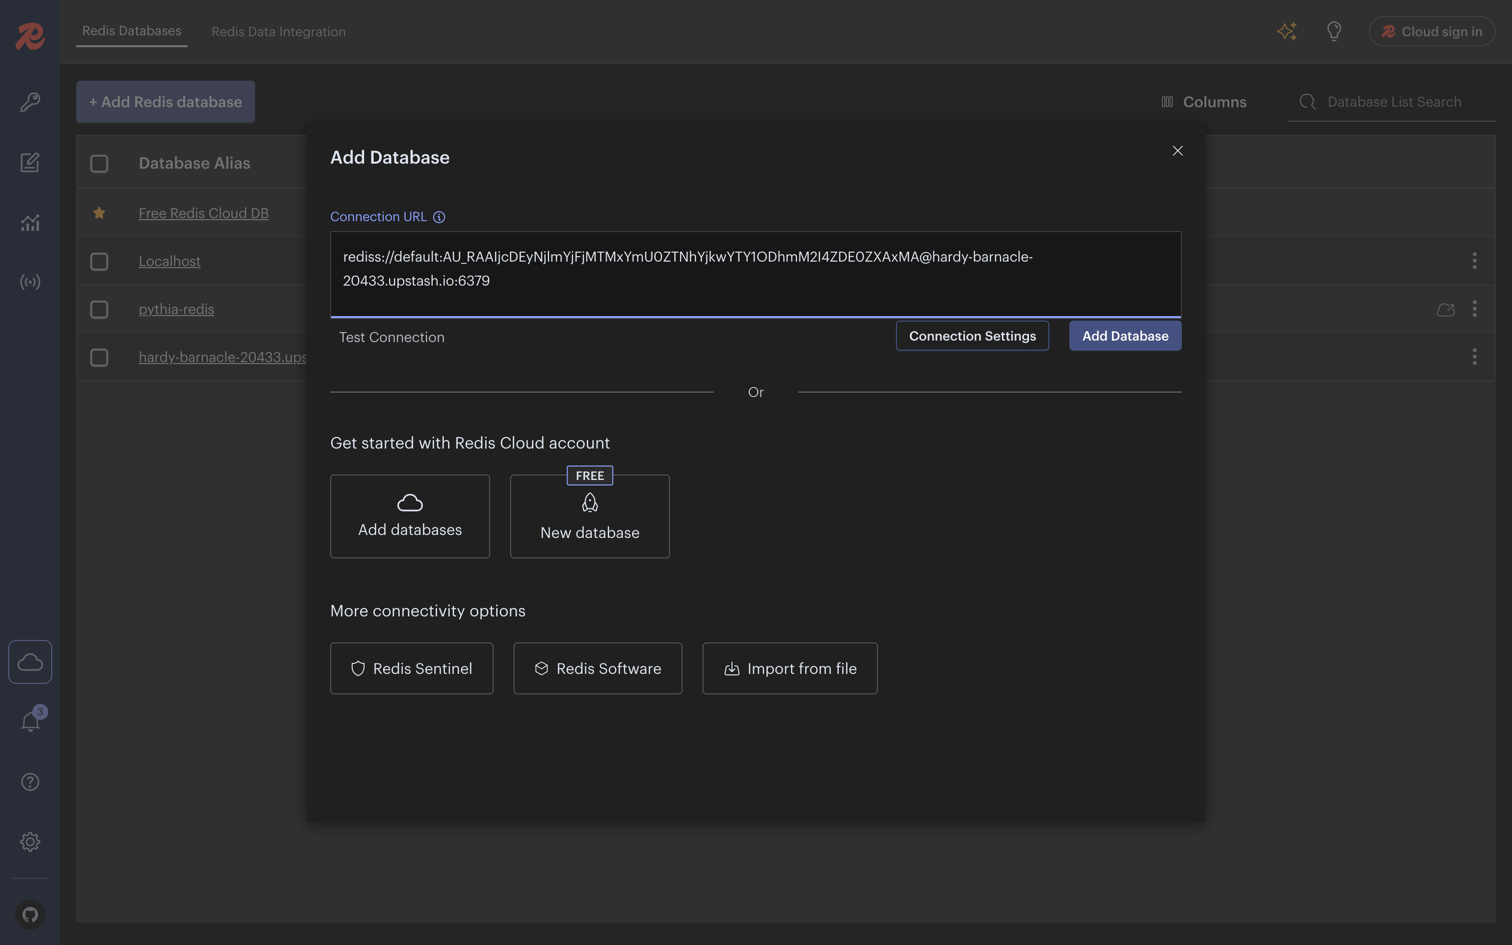
  <Step title="Add Database Connection">
    1. Open Redis Insight
    2. Click **Add Database**
    3. Paste your Upstash Redis connection string in the **Connection URL** field
    4. Click **Add Database**

    <Frame>
      <img src="https://mintcdn.com/ship-jskiller1404-add-ommiting-private-fields-feature/Dwvni7a5iTfmtLdI/images/upstash-redis/redis-insight.png?fit=max&auto=format&n=Dwvni7a5iTfmtLdI&q=85&s=192aeb9e0bbc25db8b3e8498a66a3de9" alt="Redis Insight Connection Setup" width="1512" height="945" data-path="images/upstash-redis/redis-insight.png" />
    </Frame>
  </Step>

  <Step title="Explore Your Database">
    Once connected, you can use Upstash Redis Console to:

    * Browse keys and data structures
    * Execute Redis commands directly
    * Monitor real-time performance metrics
    * Debug application data storage

    <Frame>
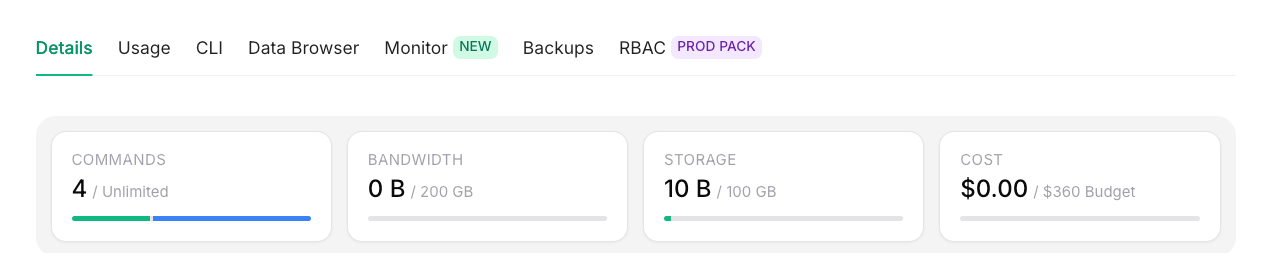
      <img src="https://mintcdn.com/ship-jskiller1404-add-ommiting-private-fields-feature/Dwvni7a5iTfmtLdI/images/upstash-redis/charts.png?fit=max&auto=format&n=Dwvni7a5iTfmtLdI&q=85&s=4338ae3e506b6cb2cc16be6b3c45cc95" alt="Upstash Redis Metrics Dashboard" width="1271" height="279" data-path="images/upstash-redis/charts.png" />
    </Frame>

    <Info>
      **Real-time Monitoring**: Upstash Redis updates database metrics automatically every 10 seconds, giving you near real-time visibility into your Redis performance and usage.
    </Info>
  </Step>
</Steps>